Hi guys,
I have buyed Titan TFD-12025M12B DCfan for cooling my amplifier. It has three wires for connecting - red, black and yellow. Black is probably gnd, red is probably +12V and yellow is probably for controling the speed of the fan.
Question - how to control the speed of this fan?
Should i regulate the dc voltage or should i use controling wire (which i would like to do best if possible) and if so - how to use it?
Best regards and thanks for the replies
sunny
p.s. here is the link for their home page but you can't find much there.........http://www.titan-cd.com/eng/dcfan/fan.php?Model=TFD-12038
o.k. - this is probably done by changing the voltage between black and red wire - so the yellow wire is output from the fan that says how fast the fan is rotating - so i have to change the voltage between red and black afterall?
Does anybody know from which voltage it will start to rotate?
regards
sunny
Does anybody know from which voltage it will start to rotate?
regards
sunny
It depends on the fan, but you can usually go down to half the specified voltage without problems. Some fans don't likte that, though, so if you have a variable voltage source, then test at different voltages. The problem is usually to get it to start at low voltages.
Edit:
Often people just add a resistor in series with the fan to get the speed they want, so one possibility is to just experiment with different resistors. Just keep in mind to respect the power rating of the resistors.
Edit:
Often people just add a resistor in series with the fan to get the speed they want, so one possibility is to just experiment with different resistors. Just keep in mind to respect the power rating of the resistors.
sunrise said:o.k. guys - thanks - it was helpfull.....i think that the easiest will be to use LM317 with a potentiometer and regulate it from 6VDC or so to about 12V or so
thanks again
sunny
Or even simpler, just an emitter follower and a pot,, since you don't need tight regulation.
The trick is to start the fan with a higher voltage, so that it
gets rotating, and then settle it down to a fraction of the rated
voltage. You can do this by putting a capacitor from Collector to
Base on the voltage follower.
You can get the spped quite low, but you have to watch out, as
dust and age may cause the fan to stop at very low speed
settings.
gets rotating, and then settle it down to a fraction of the rated
voltage. You can do this by putting a capacitor from Collector to
Base on the voltage follower.
You can get the spped quite low, but you have to watch out, as
dust and age may cause the fan to stop at very low speed
settings.
kick start your silent cooling fan
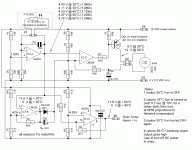
To all those having this cooling problem or, like I did, due to space restrictions, had to use a smaller heatsink (1.2 K/W in my case), the addition of a whisper fan, standing still below, say 35C and just starting to run at a low RPM above 35C, reaching full speed at 50C, and after the heatsink temp fell below 30C again (hysteresis!), this fan switches off again. Also, the nice cct outputs an alarm signal, if the heatsink temp dares to reach/surpass the 60C mark.
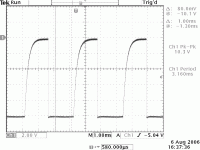
Upon cutting in, this cct outputs a 700ms long 12V pulse to the fan, so it will start turning, even when the bearings get old, giving a higher friction loss.
In the last cct collection magazine of Elektor (Jul/aug 2006, cct #028) there has been published the so long wanted solution, see pix annexed. The BOM is as follows:
silent_fan3 BOM:
C01 = 100n ceramic or foil
C02 = 100n ceramic or foil
C03 = 10µ / 25V (radial)
C04 = 10µ / 25V (radial)
D01 = 1N4148
IC1.A..D = LM324
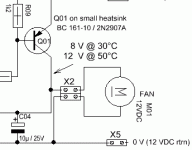
M01 = 12VDC (Fan 12VDC)
NOTE: verify if fan works on voltages from 8..12VDC!
PTC R03 = KTY81/110 (KTY81/110)
Q01 = BC 161-10 / 2N2907A
R01 = 10k (Metal film resistor, 1%)
R02 = 1k0 (Metal film resistor, 1%)
R04 = 390R (Metal film resistor, 1%)
R04 = 390R (Metal film resistor, 1%)
R05 = 82k (Metal film resistor, 1%)
R06 = 4k7 (Metal film resistor, 1%)
R08 = 270k (Metal film resistor, 1%)
R09 = 1k2 (Metal film resistor, 1%)
R10 = 4k7 (Metal film resistor, 1%)
R11 = 2k40 (Metal film resistor, 1%)
R12 = 1k2 (Metal film resistor, 1%)
R13 = 130k (Metal film resistor, 1%)
R14 = 20k0 (Metal film resistor, 1%)
R15 = 12k0 (Metal film resistor, 1%)
R16 = 7k50 (Metal film resistor, 1%)
R17 = 180k (Metal film resistor, 1%)
X1 = (solder terminal, 2 pole)
X2 = (solder/screw terminal, 2 pole)
X4 = (solder/screw terminal, 1 pole)
X5 = (solder/screw terminal, 1 pole)
X6 = (solder/screw terminal, 1 pole)
There are 120mm x 120mm low RPM (1250rpm) fans available in computer stores, which work best in these applications. But, 92mm units will do as well. The sound level of the amp output masks easily these whispering units.
One suggention that helps a lot: mount the fan onto vibration stoppers. Two are plenty enough. This avoids microphonics effects.
Good, silent cooling and a long amp life!
So long,
stoeffle.++++
Nelson Pass said:The trick is to start the fan with a higher voltage, so that it
gets rotating, and then settle it down to a fraction of the rated
voltage. You can do this by putting a capacitor from Collector to
Base on the voltage follower.
You can get the spped quite low, but you have to watch out, as
dust and age may cause the fan to stop at very low speed
settings.
To all those having this cooling problem or, like I did, due to space restrictions, had to use a smaller heatsink (1.2 K/W in my case), the addition of a whisper fan, standing still below, say 35C and just starting to run at a low RPM above 35C, reaching full speed at 50C, and after the heatsink temp fell below 30C again (hysteresis!), this fan switches off again. Also, the nice cct outputs an alarm signal, if the heatsink temp dares to reach/surpass the 60C mark.
Upon cutting in, this cct outputs a 700ms long 12V pulse to the fan, so it will start turning, even when the bearings get old, giving a higher friction loss.
In the last cct collection magazine of Elektor (Jul/aug 2006, cct #028) there has been published the so long wanted solution, see pix annexed. The BOM is as follows:
silent_fan3 BOM:
C01 = 100n ceramic or foil
C02 = 100n ceramic or foil
C03 = 10µ / 25V (radial)
C04 = 10µ / 25V (radial)
D01 = 1N4148
IC1.A..D = LM324
M01 = 12VDC (Fan 12VDC)
NOTE: verify if fan works on voltages from 8..12VDC!
PTC R03 = KTY81/110 (KTY81/110)
Q01 = BC 161-10 / 2N2907A
R01 = 10k (Metal film resistor, 1%)
R02 = 1k0 (Metal film resistor, 1%)
R04 = 390R (Metal film resistor, 1%)
R04 = 390R (Metal film resistor, 1%)
R05 = 82k (Metal film resistor, 1%)
R06 = 4k7 (Metal film resistor, 1%)
R08 = 270k (Metal film resistor, 1%)
R09 = 1k2 (Metal film resistor, 1%)
R10 = 4k7 (Metal film resistor, 1%)
R11 = 2k40 (Metal film resistor, 1%)
R12 = 1k2 (Metal film resistor, 1%)
R13 = 130k (Metal film resistor, 1%)
R14 = 20k0 (Metal film resistor, 1%)
R15 = 12k0 (Metal film resistor, 1%)
R16 = 7k50 (Metal film resistor, 1%)
R17 = 180k (Metal film resistor, 1%)
X1 = (solder terminal, 2 pole)
X2 = (solder/screw terminal, 2 pole)
X4 = (solder/screw terminal, 1 pole)
X5 = (solder/screw terminal, 1 pole)
X6 = (solder/screw terminal, 1 pole)
There are 120mm x 120mm low RPM (1250rpm) fans available in computer stores, which work best in these applications. But, 92mm units will do as well. The sound level of the amp output masks easily these whispering units.
One suggention that helps a lot: mount the fan onto vibration stoppers. Two are plenty enough. This avoids microphonics effects.
Good, silent cooling and a long amp life!
So long,
stoeffle.++++
Attachments
Re: kick start your silent cooling fan
sorry folks, I got a trace wrong in place.
see correction below.
stoeffle.++++
stoeffle said:
To all those having this cooling problem or, like I did, due to space .....
stoeffle.++++
sorry folks, I got a trace wrong in place.
see correction below.
stoeffle.++++
Attachments
you could even build a very simple circuit that bypass the voltage regulator if tach output is'nt present.. that couldnt be too hard to do.. and might be useful in time.. (dust , age ) that way you might not need a start capacitor, ( I dont like the idea of a start capacitor anyway) might even be able to use it to relulate speed ??.. hmm i think i'll have to do a lab on this one when i get back to work..
if you use a PWM chip (like the ubiquitous SG3524) you get enough voltage to start the fan, all the time, every time -- then taper the duty cycle to fit your needs. the PWM duty cycle is determined by the signal to the error amplifier. SG3524 and SG3525 have an accessible VRef so you can acurately measure temperature either via a transistor or diode or a more conventional sensor.
the slight problem with a PWM chip is that you have to be careful about not allowing it to radiate RF energy --
JOBO, the manufacturer of DIY print and film processors had a real problem with the motors in their units -- after a few years they refused to rotate -- same problem -- the startup voltage for the motor couldn't be derived from the power supply. I solved the problem for a half-dozen or so dark-roomies by building PCB's with an H-Bridge and PWM chip from National -- the processors worked like new for about $10 worth of effort and parts.
the slight problem with a PWM chip is that you have to be careful about not allowing it to radiate RF energy --
How do you keep it from radiating RF. Do you have to shield it or is it all in the filtering?
Re: corrected diagram
Hello stoeffle,
are You shure about the value from R4?
Regards
Heinz!
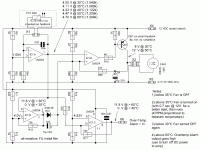
stoeffle said:the corrected schematic attached.
stoeffle.++++
Hello stoeffle,
are You shure about the value from R4?
Regards
Heinz!
Re: Re: corrected diagram
Oh Heinz, the powerbecker,
Geeee, what a good and sharp eye you got!
Tnx for finding this double label of R04:
- The one, from pin 2 to Gnd is a 390R one;
- The other one, from pin 12 to Gnd, is not R04: it should be labeled R07 and be 39k0. Copy-paste error on drawing the cct...
The original article states 390R for R04 anyhow, which is correct. Redopng the feedback calculations it fits perfectly.
so long,
stoeffle.++++
powerbecker said:
Hello stoeffle,
are You shure about the value from R4?
Regards
Heinz!
Oh Heinz, the powerbecker,
Geeee, what a good and sharp eye you got!
Tnx for finding this double label of R04:
- The one, from pin 2 to Gnd is a 390R one;
- The other one, from pin 12 to Gnd, is not R04: it should be labeled R07 and be 39k0. Copy-paste error on drawing the cct...
The original article states 390R for R04 anyhow, which is correct. Redopng the feedback calculations it fits perfectly.
so long,
stoeffle.++++
I use continous running 12V fan, which runs on 6V. With 6V the fan has no audible noise, and very small airflow. I use very simple circuit to increase the fan voltage up to 12V, if the heatsink temperature over 50 degree. To make the circuit simple, and easy to build, I use BD139 as temperature sensor
sajti
sajti
- Status
- This old topic is closed. If you want to reopen this topic, contact a moderator using the "Report Post" button.
- Home
- Amplifiers
- Solid State
- DC fan speed regulating question