Hi!
I gave in... It was sitting on my floor waiting to be sold, but begging to be worked on. Took 3 solid 12 hour days (not including the parts shopping spree), and has turned out quite well.
Trying to remember all the work I did...
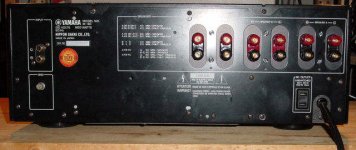
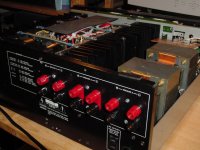
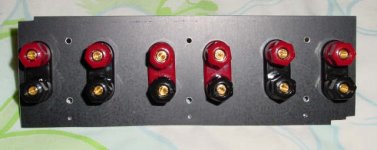
1) Gold binding/bananna posts have been added. Mounted on a very strong anodized black aluminum plate.
2) Twisted feed line length to relay board has been reduced
3) Speaker feeds connected directly to the relay posts! Not through more traces.
4) Yamaha uses different relays for different outputs, so relay 1 cleaned, relay 2 replaced with relay 3 (unused) (relay 1 is supposedly an arc reducing type, relay 2 has gold plated contacts; don't ask me why they chose to do this)
5) Speaker posts A and B are accessed by switch (C is disabled; why connect in series patched through another relay???). Posts C are hardwired in parallel with B, that way if you want to bi-wire... easy!
6) Removed the dried up rubber insulation sheet on the top of the transformers. A possible option to replace in the future if desired.
7) The enclosure may still be a bit scratched up (not my fault; previous owner), but the guts are nice and clean now! Front faceplate is in good condition.
Possibly to do:
- Adjust Bias... One side does run a bit warmer than the other. Measuring looks like it might be a bit tricky, so I'll do lots of homework before attempting. Advice appreciated if available. Will hold off, maybe buyer will prefer to do it.
- Replace transformer rubber mounting washers. I'm sure by now they have hardened some. Need to find a place that charges less than 80cents per piece!!! (hate home depot)
- no other ideas!
Still sounds great, if not better! Immediate clean audio from the relays! Have started to burn it this weekend. Very lush warm sound.
Still available! $450 or good offer, local Toronto pickup preferred! I'd keep it, but no space, and no need for a while. Original for-sale posting ad is somewhere in the marketplace section.
I gave in... It was sitting on my floor waiting to be sold, but begging to be worked on. Took 3 solid 12 hour days (not including the parts shopping spree), and has turned out quite well.
Trying to remember all the work I did...
1) Gold binding/bananna posts have been added. Mounted on a very strong anodized black aluminum plate.
2) Twisted feed line length to relay board has been reduced
3) Speaker feeds connected directly to the relay posts! Not through more traces.
4) Yamaha uses different relays for different outputs, so relay 1 cleaned, relay 2 replaced with relay 3 (unused) (relay 1 is supposedly an arc reducing type, relay 2 has gold plated contacts; don't ask me why they chose to do this)
5) Speaker posts A and B are accessed by switch (C is disabled; why connect in series patched through another relay???). Posts C are hardwired in parallel with B, that way if you want to bi-wire... easy!
6) Removed the dried up rubber insulation sheet on the top of the transformers. A possible option to replace in the future if desired.
7) The enclosure may still be a bit scratched up (not my fault; previous owner), but the guts are nice and clean now! Front faceplate is in good condition.
Possibly to do:
- Adjust Bias... One side does run a bit warmer than the other. Measuring looks like it might be a bit tricky, so I'll do lots of homework before attempting. Advice appreciated if available. Will hold off, maybe buyer will prefer to do it.
- Replace transformer rubber mounting washers. I'm sure by now they have hardened some. Need to find a place that charges less than 80cents per piece!!! (hate home depot)
- no other ideas!
Still sounds great, if not better! Immediate clean audio from the relays! Have started to burn it this weekend. Very lush warm sound.
Still available! $450 or good offer, local Toronto pickup preferred! I'd keep it, but no space, and no need for a while. Original for-sale posting ad is somewhere in the marketplace section.
Attachments
Banned
Joined 2002
Just getting to that....
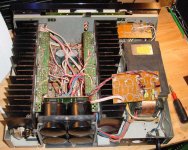
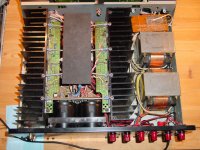
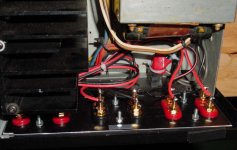
Biggest time waster was trying to figure where to put the relay board, as the original crappy-plastic yammy binding posts suspended the board near the transformers. Found a good spot (reducing lead lengths, and still good airflow.
Thanks free mounting holes on the heatsinks, I could securely bridge the gap to suspend the board. (the 4 grey wires).
Picture 1... guts out!
Attachments

part 8...
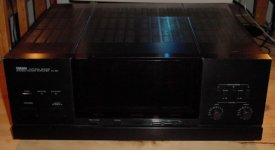
All done! Just a front shot...
Looks to easy, because you don't see any of the HELL of making a mounting plate for the posts... actually, wait for the next post...
I may toss in a shot of the gold plated relay at some later point. Never took any, but I'll keep the one I pulled as a backup.
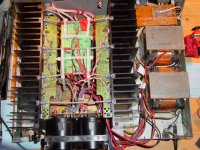
There are actually 2 speaker out boards, the one you don't see in any shot was pulled out earlier. It's just square with no useful parts. The jumper Yamaha used for it is just a decent grade ribbon... yeek.
All done! Just a front shot...
Looks to easy, because you don't see any of the HELL of making a mounting plate for the posts... actually, wait for the next post...
I may toss in a shot of the gold plated relay at some later point. Never took any, but I'll keep the one I pulled as a backup.
There are actually 2 speaker out boards, the one you don't see in any shot was pulled out earlier. It's just square with no useful parts. The jumper Yamaha used for it is just a decent grade ribbon... yeek.
Attachments
pain in the BUM!
Looks simple... but try cutting metal with a hacksaw with arthritis! And drilling without a drill press!! I had to use a tapered reamer to bring the holes up to size, then de-burr. Shoulda taken a picture of my hands... BALLOONS!!!
But I took care... filed the edges evenly, made sure things were square.
You might be able to see making tape residue line...
Attachments
TRUELY THE LAST SHOT
Just a demonstration...
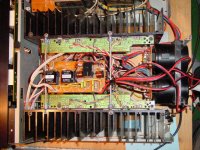
This is the limited space that held the relay boards. The relay board had no actual mounting holes (just the binding post beams held it). So, I didn't want to drill into the board, nor make a crazy clamping mechanism, PLUS I wasn't too into the idea of having the relays close to the transformer in the first place.
Putting the relay board over the main board really reduced the feed lines (3 wire twisted), and a lot of mess. Plus still quite roomy.
Would have liked to install a modular power socket, but I really wasn't in the mood to carve into the case, especially steel.
Just a demonstration...
This is the limited space that held the relay boards. The relay board had no actual mounting holes (just the binding post beams held it). So, I didn't want to drill into the board, nor make a crazy clamping mechanism, PLUS I wasn't too into the idea of having the relays close to the transformer in the first place.
Putting the relay board over the main board really reduced the feed lines (3 wire twisted), and a lot of mess. Plus still quite roomy.
Would have liked to install a modular power socket, but I really wasn't in the mood to carve into the case, especially steel.
Attachments
Yup.
In the future no one ends up wanting it, and I have money and time ... there's lots more that I could do.
Probably more things that could occupy my time...
- Shure, upgrade and shorten other wiring. The wires on it now aren't bad in any way, just pretty standard. Add some clips, for easy removal and maintenance of the less vital parts.
- Dual torroid??? (now I'd just be wasting money. The Xformers are more than adequate, shielded, and with just minimal magnetic hum.
- custom build the relay board... probably should be the first task. make it smaller and with proper mounting holes. Use matching gold plated relays. Direct part to part wiring.
- replace the bias pots (another first task)
- A lot of the caps are very good (rubycon, nichi...) maybe film substitutes for some of the others.
- 1% resistors all over
- use shielded wire from the input RCAs to the pots. Uses a good quality 5 strand ribbon, with alternating wires ground, sitting between the heatsink and frame. Should just hardwire it direct. Hate the part-to-board then board-to-wire, and vice versa design.
- rubber isolation washers/grommets for the transformer plus a thick membrane adhered to the top to kill some vibration (but would not look as good)
- better/higher/stronger feet
- modular power cord
- no more ideas...
Since it works well now, it's at the "is it worth the danger of tinkering more?" point. Protection circuit works perfectly, meter too, all switches and pots are problem free. I'd rather just stop now (DIY adventure energy is back to low), and move on to some small creative projects.
also, I'm almost out of desoldering braid...
Yup, thanks again!
Definitely was great help.
Just finished setting the bias a few minutes ago too. Pots were actually in great shape. Easily set and held.
I keep saying I'm finished, but then there's always a bit more I wanna do... I'm a night owl 100%.
Now I'm done... or am I...?
Definitely was great help.
Just finished setting the bias a few minutes ago too. Pots were actually in great shape. Easily set and held.
I keep saying I'm finished, but then there's always a bit more I wanna do... I'm a night owl 100%.
Now I'm done... or am I...?
") Really enjoyed the pics of your vacation
Really enjoyed the pics of your vacation heh... now I need a vacation from my vacation...
Pretty much the warmest & smoothest sound I've heard from a solid-state. Doesn't really need a warm-up period, maybe just about 5 minutes if any. Quiet is dead quiet.
Have just been testing it out on some bookshelf speakers I had made a while back (picture in some other thread) that have ribbons. No hint of harshness vs. a hafler amp I use. The hafler brings out more detail at the cost of a 30 minute warmup, and a slightly compressed but detailed mid-high.
So far it looks like the yamaha matches more speakers better, especially taking the edge off of metal tweeters. My hafler prefers only specific soft-domes (but does it well), with a touch more control in the bass.
Even with small bookshelves, the M80 seems to project a larger physical presence. Just feels right from the go with out the need to adjust anything. Will move it back to my main setup for more A/B'ing after the weekend. But after a small nap... what do I wanna tweak now????
Banned
Joined 2002
I have a nice yamaha amp that i like and refuse to get rid of these days. It s RX980 It's built nice and sounds great mod's that i have done was put in a nice alps pot the old one wore out. The transformer in mine is in a nice steel case and when flipped upside down it is sealed. probably one thing that helps the sound for sure. I got it free from a guy that bought a new version. I have had it about 7 years now and use it all the time.
Yeah, I think I may now recend my for-sale offer.
Just put a Shuffle Demons CD (great local fun-Jazz group) on as part of the burn-in discology. Sounds too good. Runs lots cooler now that the bias is set. Gotta pull out some other speakers to test and enjoy.
I guess my original reason for wanting to sell was the mess of wires inside, since I prefer simple single-board designs. But with all the power this puts out, there doesn't seem much choice.
Once you get the hang of how it's built and go slowly, it's not that big of a monster to deal with. Will take a definite break, but may go back and continue with my to do list.
- Status
- This old topic is closed. If you want to reopen this topic, contact a moderator using the "Report Post" button.
- Home
- Amplifiers
- Solid State
- Yamaha M-80 Mods FINISHED! GOLD!!!