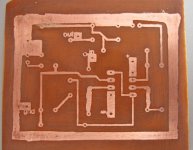
i have done my first pcb this morning:
1) printed the reversed image on paper
2) photocopied it on a transparency film (0.4 €, i had 2 films done)
3) ironed it on a cheap copper board for 3-4 mins (0.3 € for a 16cm x 10cm)
4) about 50 min into ferric chloride (6€ for 1 lt)
i'm not a master, but i think the result is pretty good")
here it is
bye
1) printed the reversed image on paper
2) photocopied it on a transparency film (0.4 €, i had 2 films done)
3) ironed it on a cheap copper board for 3-4 mins (0.3 € for a 16cm x 10cm)
4) about 50 min into ferric chloride (6€ for 1 lt)
i'm not a master, but i think the result is pretty good
here it is
bye
Attachments
Well done! Thats very similar to how my first boards looked. The more you make the better you will get at it.
One suggestion you may want to try... your etch time was pretty long and you probably let the board go under the solution face up. If you float the board on top of warmed up solution it will etch completely in about 15 min and this completely eliminates undercutting or etch through of very small traces. What happens this way is that the heavy copper thats being etched away will fall to the bottom of the tray of solution because of its weight and fresh ferric chloride will always be in contact with the copper. Works for all but very large and heavy boards. I remember reading this tip in Popular Electronics way back in the late 60's and have done it this way ever since.
One suggestion you may want to try... your etch time was pretty long and you probably let the board go under the solution face up. If you float the board on top of warmed up solution it will etch completely in about 15 min and this completely eliminates undercutting or etch through of very small traces. What happens this way is that the heavy copper thats being etched away will fall to the bottom of the tray of solution because of its weight and fresh ferric chloride will always be in contact with the copper. Works for all but very large and heavy boards. I remember reading this tip in Popular Electronics way back in the late 60's and have done it this way ever since.
Hi m0nty,
It's good to try. I am not trying to discourage you but there are things that you can do better.
The two "fat" traces running vertically on the lower right side of the board looks a bit sloppy. Did you do a touch up for the trace with a marker? You can put "scotch" on both sdie of a trace before touching-up with markers, that makes them more sharp and thin.
The one running horizontally underneath the ground trace on the upper left side is getting too close to the ground (or are they part of it?) You have to give more clearence there. When touching up with marker, do twice to get a better cover of the traces
As Mark suggest, use warm etchant at about 70-65 degree C. What I useally do is I drill one of the mechanical holes (3mm dia.)first, pass a wire tie that can just go thru from the copper side. When you put the board face down into the etchant, one side of the board will be slightly elevated by the "knot" of the tie so that the copper side will not get in close contact with the bottom of your trough, giving way for etchant to do their work with the copper. While you are waiting for the etching, you can slight paddle you board by pulling the tie. ie. a human agitator. It saves me about 5 mins doing this.
Hope this can help.
- Status
- This old topic is closed. If you want to reopen this topic, contact a moderator using the "Report Post" button.