Hi All,
Just a long overdue update on my preamp - the last details were in this thread ...
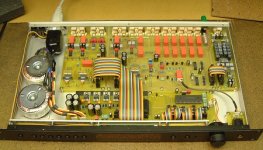
Since then I've finished the metalwork. I had the display cut-out milled for me, and I managed to fit in a perspex window. I spent ages finely working the perspex to get a good tight friction-fit - luckily the first attempt worked reasonably well. Even managed to get half-decent radiused corners!
The front panel needs finishing - the supplied paint finish got a bit scuffed during the machining, which is to be expected... Any advice here would be much appreciated")
Sound quality: Well, bear in mind that I don't have a high-end setup or anything... And, I'm a bit biased! But, I can't hear it when it is installed in the signal path - I'm sufficiently convinced that it is transparent in the context of my hifi.
Here's how I checked it. I set it to unity gain, and wired it into the tape loop of my amplifier. So, pressing the tape monitor switch on the amp puts it in circuit. It was a level-matched test, as the gain can be set to exactly 0dB by adjusting the volume level appropriately. I just listened to lots of different tracks with the tape monitor switch in different positions.
One thing - if you stop the CD and turn the volume control to max on my main amp, you can hear that the preamp does contribute slightly to the noise floor. It's not a huge amount, though. I know from earlier experiments that the PGA2310 is the cause of this - the output buffers are extremely quiet.
I'm rather pleased with the Self-designed phono preamp - I've listened to a lot of records with this preamp. It shows how bad the phono stage of my main amp is.
There's still lots to do - although I've done a lot on the firmware, it still needs finishing. I need to sort out the earth arrangements - given that the case is earthed for electrical safety requirments, I'm still working out the best way to connect signal earth and the record-player earth point... Any advice?
There's quite a lot of new stuff on the website - a section about the user-interface has been added (with a diagram of the menu system) - and a bit about the mechanics, for example. Chect it out...
Thanks to you all,
Mark
Just a long overdue update on my preamp - the last details were in this thread ...
Since then I've finished the metalwork. I had the display cut-out milled for me, and I managed to fit in a perspex window. I spent ages finely working the perspex to get a good tight friction-fit - luckily the first attempt worked reasonably well. Even managed to get half-decent radiused corners!
The front panel needs finishing - the supplied paint finish got a bit scuffed during the machining, which is to be expected... Any advice here would be much appreciated
Sound quality: Well, bear in mind that I don't have a high-end setup or anything... And, I'm a bit biased! But, I can't hear it when it is installed in the signal path - I'm sufficiently convinced that it is transparent in the context of my hifi.
Here's how I checked it. I set it to unity gain, and wired it into the tape loop of my amplifier. So, pressing the tape monitor switch on the amp puts it in circuit. It was a level-matched test, as the gain can be set to exactly 0dB by adjusting the volume level appropriately. I just listened to lots of different tracks with the tape monitor switch in different positions.
One thing - if you stop the CD and turn the volume control to max on my main amp, you can hear that the preamp does contribute slightly to the noise floor. It's not a huge amount, though. I know from earlier experiments that the PGA2310 is the cause of this - the output buffers are extremely quiet.
I'm rather pleased with the Self-designed phono preamp - I've listened to a lot of records with this preamp. It shows how bad the phono stage of my main amp is.
There's still lots to do - although I've done a lot on the firmware, it still needs finishing. I need to sort out the earth arrangements - given that the case is earthed for electrical safety requirments, I'm still working out the best way to connect signal earth and the record-player earth point... Any advice?
There's quite a lot of new stuff on the website - a section about the user-interface has been added (with a diagram of the menu system) - and a bit about the mechanics, for example. Chect it out...
Thanks to you all,
Mark
Attachments
Hi Brian,
Sorry for the delay in replying...
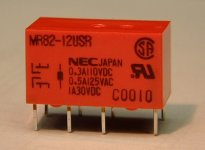
Here's a close-up of a spare one, showing that it's made by NEC - the part number being MR82-12USR
They're high-sensitivity (17mA at 12V) and quite cheap (good because I needed 19!). Farnell sell them - let me know if you want me to find out their part number...
PS: Anyone able to offer (or point me towards) answers to the questions above - advice for finishing front panels (paint or otherwise), and experiences with earthing.
Specifically, should I connect the ground lead from my turntable to signal ground, or mains earth? And how should these two 'earths' be connected? I know that every situation is different, and I will do some experiments in the near future, but your insights would be most helpful
Thanks in advance,
Mark
Sorry for the delay in replying...
Here's a close-up of a spare one, showing that it's made by NEC - the part number being MR82-12USR
They're high-sensitivity (17mA at 12V) and quite cheap (good because I needed 19!). Farnell sell them - let me know if you want me to find out their part number...
PS: Anyone able to offer (or point me towards) answers to the questions above - advice for finishing front panels (paint or otherwise), and experiences with earthing.
Specifically, should I connect the ground lead from my turntable to signal ground, or mains earth? And how should these two 'earths' be connected? I know that every situation is different, and I will do some experiments in the near future, but your insights would be most helpful
Thanks in advance,
Mark
Attachments
The easiest way to fix scuffed paint is to paint it again. You might try use automotive primer first to even the scuffed spots, sand it with 350 and up grid sand paper and then paint it with a paint of your choice . I usually used automotive paints in spray.
If you want to go one step further, anodizing would be nice.
As to connecting the turntable ground cable you might try a point on your chassis (usually the one which connects your preamp chassis to mains ground). But I don't have much experience with that.
If you want to go one step further, anodizing would be nice.
As to connecting the turntable ground cable you might try a point on your chassis (usually the one which connects your preamp chassis to mains ground). But I don't have much experience with that.
Hi Peter,
Thanks for your reply. You're right - a respray is in order. After machining, I rubbed down the panel with 100-grit emery cloth (wet), and then used a mild cutting polish, which worked reasonably well. Unfortunately, the original powder-coat finish wasn't all that thick, so I've got signs of the primer showing. I'm hoping that I can apply a topcoat straight from an aerosol without having to go back to the bare aluminium, as I’m told that priming ali is a bit tricky…?
Given that anodising is beyond me (I think!), I could try rubbing back to the ali and applying some sort of lacquer. Any recommendation for something that would be durable and not discolour over the years? Although I might not do that because my black switches would probably look a bit strange next to silver…
To earthing: I’ve drawn a sketch of the current setup. During assembly I connected the record player earth (a 4mm binding post) to mains earth and the chassis, partly because this was convenient. Signal earth is connected to mains earth via R, which is currently 100 ohms. Ideally, I don’t want to make this connection because my system already has a mains earth via the AV system – this is why I kept the value of R high-ish. I quite like the Pass method of using a thermistor here which is high in value unless significant currents flow…
Anyway, starting the record deck generates a bit of a transient, which causes an audible noise – this doesn’t happen with my integrated amp that has a much smaller value of R and no mains earth connection. So, this makes me think that I should move the phono-earth connection and join it to the signal earth, and this is what I will try next. Then, I could increase R. But, then I’ll have an earth binding post that isn’t actually connected to earth…. At this point it gets confusing, so I thought I’d better ask for your experiences
Attachments

Check the last post on this page: http://www.diyaudio.com/forums/showthread.php?s=&threadid=3981&perpage=15&pagenumber=4
PedroPo laqured his amp and you might ask him for details. If you want to paint don't remove the old paint, so the new one wouls stick better. You might use primer just to fill the voids.
Matte silver knobs look really nice with black panel.
As to grounds keep it as simple as possible. 100 ohm resistor doesn't really do anything there so I would remove it. Thermistor Nelson is using is around 10 ohm.
Thanks for that, Peter - lots of good advice in that thread - will read through in detail when I'm back at work
And I hadn't realised that the "Pass thermistor" is nominally 10 ohms - interesting. There's definately more than meets the eye to earthing and earth loops - which explains why most domestic kit is un-earthed these days.
Personally, I don't like this so-called "double-insulating" - I've got several bits of kit with PCB-mounted mains transformers and just a 10mm airgap. Ok, apparently air is regarded as an insulator, so where is the second insulator?
Finally - Peter - why oh why haven't you got a website to showcase your beautiful work???? Please don't reply saying "I have - it's called diyaudio.com!"
mhennesey: I am still interested in those switches. Are they tactile? Is the LED built into the switch permanently or can you switch it out? Can you post or email a close-up picture on those switches. I am having a hard time finding a distributor which sells these kind. Digikey, Mouser, Allied Electronics, and Newark (the US Farnell division); none of these guys have quite what I am looking for. If anyone else out there has a good recommendation for switches like this please pass it on to me.
BeanZ
BeanZ
Hi BeanZ,
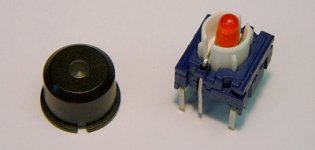
They came from Farnell in the UK. You buy the switch bodies and caps seperately (example part numbers 311-3760 and 678-077). There is a good range of cap styles these days - you can choose a non-illuminated switch body if you prefer...
I bought some with bi-colour LEDs first (see the research page), and then a load with red LED's. I changed the LED's myself because (A) I already had some blue LED's, (B) they're not available with yellow LEDs, and (C) it was cheaper!
The switch is a tactile momentary single pole device. Be careful when mounting them - they click a bit and a thin, unsupported PCB will make them sound a bit cheap. They "feel" good, and have been used by some well-known hifi manufacturers.
As you can see from this picture, the LED is a seperate component - just a standard 3mm device. You can remove it if required. If you buy a switch body without an LED, you might be able to fit your own - I haven't bought one yet to see if they are the same. If they are, it should work out cheaper if you don't include your time
Attachments
- Status
- This old topic is closed. If you want to reopen this topic, contact a moderator using the "Report Post" button.
- Home
- Amplifiers
- Solid State
- Preamp Update