Hello everyone,
I posted pictures of this in its mark I state but no-one seemed interested whilst it was nailed to a bit of chipboard with a bodged heatpipe from a PC for cooling , so I;m hoping you'll be more interested in the mark III version......Its my first so be nice or I'll
I posted pictures of this in its mark I state but no-one seemed interested whilst it was nailed to a bit of chipboard with a bodged heatpipe from a PC for cooling , so I;m hoping you'll be more interested in the mark III version......Its my first so be nice or I'll
Attachments
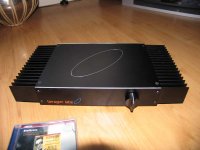
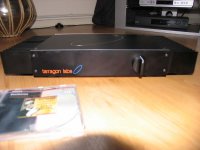
Thanks....I designed the chassis around the heatsinks of which I got 5 for £40 off e-bay. The panels I had made up to my design by scheaffer AG, you download the software, design the panel and they post it to ya in a week or two. The panels cost £90 total including delivery from germany! The amp itself is a kit from white noise audio which sounds great to my ears. As a first build I thought a kit would be a prudent way to learn without ending up with a pile of junk.
tonga
tonga

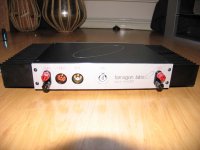
Yeh psu is elsewhere in a crappy plastic box. The £90 was for all four panels in 3mm thick ally with drilling and lettering. For just a front and rear panel it wouldve been £35-40 and this includes VAT etc...I thought it was a reasoable fee as I dont have access to the tools required and I used a load of letters in different sizes (you pay each time a tool is changed) so you could get the price down.
tonga
tonga
Banned
Joined 2002
Hi again...the boards can be got here http://www.wnaudio.com/.
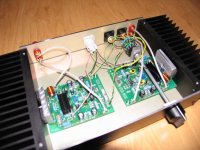
How would I go about adding the reserve caps - just wire em in parrallel with the supply lines and what size would I need? The cable between the psu and amp is only 25cm long do I still need caps?
I did think I should use thicker wires, but why would this be better (wouldnt the wires get hot if they werent upto the job)?
please excuse my ignorance
tonga
tonga said:How would I go about adding the reserve caps - just wire em in parrallel with the supply lines and what size would I need? The cable between the psu and amp is only 25cm long do I still need caps?
Personally i'd say stick some 8200uF across the rails. It's always best to have the caps as local as possible so that losses due to wiring etc are reduced.
tonga said:I did think I should use thicker wires, but why would this be better (wouldnt the wires get hot if they werent upto the job)?
Class AB amps tend to use current in pulses, and it's dealing with these pulses that you want to cater for.
tonga said:please excuse my ignorance
We all have to start at the beginning
")
great job pal, your amp looks incredible
some of the guys suggestions here like using heavy gauge wires may not
have much substance because they are mentioned without knowing the
specs of the amp like output power etc the substance i see is overrating everything so it looks a little bit nicer
and again for afirst amp youve done a great job lookswise
Thanks for the compliments guys/gals. No, unfortunately I'm not from tonga - its just a nick I use.
I'm very happy with the sound of the amp. It runs in class A for most of the time (so I'm told) but gets too hot methinks drawing half an amp quiescent so I'll have to lower it for regular use. I'm not totally happy with the wiring so far as i'm sure it can be simplified. I think I shouldve used a DIN connector for the power. These are small annoyances which I'll sort out in time. I've lapped the back of the MOSFETs and mounted them directly against the heatsink (relying on the annodising as insulation) with some arctic silver tim paste - works a treat.
I guess the main thing is it works and sounds much better than what I had and I had a great time emptying my wallet buiding it.
T
Hi,
I second the addition of local supply decoupling - a minimum of 2 x 4700uF per rail per channel. That's 8 in total, plenty room.
Keep the small wiring between the PSU and local decoupling. A little bit of CRC filtering will help here.
Is that a 3 pole connector from the PSU? A 5 pole XLR might be easier if you change it. Then you can put in dual rectifiers and separate the 2 channels to almost monoblock standard.
Mosfets on the output? They like a higher voltage to the driver & front end.
The heatsink attachment block would benefit from being longer and adding a bolt/setscrew outboard of each FET.
Overall a super job, just add some cream.
- Status
- This old topic is closed. If you want to reopen this topic, contact a moderator using the "Report Post" button.
- Home
- Amplifiers
- Solid State
- My first amp!