You will have too much copper loss by using 6 or 7 26 AWG wires. You should think about using 7 or more 18-16 AWG. You are interested in about 350W. At about 12V in, the primary wire needs to be able to handle more than 30A of current. If you wire is too small, the transformer will have an unacceptable temperature rise of more than 60-70 degrees C. You may want to look into using Litz wire.
BeanZ
BeanZ
Litz wire is short for Litzendraht and is german for (woven wire). It is mainly smaller wires woven into a larger one. The winding technique assures that each wire spends equal time in the center and outside of the wire. The minimizes the skin effect. Speaker wire is typically a type litz wire, observe its woven patterns.
BeanZ
BeanZ
The strands in Litz wire are usually polyamide-nylon insulated (enamel). They are usually stripped with the use of a solder pot but this is something that is not usually available to the hobbiest. It is possible with practice to tin the wires (an thus strip it with a large soldering iron. Another choice on the litz wire is: served or unserved. Serving is a nylon sleeve that is around the entire wire to make it easier to work with and prevent damage to the individual wires. For magnet wire sources try:
MWS Wire- www.mwswire.com
These guys can sell by the foot or by larger bulk quantities.
Unlike speaker wire, Litz does not have the plasitc coating. Imagine working with just the copper strands inside that clear plastic sleeve and that is what working with litz wire is like. You have to be careful not to fray or break any of the strands or performance is severely degradated. This is not the greatest choice for a mass production effort but it will give the best performance if you get the manufacturing process down. It is typical for car audio manufacturers to use about ten (10) 18 AWG solid copper strands twisted together in parallel for the primary windings. The guage that is choosen depends on the frequency. The frequency determines the skin depth. The current density of the wire decays exponentially from the outside to inside and the skin depth is defined as the depth in which the current is 1/e (~37%) times that at the surface of the wire. The equation is approximately:
S=2837 / (sqrt f)
where S is the skin depth in mils (thousandths of an inch) and (sqrt f) is the square root of the frequency in hertz.
The purpose of using smaller wire is that the radius of the smaller wires are smaller than the skin depth and so more of the wire is acually used to carry the current, therefore a higher current density is achieved and the equivalent resistance is reduced and the copper losses are minimized and leads to a lower temperature rise in the transformer. Most of you probably already knew this but I hope this helped anyway.
BeanZ
From your equasion, I'd need 15x22AWG wires to keep the radius just under the skin depth, MWS has lots of cool wire, but nothing like that. The closest they have is to get 4x18AWG Litz wires (60x36AWG each), but be dealing with 240 hair thin conductors, even though, a solder pot is something I can do easily. It looks like I'll have to get 15 22AWG wires and twist them together myself, 22AWG is a lot easier to work with than 36.
Almost.... but not quite. The first step should be to choose frequency and its associated skin depth. Then choose a wire guage where the skin effect is not too excessive. Then determine how many of these wires have to be used in parallel in order to achieve the same copper area as a solid wire. This is chosen based on your maximum current needs. The amount of current you are switching determines the amount of cross sectional area of wire. All you need to do now is add up a bunch of smaller conductors in parallel to achieve enough copper. The actual "bundle" of wires will occupy more window area of a toroid (the open area in the middle which limits the amount of turns and wire and ultimately the maximum power) than if a single wire of the same area were used. However, the efficiency would be junk and the transformer would get too hot and your power output would be not that effective.....all because of the skin effect. I hope this helps some more. Have you chosen a type of ferrite material yet? I recommend P-type or F-type ferrites for you application. What kind of numbers are you working with so far for you transformer core area? I assume that you began with Faraday's Law....hope it all goes well for you!
BeanZ
BeanZ
I'm mostly still thinking of wire. I have already done just what you said for my last post, figured out the skin depth, about 0.0127", then multipied that by 2 and chose a wire AWG that has that diameter or less (22AWG). I then figured out how many I would need to handle 30A, 15 would be plenty, I probably wouldn't even need that many.
For ferrite material, anything that will work well will do, I'm not picky, p-type is fine. I have not worked with core area yet, I will use Faraday's law and work on that stuff next. Is there a way I can figure out just how warm the transformer will get? It will be in a wind tunnel, by the way.
For ferrite material, anything that will work well will do, I'm not picky, p-type is fine. I have not worked with core area yet, I will use Faraday's law and work on that stuff next. Is there a way I can figure out just how warm the transformer will get? It will be in a wind tunnel, by the way.
You should be dealing with the radius of the wire and compare it to the skin depth. The wire does not have to be completely smaller than the skin depth just near it. 18-22AWG solid wire should work fine. There are calculations for temperature rise but they are too complicated for putting on the posting board. They contain crazy powers and stuff like that. For an optimized transformer, the core loss should be balanced with the copper loss. This assures the lowest temperature rise and the maximum power and transformer efficiency. The core loss is proportional to the flux density, frequency, area of the core, and specific core material. Different ferrite materials have differing amounts of core loss usually rated as mW/ kG. You can also find core loss curves for approximating core loss for flux density. The equations for all of this can be found readily on the web. Have you thought about the output inductors yet? The output inductors should be a high permeability material. These are your powder cores. Molypermalloy Powder (MPP), KoolMu, etc. Keep in mind also that the core area of a transformer or inductor can be increased by stacking two or more toroids on top of each other and winding the wire around the stack. This is good if you are trying to design to a minimum footprint size. Keep in mind that if this is done, the core loss is at least doubled. The numbers can be massaged to get you where you want to be. I also want to recommend a monolithic high recovery diode for your output rectifiers. I like to use dual diodes in a TO-247 package such as the RURG series from Intersil. For a dual supply, you will have two secondary windings just like a regular 60 Hz transformer. Also, two filter inductors, two banks of filter caps, etc. Are you isolating your voltage mode control loop? Or are you just going to feed it straight back? I recommend isolation using an optocoupler. This is usually how it is done.
BeanZ
BeanZ
Who said anything about 10AWG wire?
I put the size of the wire in perpective. Everybody that read my post missed the last sentence. I did note that 0.4 mm is 26 guage or gage.
Yeah, for output inductors, I was just going to buy toroidal powder core indictors. I have not thought about value, and I don't want regulation. Rod doesn't even have output inductors in his circuit. I am also going to use an input inductor. Another thing that I will do, that Rod didn't, is use decoupling capacitors in the bridge circuit. For a rectifier, I was going to use 2 Fuji ESAD92-02B fast recovery dual diodes in TO-3P cases. If you know of something better that's not too expensive, please say so. Those Intersil ones aren't available through Allied electronics, and I usually don't bother in that case, unless you know where I can get them.
Check out the circuit on Rod's site, at http://sound.westhost.com/project89.htm . He has a prototype that works, but please tell me what you think and what I can implement to get many years of reliable, efficient, and noise free performance from this circuit.
I see that Billings's book is very long and very expensive. I have as of yet not read any books on the subject. What other SMPS books are good?
Thanks
P.S. My browser couldn't find valveaudio.com.
PWM supplies...
I've built more than a few of these things (and repaired hundreds) as car audio designs and I'll share my experiences.
Cheap and easy, use the TL494 in straight free running R/C mode without feedback from secondary/flyback diodes. It's less than 1/4 the price of the 3525, but you lose soft-start capability. Use 4 IRFZ44N MosFets. They're inexpensive workhorses. Want the circuit to last a long time? Be extremely careful with winding the core - making sure that the pri-sec sections are evenly overlapping and are of even turns before and aft the center taps. You don't need any series resistance inline with the primary - at least not in car audio amps. Layout is important - make sure that the traces are the necessary width for the currents drawn (about 25A primary). Use TO-220 UF dual-diodes, TO-247 is way overkill. It's not necessary to use decouplers in the bridge, as the diodes do a good job of switching off quickly enough. Filter everything well! Since this is a "cheap" design, you might need to compensate for lack of power filtering in the preamp sections - stopper resistors and caps to prevent HF oscillations or amplification.
Another issue is the need for overcurrent protection. You can handle this with a couple OpAmp (LM339) comparator sections coupled with a simple V-I limiter to shut the PWM oscillatior down - there is a shutdown pin to do this - also used for power control.
Be aware that you'll skin your fingers to the bone making nice toroid-wound transformers. I wouldn't even worry about litz winding anything. You design is to be cheap and effective. Most car audio companies' amps use plain vanilla 14 gauge magnet wire unless the design calls for high current into very low impedances.
When you design the preamp, it's wise to build a quasi-balanced differential input circuit that doesn't use the same ground as the primary side of the transformer and have at least 100ohms resistance between the two windings' center taps. Reasoning is this: a consumer installs the amplifier with a poor chassis ground and attempts to use the amplifier. The amplifier will actually "seek out" the ground the from another source - namely the headunit. It will then burn traces in the headunit until the amplifier itself fails from burnt traces or oscillations caused by an unshielded input.
You will be surprised how many people will blow your amplifier up. I've TRIED to blow mine, and find it very difficult - you really have to abuse them or just short a bunch of things out at full power. For cheap, I would look into using the LM3886 amps (only $3.95 at apexjr.com) since they have built in shutdowns and over current protections. You may not even need to shut the supply down except in drastic emergencies (fuse!). The money you save in output transistors and drivers and...can be spent in 1% hand matched tolerance resistors for bridging. It's easy once you've built a few.
I recommend getting an old car amplifier and copying parts of the design and layout. It's a lot easier doing this the first time and you'll have a jig to test your transformers out on. 50KHz is a good frequency for something low powered like that and if your transformer stays pretty cool at idle currents, you're doing a lot better than many car audio companies' power designs (Soundstream and Rockford come to mind). Profile car amps had pretty damn good supplies in their cheap little amps. They rarely failed and, more commonly, the output transistors (TIP35/36) shorted causing shutdowns. Either the white California Series or the newer blue ones are good candidates for resources.
$100 is pretty cheap for a handbuilt amp. Try marketing some interesting features into it. This is how USAmps got started - two guys working in the back of a car audio shop over 15 years ago building high current amps and selling them to their customers. Considering a GOOD 150W car amp is about $300, you might want to up your price if you've built a BETTER one.
Beanz: I wish I had you around the first few times I tried this!
I've built more than a few of these things (and repaired hundreds) as car audio designs and I'll share my experiences.
Cheap and easy, use the TL494 in straight free running R/C mode without feedback from secondary/flyback diodes. It's less than 1/4 the price of the 3525, but you lose soft-start capability. Use 4 IRFZ44N MosFets. They're inexpensive workhorses. Want the circuit to last a long time? Be extremely careful with winding the core - making sure that the pri-sec sections are evenly overlapping and are of even turns before and aft the center taps. You don't need any series resistance inline with the primary - at least not in car audio amps. Layout is important - make sure that the traces are the necessary width for the currents drawn (about 25A primary). Use TO-220 UF dual-diodes, TO-247 is way overkill. It's not necessary to use decouplers in the bridge, as the diodes do a good job of switching off quickly enough. Filter everything well! Since this is a "cheap" design, you might need to compensate for lack of power filtering in the preamp sections - stopper resistors and caps to prevent HF oscillations or amplification.
Another issue is the need for overcurrent protection. You can handle this with a couple OpAmp (LM339) comparator sections coupled with a simple V-I limiter to shut the PWM oscillatior down - there is a shutdown pin to do this - also used for power control.
Be aware that you'll skin your fingers to the bone making nice toroid-wound transformers. I wouldn't even worry about litz winding anything. You design is to be cheap and effective. Most car audio companies' amps use plain vanilla 14 gauge magnet wire unless the design calls for high current into very low impedances.
When you design the preamp, it's wise to build a quasi-balanced differential input circuit that doesn't use the same ground as the primary side of the transformer and have at least 100ohms resistance between the two windings' center taps. Reasoning is this: a consumer installs the amplifier with a poor chassis ground and attempts to use the amplifier. The amplifier will actually "seek out" the ground the from another source - namely the headunit. It will then burn traces in the headunit until the amplifier itself fails from burnt traces or oscillations caused by an unshielded input.
You will be surprised how many people will blow your amplifier up. I've TRIED to blow mine, and find it very difficult - you really have to abuse them or just short a bunch of things out at full power. For cheap, I would look into using the LM3886 amps (only $3.95 at apexjr.com) since they have built in shutdowns and over current protections. You may not even need to shut the supply down except in drastic emergencies (fuse!).
The money you save in output transistors and drivers and...can be spent in 1% hand matched tolerance resistors for bridging. It's easy once you've built a few.I recommend getting an old car amplifier and copying parts of the design and layout. It's a lot easier doing this the first time and you'll have a jig to test your transformers out on. 50KHz is a good frequency for something low powered like that and if your transformer stays pretty cool at idle currents, you're doing a lot better than many car audio companies' power designs (Soundstream and Rockford come to mind). Profile car amps had pretty damn good supplies in their cheap little amps. They rarely failed and, more commonly, the output transistors (TIP35/36) shorted causing shutdowns. Either the white California Series or the newer blue ones are good candidates for resources.
$100 is pretty cheap for a handbuilt amp. Try marketing some interesting features into it. This is how USAmps got started - two guys working in the back of a car audio shop over 15 years ago building high current amps and selling them to their customers. Considering a GOOD 150W car amp is about $300, you might want to up your price if you've built a BETTER one.
Beanz: I wish I had you around the first few times I tried this!
All things noted. I will use TO-220 rectifiers, and protection on the PSU output.
By preamp, I assume you mean the audio preamp, and not the PWM control circuitry, right? You are in essentially saying that the primary and secondary windings should not share a ground, i.e. the PWM ciruitry and audio circuitry are completely isolated by at least 100ohms? You don't have to worry about that. Besides, primary circuit common is +12V in this circuit. Secondary circuit common will only be the center tap.
I'd rather use a completely descrete amp, no LM3886's please. I was planning on using a circuit that is similar to ESP Project3A, but with a few changes, like a current mirror, a multislope VI limiter, higher gain, MJ15003/MJ15004 OPS, and 100uF decouplers to go with the 0.1uF ones. This circuit would probably sound better than most commercial car amps, not that it would matter too much anyway, since most of my potential customers are sub-happy, but I do want it to have superb performance anyway, sound quality is good to have when you can hear it, right? Also, with the VI limiter, it can withstand infinite short circuit, supress arcing, and safely drive 2 ohms (a must for a car amp, huh?!).
It costs about $65 for the first amp (just the amp), but this is just because the resistors (1% metal film) come in packs of 100. This is sort of just a getting started cost, but taking into account the actual cost of each resistor, the power amps can be built for less than $30 each. Who knows how much for the whole modules, but I'm sure it will be reasonable. Everyone I know seems to worship JL audio (but jeez do their subs ever have low Q, tap one and it hums for half a second!), and their amps (class D) are cheap, so it's hard to compete. Also, all the other big name amps are cheap too.
My amps should be pretty marketable though, hi fidelity, robust, ingeniously 2D modular (ok, not to the layman, but still modular), high & low pass adjustable Xover, compact, low thermal resistance, and pretty looking. They could be assembled in a long, narrow array, only 4" x 4" cross section, to fit behind the seat in a pickup on top of the speakers or something. I will also put a bridge rectifier first thing in the PSU, so it will run no matter how the power is hooked up (I'm not gonna have the case be - anymore), most car amps would just blow up if you hook it up backwards, but not these.
I don't see how 14AWG wire would work, especially if you're talking about only a single strand. I know it won't be easy to wind the toroids either way.
Should I put a minimum load on this thing?
I just now studied a 4 x 60W Rockford amp (as best I could, the board, which is 2 sided with lots of SMT, won't come out). It had no remarkable design features which I could copy from, but there was an additional small winding on the toroid, maybe 28 or 30AWG, which connected to one side of the secondary, I couldn't tell where it went, not being able to see the other side of the board.
So, in conclusion, are there any creative ways that customers can accidentally blow up my amps, or that the amps can blow themselves up, so I can design something in to prevent it?
What can I read to get more aquainted with switchers?
The 494C chip from TI is used by almost every car amplifier that I have taken apart...its a good performer and easy to use. The 14AWG wire can work because the normal operating conditions consist of a dynamicly changing load and the "average" power over a given time during audio program material is rather low. Occasionally, you will have momentary peaks and transients which will require more power but 14 should suffice. From experience winding this size wire can be a chore. It is very do-able but you really have to work to tame the large cross-sectional area of these larger guage wires. The additional winding is most likely what is called an "auxilliary winding". It is just an additional secondary for additional voltage outputs. Since there are not many turns this is probably 5V for some of the control logic, either the PWM or something else. 5V is common for a lot of circuitry. Toroids are usually soldered to the circuit boards which means that the holes are in fixed locations. What you need to remember is that your windings result in ends which are near these holes so that the toroid can just be populated like a normal component. If you don't hit this mark you will spend a lot of time (money) in extra labor making the windings line up. Remember this trick which is also used by car audio guys: As you are winding the core and you know that you are going to have your ends nowhere near where the are supposed to be, i.e. the opposite side of the toroid, you can take the winding diagonally across the toroid and continue winding on the other side that it lines up correctly. It sounds obvious but if you dont think of it ahead of time it will bite you.
As for reading I could recommend some sources but none of them will be as good as the Pressman book:"Switching Power Supply Design", second edition. Find it in a library or here Good luck let me know if you need to know more....
BeanZ
As for reading I could recommend some sources but none of them will be as good as the Pressman book:"Switching Power Supply Design", second edition. Find it in a library or here Good luck let me know if you need to know more....
BeanZ
i am sorry.the url is http://valveaudio.tripod.com/. if you cannot still get it try a google search for valveaudio
Yes, I meant to say 100 ohms between secondary center tap and source ground not primary center tap (it was 2am when I wrote that).
The extra windings in that Rockford amp actually are for the voltage amp sections of the MosFet outputs. I believe the secondary voltage is around +/-18V while the tertiary winding is roughly double that. They also use aux windings for things like preamp power and flyback windings for regulated and self-oscillating designs (US Amps used SOs - almost indestructable).
Typically speaking, the TL494 runs straight from 12V (filtered of course) through a transistor-paired buffer utilizing the shutdown pin. Paralleled with that are the comparator outputs from the VI limiter for complete shutdown. It has its own onboard +5V reference source for use with optoisolators, protection and compensation circuits - quite handy, really.
You want to properly filter the +12V input (L/C) to prevent switching spikes and harmonic garbage from reaching the vehicle's electrical systems. They're already noisy, but a high current PWM supply will only make it worse...which brings up another point... A modular design means many closely spaced PWM supplies running at the same frequency, correct? Almost? Well, you can be guaranteed they won't all run at EXACTLY the same frequency, each step in unison - unless...you also daisy chain the clock frequency (buffered, of course) that drives the MosFets/Toroid. This is used to maintain an extremely low noise floor. Tiny "birdies" can occur from beat frequencies caused by out of step frequencies heterodyning (mixing - radio term). The net result is an audible "beat" many times per second, yet in the audbile frequency range. This is something you'd hear under extremely low noise circumstances anyway - mainly for competition uses, but something to keep in mind. I haven't found a difference in anything but testing - my noise floor is super low, but I've never detected the birds. Just something to file away in case you need it someday...
The supplies I've built and those used in car amps haven't needed loads to run properly, but you needn't worry about that since the audio amplifier will draw an idle current nonetheless.
You might want to outsource those toroids - possibly even gen them as spare parts from a manufacturer. You'll have the same spacing everytime and they've been dielectric tested. Last one I replaced was for an Xtant 1000W Class D and it was only $35 for this huge 2.5" cored litzwound monster. Soundstream just got bought out by Power Acoustik (bleh!) - maybe they have a billion toroids they need to get rid of quickly.
Modes of destruction include: Thermal overload, reverse wiring, alternator overvotage (I've measured 24V!), shorted speakers, customer connects everything live and shorts screwdriver from speaker/power to the case, amplifier isn't mounted down to ANYTHING - just floats around in the trunk and breaks off the RCA connector's shield connection which sends the amplifier into oscillation and blows itself up - usually taking the power supply with it - of course, all of this happens at full power - a small fire ensues inside and is extinguished when the fuse pops. I am NOT kidding. I was able to simulate this on the bench and it's scary what COULD happen. You have to assume the customer is a complete idiot and sell your product around that - make it bulletproof.
The extra windings in that Rockford amp actually are for the voltage amp sections of the MosFet outputs. I believe the secondary voltage is around +/-18V while the tertiary winding is roughly double that. They also use aux windings for things like preamp power and flyback windings for regulated and self-oscillating designs (US Amps used SOs - almost indestructable).
Typically speaking, the TL494 runs straight from 12V (filtered of course) through a transistor-paired buffer utilizing the shutdown pin. Paralleled with that are the comparator outputs from the VI limiter for complete shutdown. It has its own onboard +5V reference source for use with optoisolators, protection and compensation circuits - quite handy, really.
You want to properly filter the +12V input (L/C) to prevent switching spikes and harmonic garbage from reaching the vehicle's electrical systems. They're already noisy, but a high current PWM supply will only make it worse...which brings up another point... A modular design means many closely spaced PWM supplies running at the same frequency, correct? Almost? Well, you can be guaranteed they won't all run at EXACTLY the same frequency, each step in unison - unless...you also daisy chain the clock frequency (buffered, of course) that drives the MosFets/Toroid. This is used to maintain an extremely low noise floor. Tiny "birdies" can occur from beat frequencies caused by out of step frequencies heterodyning (mixing - radio term). The net result is an audible "beat" many times per second, yet in the audbile frequency range. This is something you'd hear under extremely low noise circumstances anyway - mainly for competition uses, but something to keep in mind. I haven't found a difference in anything but testing - my noise floor is super low, but I've never detected the birds.
Just something to file away in case you need it someday...The supplies I've built and those used in car amps haven't needed loads to run properly, but you needn't worry about that since the audio amplifier will draw an idle current nonetheless.
You might want to outsource those toroids - possibly even gen them as spare parts from a manufacturer. You'll have the same spacing everytime and they've been dielectric tested. Last one I replaced was for an Xtant 1000W Class D and it was only $35 for this huge 2.5" cored litzwound monster. Soundstream just got bought out by Power Acoustik (bleh!) - maybe they have a billion toroids they need to get rid of quickly.
Modes of destruction include: Thermal overload, reverse wiring, alternator overvotage (I've measured 24V!), shorted speakers, customer connects everything live and shorts screwdriver from speaker/power to the case, amplifier isn't mounted down to ANYTHING - just floats around in the trunk and breaks off the RCA connector's shield connection which sends the amplifier into oscillation and blows itself up - usually taking the power supply with it - of course, all of this happens at full power - a small fire ensues inside and is extinguished when the fuse pops. I am NOT kidding. I was able to simulate this on the bench and it's scary what COULD happen. You have to assume the customer is a complete idiot and sell your product around that - make it bulletproof.
By source ground, do you mean signal source ground (how would I do that?) or power source ground (no problem)?
As far as bulletproofing,
Thermal overload: There will be a thermostat in series with the main power line.
Reverse wiring: There will be a bridge rectifier in front of the PSU.
Severe alternator overvoltage: the car's battery and regulator should take care of that, if it doesn't, everything else in the car will fry, as well as my amp. The amp (and PSU) will however be able to withstand quite a bit higher voltage, and the VI limiter will limit the output current
Speaker outputs shorted: Multislope VI limiter will limit output current to 1.75A/transistor under short circuit, 5.25A/transistor under 2 ohm load.
Something shorted to case: The case will be isolated from all the amp's innards, including power, signal, and speaker grounds.
Shield connection breaks: There will be a bandpass limiter and clamping circuit in the input, I don't know of anything other than that I could do, and I'm not sure if this would help under these circumstances, but they are a good thing to have anyway.
I will also include a DC protection circuit of some type (maybe just a crowbar circuit) if I can afford the extra cost of implementing it. The purpose of this is mainly just in case the customer foolishly hooks up the power line to the speaker output. This is however less likely with this design, because most car amps have the speaker hookups and power hookups right next to each other, this amp won't.
It might be a good idea to isolate the input too, so if the amp goes, it won't ruin the signal sourse.
I'm hoping the PSRR of the amp will help to supress any "birds."
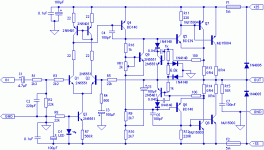
Here's the amp circuit I want to use:
As far as bulletproofing,
Thermal overload: There will be a thermostat in series with the main power line.
Reverse wiring: There will be a bridge rectifier in front of the PSU.
Severe alternator overvoltage: the car's battery and regulator should take care of that, if it doesn't, everything else in the car will fry, as well as my amp. The amp (and PSU) will however be able to withstand quite a bit higher voltage, and the VI limiter will limit the output current
Speaker outputs shorted: Multislope VI limiter will limit output current to 1.75A/transistor under short circuit, 5.25A/transistor under 2 ohm load.
Something shorted to case: The case will be isolated from all the amp's innards, including power, signal, and speaker grounds.
Shield connection breaks: There will be a bandpass limiter and clamping circuit in the input, I don't know of anything other than that I could do, and I'm not sure if this would help under these circumstances, but they are a good thing to have anyway.
I will also include a DC protection circuit of some type (maybe just a crowbar circuit) if I can afford the extra cost of implementing it. The purpose of this is mainly just in case the customer foolishly hooks up the power line to the speaker output. This is however less likely with this design, because most car amps have the speaker hookups and power hookups right next to each other, this amp won't.
It might be a good idea to isolate the input too, so if the amp goes, it won't ruin the signal sourse.
I'm hoping the PSRR of the amp will help to supress any "birds."
Here's the amp circuit I want to use:
Attachments
- Status
- This old topic is closed. If you want to reopen this topic, contact a moderator using the "Report Post" button.
- Home
- Amplifiers
- Solid State
- 12V in switchmode power supplies