Hello, this is my first post here.
I had a nice Onkyo 5.1 receiver for about 20 years. My old reliable. But my old reliable went toast.
The symptom was the 5.1 processor troubles caused by bad power supplies. Basically, the main board had slowly baked away. Brown in color, lifted/broken traces mainly around the +-12 regulators. I tried to save the remaining audio amplifiers but proved useless.
I am not one to toss potentially useful electronics away... and this was a perfect tinkering project. Remaining was a good steel case, big heatsink and 30 pound (or so) power transformer.
I found a reasonable priced DIY amp kit my LJM so I bought and assembled it.
My goal is to create a good strong audio amp (Just amplifiers) out of the remains of my old reliable 5.1 receiver. If this project is successful I will be adding up to 3 more lower power amps in the same cabinet.
I salvaged the PS filter caps and main rectifiers from the Onkyo main board and added 20K bleeder resistors. I'll be using the Onkyo tone board that requires +-12 so I'll be making a supply for that.
The supply is +-58v (unloaded). It comes from two full wave bridges filtered by 12,000uf caps. I am hoping that will be enough AC filtering. It was the original Onkyo configuration.
I have 8 out of the 16 drivers mounted. I hope to get the rest mounted, do some pre-power testing and if all goes right to test them this evening.
Please wish me luck.
I'd upload project pics but I'll have to discover how to do so.
Thanks for reading, I'll keep you posted on the project.
Update:
I powered the unit up and these amplifiers sound phenomenal. My power supplies don't hum and I get a full audio range. Real clean sound.
Here's some recent photos:
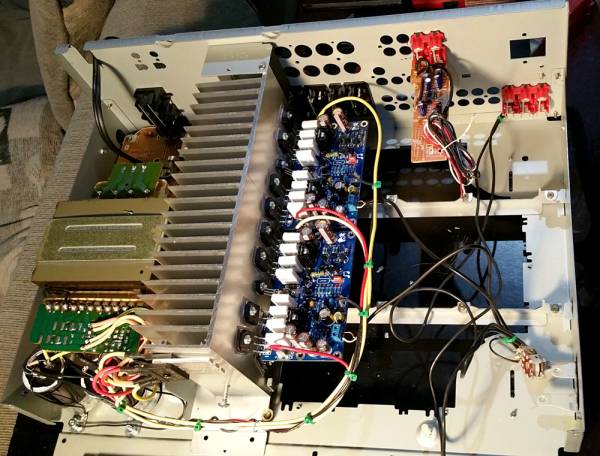
Note I had to mount some drivers off-center to accommodate the heatsink fins for mounting screws. The drivers were mounted first, the leads formed and then soldered to the boards.
The odd-shaped board mounted half way up the back panel is the original Onkyo phono preamp. I cut it out of the main board with a Dremel cut-off wheel and re-routed the output back to RCA jacks.
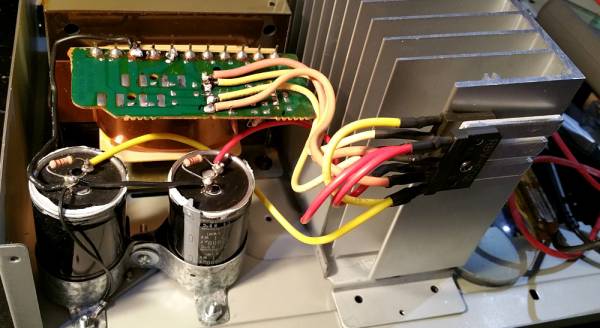
Here is my +-58v supply with custom DIY mounts. Cap values are 12,000uf/70v with 22K 1/2w bleeders. Caps and rectifiers are salvaged from the original Onkyo main board.
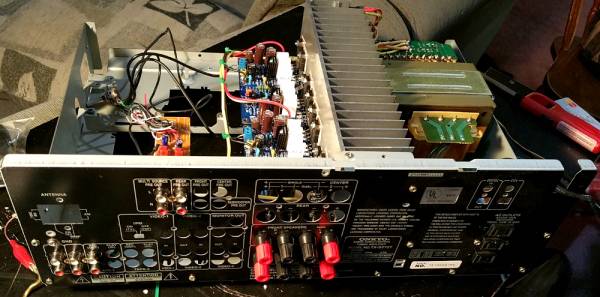
This receiver had a ton of rear connections. Since this mod will only contain 3 or 4 audio amps most of the rear connections will be removed. I plan to blank the unused holes and refinish the rear panel.
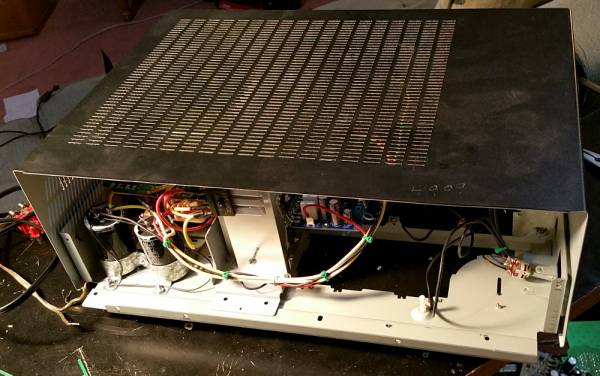
Finishing the front of this amplifier is going to be a challenge.
I don't want to buy a blank aluminium plate and the original face plate won't look right.
How would you finish the front of this amp?
The only controls will be on/off, a small power LED, volume and tone knobs.
There is plenty of room in that cabinet for a speaker protection board and additional amplifiers. Those are on the list but I am working to get my +-12 supply going. It supplies my tone and phono preamp board.
I am really excited about this project. Judging by ear, Kenny G and Sade sound excellent. Strong and clear.
I powered the unit up and these amplifiers sound phenomenal. My power supplies don't hum and I get a full audio range. Real clean sound.
Here's some recent photos:
Note I had to mount some drivers off-center to accommodate the heatsink fins for mounting screws. The drivers were mounted first, the leads formed and then soldered to the boards.
The odd-shaped board mounted half way up the back panel is the original Onkyo phono preamp. I cut it out of the main board with a Dremel cut-off wheel and re-routed the output back to RCA jacks.
Here is my +-58v supply with custom DIY mounts. Cap values are 12,000uf/70v with 22K 1/2w bleeders. Caps and rectifiers are salvaged from the original Onkyo main board.
This receiver had a ton of rear connections. Since this mod will only contain 3 or 4 audio amps most of the rear connections will be removed. I plan to blank the unused holes and refinish the rear panel.
Finishing the front of this amplifier is going to be a challenge.
I don't want to buy a blank aluminium plate and the original face plate won't look right.
How would you finish the front of this amp?
The only controls will be on/off, a small power LED, volume and tone knobs.
There is plenty of room in that cabinet for a speaker protection board and additional amplifiers. Those are on the list but I am working to get my +-12 supply going. It supplies my tone and phono preamp board.
I am really excited about this project. Judging by ear, Kenny G and Sade sound excellent. Strong and clear.
Well done
Hey Steven
I bought the same modules about 2 years ago , built a dual rail PSU with 400VA 43-0-43 torroidal , 600V rectifier and 6x 10 000 uF Chemicon caps for ~ 60-0-60 VDC supply . I have the modules attatched to 3 kg Heatsink taken from 3-phase power supply board . It is driving home-made 3-way speakers that use a focal 13" sub /cab for bass duties - serious loads to drive .
Still going strong and I am really impressed with the sound .
I would definitely buy these modules again . Mine are the ones with angle-profile aluminium attached .
- Status
- This old topic is closed. If you want to reopen this topic, contact a moderator using the "Report Post" button.