Earlier this year, I was looking for a better pre-amp. On my shopping list was a low noise design, neutral in sound, and hopefully with balanced outputs. Oh yeah, I'm lazy. I wanted a remote control.
I found Relaixed2. It is a DIY balanced Pre-Amp from Jos van Eijndhoven. The usual disclaimer here; I am just a customer. I don't have any interest in this product, other than as a customer.
Layout
Starting from the input, it has either 4 single ended inputs and 2 balanced inputs or 3 single ended inputs and 3 balanced inputs. The choice is controlled by jumpers. Output is by balanced XLR connectors.
The signal has the minimum number of components in its path. Only input channel switching, 2 op-amps per channel as a buffer, and a stepped ladder attenuator. The op-amps convert single ended inputs into balanced inputs and provide gain. LM4562s are suggested for the signal op-amps, but any 8 DIP dual op-amp can be used. This is a good place to consider rolling op-amps to find the ones that you like best as the rest of the circuit should be insensitive to op-amp choice.
Here are some specs as measured by Jos. See his very complete website for more details.
RelaiXed2 -- Documentation
Specs
Frequency range of DC to 320kHz (-3 dB)
Channel separation (@ 1 kHz) – single ended – 128 dB
balanced – 137 dB
Signal to Noise Ratio – 123 dB at max volume, input shorted
Output Noise Voltage – 10nV/Hz @ max volume
The most unusual thing about Relaixed2 is it's use of high quality relays. Electronic volume controls can color sound. Mechanical wipers in potentiometers and mechanical contacts in manually switched attenuators have the potential for noise. Jos found that high quality sealed relays have long life and make a very low noise contact. In Relaixed2, he uses relays to switch inputs and to switch between resistors in the stepped ladder attenuator.
The Relaixed2 uses a digital control system to select the relays controlling input channel, volume, and balance. In this case, balance control is simply offsetting the left or right channel by a different choice of volume between the left and right channels.
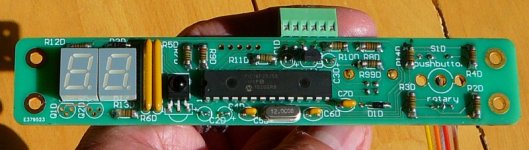
All of this is controlled either by a universal infrared remote control using Philips or Sony control language or by a rotary encoder on the face of the preamp. Status is shown by a two digit LED display.
Jos offers PCBs for the project and the option of a pre-programmed micro-controller. Cost of the boards and controller, plus shipping was about $125 US at the time of my purchase. A component table with links to suppliers is on the website. The end user purchases these components his or herself to match the BOM. Combined with the cost of the boards, the total cost of the project (less chassis) was a little over $400 US. A significant part of this cost is the cost of the relays.
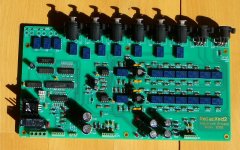
The boards arrived from Europe in about a week. They are very high quality and well laid out. The system uses separate power supplies for the audio and digital control system. There is now a US component table because I found that some components that are available in Europe are not available in the US.
The board went together easily. This was my first time with surface mount components, but the board has been designed with many through hole components and enough room for hand soldering surface mount components. Whenever I got into trouble, Jos was able to help me. Most of the time, I could find the answer just by studying his very complete schematics.
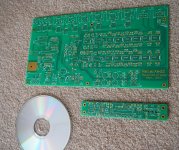
The pictures show the bare boards and the completed boards. My soldering skills are not that great, so my board is not as pretty as the one on the website, but I had no problems making workable solder joints. The only change from the design is that I added a terminal block on the top of the display board to make connection easier.
It's early and I haven't done a lot of listening. So far, I've only listened to the pre-amp as bare boards with jury rigged wiring. Basically, I don't like to give subjective impressions because every person and every system is different. That said, I am happy with what I am hearing so far. For me, the Relaixed2 sounds very clear and open. Now I have to get busy building the chassis so I can spend more time listening to it.
I found Relaixed2. It is a DIY balanced Pre-Amp from Jos van Eijndhoven. The usual disclaimer here; I am just a customer. I don't have any interest in this product, other than as a customer.
Layout
Starting from the input, it has either 4 single ended inputs and 2 balanced inputs or 3 single ended inputs and 3 balanced inputs. The choice is controlled by jumpers. Output is by balanced XLR connectors.
The signal has the minimum number of components in its path. Only input channel switching, 2 op-amps per channel as a buffer, and a stepped ladder attenuator. The op-amps convert single ended inputs into balanced inputs and provide gain. LM4562s are suggested for the signal op-amps, but any 8 DIP dual op-amp can be used. This is a good place to consider rolling op-amps to find the ones that you like best as the rest of the circuit should be insensitive to op-amp choice.
Here are some specs as measured by Jos. See his very complete website for more details.
RelaiXed2 -- Documentation
Specs
Frequency range of DC to 320kHz (-3 dB)
Channel separation (@ 1 kHz) – single ended – 128 dB
balanced – 137 dB
Signal to Noise Ratio – 123 dB at max volume, input shorted
Output Noise Voltage – 10nV/Hz @ max volume
The most unusual thing about Relaixed2 is it's use of high quality relays. Electronic volume controls can color sound. Mechanical wipers in potentiometers and mechanical contacts in manually switched attenuators have the potential for noise. Jos found that high quality sealed relays have long life and make a very low noise contact. In Relaixed2, he uses relays to switch inputs and to switch between resistors in the stepped ladder attenuator.
The Relaixed2 uses a digital control system to select the relays controlling input channel, volume, and balance. In this case, balance control is simply offsetting the left or right channel by a different choice of volume between the left and right channels.
All of this is controlled either by a universal infrared remote control using Philips or Sony control language or by a rotary encoder on the face of the preamp. Status is shown by a two digit LED display.
Jos offers PCBs for the project and the option of a pre-programmed micro-controller. Cost of the boards and controller, plus shipping was about $125 US at the time of my purchase. A component table with links to suppliers is on the website. The end user purchases these components his or herself to match the BOM. Combined with the cost of the boards, the total cost of the project (less chassis) was a little over $400 US. A significant part of this cost is the cost of the relays.
The boards arrived from Europe in about a week. They are very high quality and well laid out. The system uses separate power supplies for the audio and digital control system. There is now a US component table because I found that some components that are available in Europe are not available in the US.
The board went together easily. This was my first time with surface mount components, but the board has been designed with many through hole components and enough room for hand soldering surface mount components. Whenever I got into trouble, Jos was able to help me. Most of the time, I could find the answer just by studying his very complete schematics.
The pictures show the bare boards and the completed boards. My soldering skills are not that great, so my board is not as pretty as the one on the website, but I had no problems making workable solder joints. The only change from the design is that I added a terminal block on the top of the display board to make connection easier.
It's early and I haven't done a lot of listening. So far, I've only listened to the pre-amp as bare boards with jury rigged wiring. Basically, I don't like to give subjective impressions because every person and every system is different. That said, I am happy with what I am hearing so far. For me, the Relaixed2 sounds very clear and open. Now I have to get busy building the chassis so I can spend more time listening to it.
Attachments
Finished my Relaixed2 this weekend; a very good pre-amp indeed and very well documented. Even an idiot can build it. So far little or no audible difference between with of without the Relaixed (before I used a direct connection between the Twisted Pear Buffalo DAC and the ExtremA power-amp). No difference is perfect in my opinion; just a wire with gain.
Only one small problem during building due to the fact that I used a 6v transformer insted of the prescribed 7v; this caused the 230v relay to "clapper". The origin of this behaviour was the 7805 regulator. The voltage drop was too low for this regulator. After replacing it with a L4940-5 low drop regulator everything worked flawless.
In the following months I will build a case to match my DAC and Power-AMP.
Scanspeakman
Attachments
That's a nice setup you have there scanspeakman. Buffalo+ExtremA should be pretty decent, to say the least. ")
There is also RelaiXedSMD out now.
There is also RelaiXedSMD out now.
That's a nice setup you have there scanspeakman. Buffalo+ExtremA should be pretty decent, to say the least.
No complaining by me.....
. It is indeed a great combo.Scanspeakman
There is also RelaiXedSMD out now.
Very interesting project...wondering if LME49990 would be drop in replacement here too without modifications?
Very interesting project...wondering if LME49990 would be drop in replacement here too without modifications?
Both Relaixed projects use dual amp, 8 DIP for the audio op amp. Put a couple of LME49990 amps on a brown dog adapter and it should be smokin'. I have some OPA627 on adapters waiting on the shelf to try in the Relaixed2. It should be easy to tailor the sound of the preamp with your favorite op amp.
By the way, the LME49990 looks very nice. This was the first I had seen of them. Thanks.
The designer of RelaiXed suggests metal-can LME49720s.
See this post.
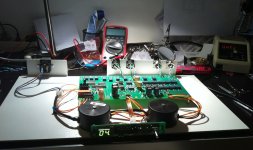
The metal can LME49720s are very nice. I built my Relaixed2 with them and it sounds great. Be aware that the metal can amps run a lot hotter than the plastic case DIP8 op amp. Even with the heat sinks shown in my picture and on Jos' website photos, they run pretty hot. I've been looking for even better heat sink options for the metal can.
I am currently playing with op amp options, just because I am curious how different op amps will sound in this pre. When I finally decide, I will remove the socket and solder directly to board. If it turns out to be the metal can, that should help with heat.
I am currently playing with op amp options, just because I am curious how different op amps will sound in this pre. When I finally decide, I will remove the socket and solder directly to board. If it turns out to be the metal can, that should help with heat.
If you will test LME49990, please report us results.
BTW: Which power amplifier do you use?
I'm using Fremen Edition MyRef chipamps for power amp.
Do you use unbalanced or balanced connection to your amplifier?
Do you use unbalanced or balanced connection to your amplifier?
I am in the process of shifting to balanced. Since each monoblock power amp is internally single-ended and is located at the speakers, I have some differential line receivers that I have designed and am in the process of building. So far, I've been playing with them on a breadboard. I'm looking forward to pulling it all together.
Can you hear a difference using the R-II balanced or unbalanced?
I'm not really in a position to answer that question very well. It wasn't really the point of my breadboard experiments where I was looking for stability of my circuit. Perhaps scanspeakman can comment. How about your own expeirence?
I'm not really in a position to answer that question very well. It wasn't really the point of my breadboard experiments where I was looking for stability of my circuit. Perhaps scanspeakman can comment.
Not able to test that yet; I have not build the pre-amp in a case yet so I only soldered a pair of XLR in- and outputs to the pcb.
Scanspeakman
- Status
- This old topic is closed. If you want to reopen this topic, contact a moderator using the "Report Post" button.
- Home
- Amplifiers
- Solid State
- Relaixed2 -- DIY Balanced Pre-Amp Build Report