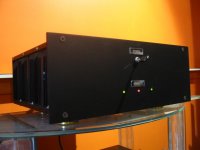
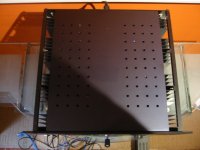
The following are Pics of my current Amp. The Amp has 4 channels for my Biamped speakers that I am building. I dont think may DIY's are using the method of construction that I have used here. The front amd back panels are held together by 4 square section AL rods which have been drilled and taped... I have used this method of case building for quite a few amps.
A unique feature (that I copied ) is that the amp's on-off switch is a Key. I originally thought that it would be a good idea to stop my kids messing with the setup when i wasnt around ( they dont, so the key has never left the hole)
What do you think ?
A unique feature (that I copied ) is that the amp's on-off switch is a Key. I originally thought that it would be a good idea to stop my kids messing with the setup when i wasnt around ( they dont, so the key has never left the hole)
What do you think ?
Attachments
mFinalHeaven:
the case is made from AL that I purchase from a AL reseller. I just ordered the AL cut to my specs - this includes the square bar. To do the rest you need a Drill bench press. After I drilled and tapped the four bars and drilled the panels, I use Steel wool to take out any scratches. The final stage is finding a company that anodises the AL. I hope this helps!!!!
Vivek:
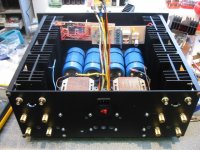
there is only one answer to that question - Fantastic. On a serious note the Amp has plenty of VA in reserve. I like to build amps with over speced power supplies - to me the always sound better. The Amp has 800VA power and Audio output @ 8ohms is approx 70wrms X 4.
the case is made from AL that I purchase from a AL reseller. I just ordered the AL cut to my specs - this includes the square bar. To do the rest you need a Drill bench press. After I drilled and tapped the four bars and drilled the panels, I use Steel wool to take out any scratches. The final stage is finding a company that anodises the AL. I hope this helps!!!!
Vivek:
there is only one answer to that question - Fantastic. On a serious note the Amp has plenty of VA in reserve. I like to build amps with over speced power supplies - to me the always sound better. The Amp has 800VA power and Audio output @ 8ohms is approx 70wrms X 4.
Hi Lisandro_P
The Operation of the Power switch and LEDS may not be obvious. The Middle LED indicated Mains Power is on. The Left and Right Leds are connected across the 2 rails. As long as Ive built Power amps, ive always had 2 leds for power - I dont really know why.... The power Key only has 12V to it. Their is a small transformer which supplies 12 all the time and when the the is activated, a 20A relay applies power to the main Transformers - Im curious to find out if anyone else has used this method for Power On.
The Chrome plates that say "power" and "standby" were purchased from a Trophy Shop. 15 years ago i would have used rub on letters, but i cant seem to buy these any more. Is this other peoples experience or are they just not available in AUS?
BTW the extra holes in the back of the amp are from an amp which i started 15 years ago and never finished.. so I just recycled the case.
series 4000
Same as ETI Series 5000 which didnt get a good reputation
I bought 2, then another 4 of them when they where on sale at DSE.
Unfortunatly I had lots of problems.
The driver transistors kept blowing & the
resistors would catch on fire, (I guess
true Motorola would have helped here)
I think you can relace the drivers(469,470??) with MJE340 MJE350 which have a higer rating
I used a couple in PA amps, had problems with the resistor in the zobel overheating then falling out after the solder melted.
I now have AEM6005 (also desighned by Tilbrook). These are huge improvement
(but the PCB's are quite large)
Did you not mount the T03's on the PCB??
Great job on the case, my cases always look like crap.
Hi Steverb
I meant to say series 5000 of course!. Ive always found this module to be very reliable. The version in this amp are the AEM version but i dont think that they differ electrically to the ETI version
I dont think i know the 6005, what year did it come out?. what does it use for output devices? i would like to know more about your amp.
2 modules have PCB mounted Mosfets and 2 modules have them mounted directly on the heatsink.
BTW where do you live?
Mesh said:The Chrome plates that say "power" and "standby" were purchased from a Trophy Shop. 15 years ago i would have used rub on letters, but i cant seem to buy these any more. Is this other peoples experience or are they just not available in AUS?
The rub-on letters were called Letraset and they are very rarely available. They will be new-old stock if you see them anywhere - the kind that has been in the inventory a long time. They used to be used for pasting up camera-ready artwork for printing posters and the like. With the rise of desktop publishing and the laser printer, there just isn't a need for them. Besides, the engraved plates you have look much classier.
") ensen.
ensen.AEM600x Amps
Hi Mesh,
Check your email. The AEM6005 came out in April '87 I believe. It was based on the AEM6000 (which came out in June '86) but with a different PCB layout, designed as an upgrade for AEM5000 users. It used the same output MOSFETs as the 5000 (whatever those were; FWIW the 6000 used 2SK176 / 2SJ56), so that they could be reused. Some people, myself included, are working on a slight re-design of the 6000 for use with modern semiconductors, etc. Unfortunately some potentially important and useful details are in the original articles, which can be hard to find. I have some of the AEM600x articles thanks to whitetrash, but am still looking for AEM June, August & September '86 (parts 1, 3 & 4 of AEM6000). I realise that since you're asking you probably don't have them, but maybe somebody reading this can help us out. Some more information can be found in this thread: http://www.diyaudio.com/forums/showthread.php?s=&threadid=16681
Feel free to fire me an email if you have further questions you'd like to take off-line (piertr[at]hotmail.com).
Cheers!
Hi Piertr
You are bringing back some old memories.... The Case you see above was originally built for the AEM6000 some 16 years ago. I actually took out the 6000 modules still attached to the heatsink to refit with my 4 channel AEM modules. The AEM 6000 was the last (uncompleted) project before I gave up DIY 16 years ago...
I didnt continue with the 6000's as I wanted 4 channel. I dont have the AEM articles but may know someone who does if you are still interested - let me know. If you like I could post a pic of my 6000 modules (for curiosity). They contain the Hi power Fets. If your interested you could have them for a very good price.
I read the Thread you had a link to - very interesting
- Status
- This old topic is closed. If you want to reopen this topic, contact a moderator using the "Report Post" button.
- Home
- Amplifiers
- Solid State
- Pics of my new 4 Channel AMP