Hi all 🙂
I'm sure some of you have seen the so called Spiral Horn design to speaker box enclosure as outlined by M. Takenaka in his website. On one of its pages he went into saying that higher Qts speakers in general should work very well in a Spiral Horn design, although failing to give theoretical justifications. Well, when I think of high Qts I think of the W/FR125S speakers from CSS (being from BC after all), so I decided to go for a spiral horn speaker for my newly planned computer audio rig. Hopefully this would also help complement Dave's growing list of viable FR125S box plans.
I've contacted Mr. Takenaka and he mentioned having heard OF these new CSS speakers. His suggestion was to build a Linear Model L100 spiral horn (from his website) with some slight enlargements to the box. The spiral itself, he said, need not be re-calculated. This is perfect since the L100's height of ~45cm is the height of most 19" LCD monitors, including mine. These should therefore be asthetically pleasing as computer speakers, provided that the bass is not too overwhelming for near-field.
What can I say? Why do it when the FR125S has already very good bass in BR enclosures? Dare to be different I guess. I am making these out of curiosity more than anything else.
I dropped by my local Home Depot this evening to buy the pipe segments and the winding wire for the spiral, as well as ordered a piece of 4'x4' ply to be cut to my plan. The lumber person grumbled somewhat but eventually succumbed to my endless barrage of "it's just straight cuts" 🙂 Don't let them stop you from exploiting them!
More to follow, including parts details and pics when I wake up tomorrow...
NOTE: Does anyone have experience building enclosures using LePage's "No More Nails" adhesive? I was hoping to get away without buying any clamps for this project...
Hmmm, I never seen that before. Looks to me like it'd just act like a looooong port. Good luck and let us know how it sounds! 😀
As for the glue, I tried it on a hardwood (oak) and will stick to yellow glue and clamps. Might work gangbusters on softwood or MDF though.
As for the glue, I tried it on a hardwood (oak) and will stick to yellow glue and clamps. Might work gangbusters on softwood or MDF though.
A quick look without research look slike you are simply dividing your port into two sections, effectively making it a dual port design, requiring longer lengths, which is where the spiral helps. Yes? No? Maybe?
Noidster
Noidster
theNoid said:A quick look without research look slike you are simply dividing your port into two sections, effectively making it a dual port design, requiring longer lengths, which is where the spiral helps. Yes? No? Maybe?
Maybe. From what I understand, the original builder set out to create an alternative construction method for rear-loaded horns. He ended up with a horn constructed in a spiraling manner which seem to exhibit 2 advantages:
1) Easy to build with no need of advanced woodworking skills beyond those of building a rectangular box
2) Elimination of standing waves and distortion inside the horn via absence of angular corners and parallel planes
Whether these assertions are true stand to be tested. I'm merely making these out of curiosity. Mr. T seemed to have discovered that this box type operates more on the principles of BR rather than a horn, but the fluid dynamics of a conch-like shape seem to have overcome the problem of conserved sound energy in a BR (ie, low Fh means that the lower range needs to borrow energy from across the wave spectrum, resulting in sags in SPL/Frequency)
the spiral horn..
I spent the better part of a month (actually two weeks if I can remember correctly) tearing the theory of the spiral horn down into something that I could understand. I think if you look at the "spiral horn" as a port, that is the beginning. The port is not divided into two (look at the paths very carefully). The port is a Hemlholtz resonator. Tune it to the Fs of the driver, using whatever software or mathematics you have at hand. Now look at the port as its own system. try to create a spiral horn that will fit the port when wound in Mr. T's fashion, and tune THAT horn to the same frequency.
I think it is a special kind of hybrid. But it does make sense. Tune the port to a frequency, create a horn within the port to "amplify the frequency", and you will get an acoustic gain of that frequency.
Maybe I'm missing it completely but I don't think so. Good luck
If you've completed them , how have you found them to be ?
How's the project goin'
I'm considering building a spiral port myself... loosely based on the same project, but with a pair of cheapie HI-Vi B3s'. They seem to be a nice combo of lowish Fs and high-ish Qts, so theuyll make a good cheap test subject.
I was thinking of tweaking the box to make it more golden-ratio-ish, and redoing the math on the port and spiral... I'd be interested to hear how yours is going.
I wonder if there's a way we can work out some of this using Martin's MathCad worksheets.
On the subject of No More Nails, ordinary carpenters glue only requires around 15psi to set like rock, and you can easily achieve this with something as simple as masking tape. I built a pair of cabinets using the folding mitre technique Terry Cain mentions, and it works perfectly. Also, the glue, as it drys, provides around 5psi of pressure / suction itself, helping still more. So this no more nails stuff could be worth a shot.
Scott
The construction was put on a halt when midterms and stuff came up... I'll be finishing it up soon
Cabinet construction with just 2 clamps and a hand drill requires a lot of enginuity 😉
Cabinet construction with just 2 clamps and a hand drill requires a lot of enginuity 😉
And patience.
It'll take you several days what could be done in one.
Ask Santa for more glueclamps
It'll take you several days what could be done in one.
Ask Santa for more glueclamps
An externally hosted image should be here but it was not working when we last tested it.
I posted some musings on the spiral math in another thread:
http://www.diyaudio.com/forums/showthread.php?s=&postid=763989#post763989
it seems like a cool design to me, if it is implimented properly... I have 2 amps to finish building, and then I can get down and dirty with some carpentry... yaaaay!
http://www.diyaudio.com/forums/showthread.php?s=&postid=763989#post763989
it seems like a cool design to me, if it is implimented properly... I have 2 amps to finish building, and then I can get down and dirty with some carpentry... yaaaay!
I have just discovered using surgical tubing as clamping material. It's cheap (.50/ft) and it disperses the clamping force along the seam much better than clamps do.
An update, an update!
At the eve of Geek making some progress on his FR125S project, I thought I'd share where I stand as well. With pics too! 🙂
First step is building the spirals while I wait for the Home Depot guys to cut some wood for me. This is the initial mess
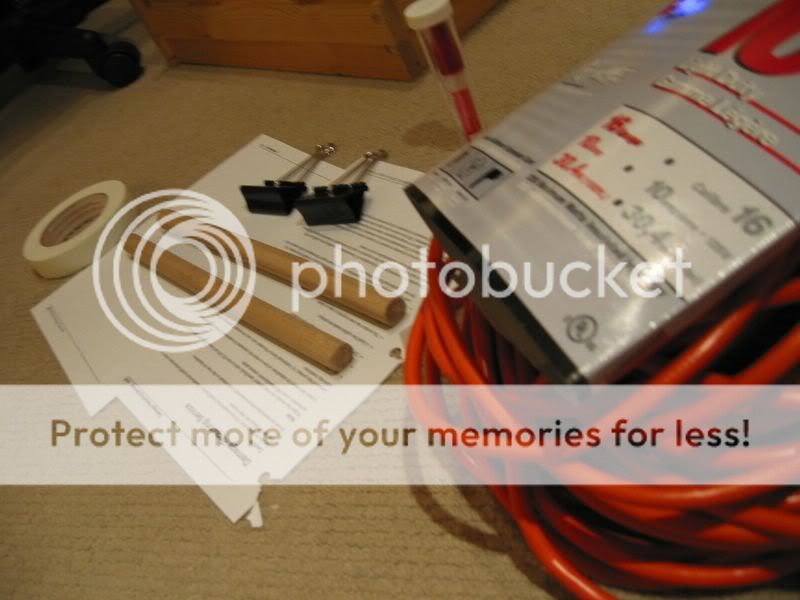
I bought this for my cabtire cable. Cheap ($20 cad) extension cord that'll last me till eternity building these spirals.

Taping the 2 dowels up so I can draw straight lines. An architect's T-ruler really helps

3 windings down. I find that with this cable 5 winds is just about right to fit a 4" ID ABS sewage pipe, which is what I used...and...

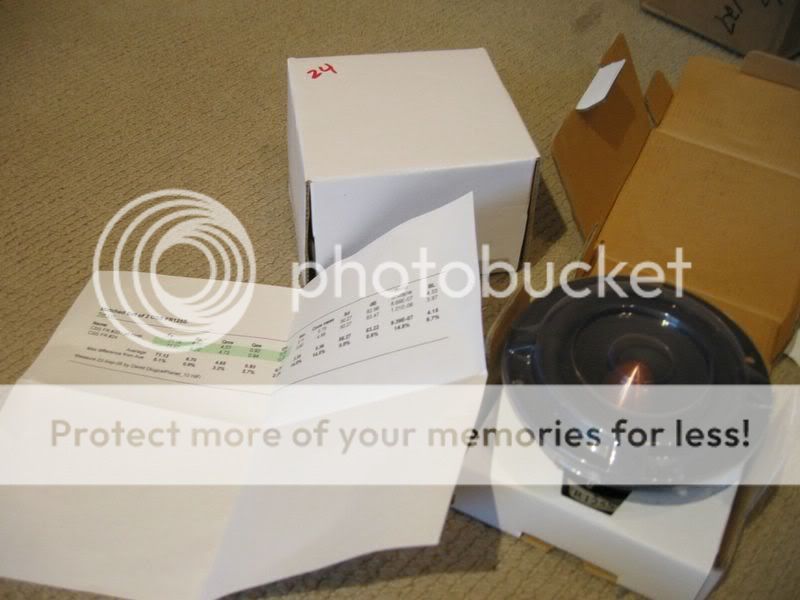
Ding! The mailman arrives with a package from planet10. I open it up to find my FR125Ses! As reputed, planet10 is a really nice person and I felt great buying form him. You get measured T/S params for every driver. Plus, as he had neumerous pairs on hand, he sent me matched ones.
The finished spirals. The one the top left is the first one I did, and you can obviously see how much the winding has improved when I did the second one. Winding these suckers definately gives you a crash course in sweatshop labour. Now I feel like I'm ready for some trannys
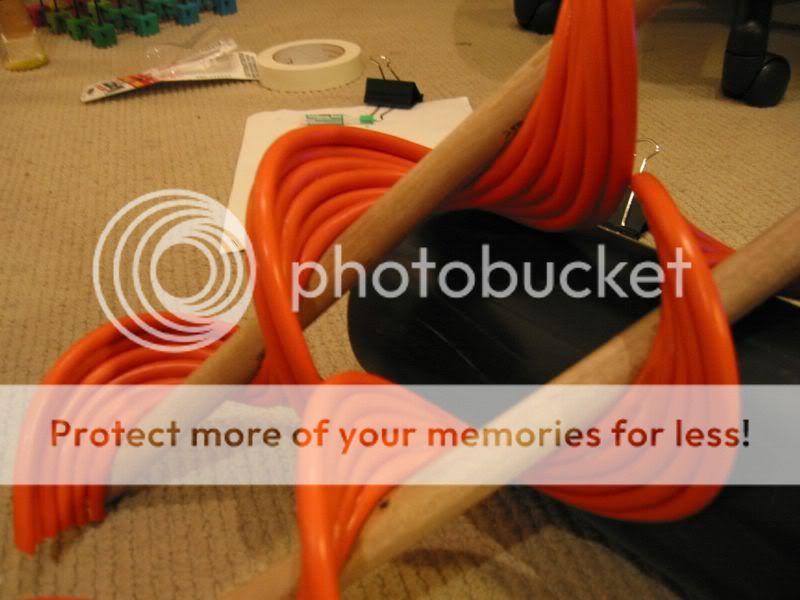
I should point out that cabtire winding is a fairly suitable method in that it is easy to get materials for it and it's fairly easy in its implementation. The only trouble is that the cable is perfectly round (I can't find clat ones) so I had to struggle to get a "feel" of how to wind it perfectly parallel in every tangential plane.
The speghetti aftermath. I figuer I got enough cables left for 2 more pairs.

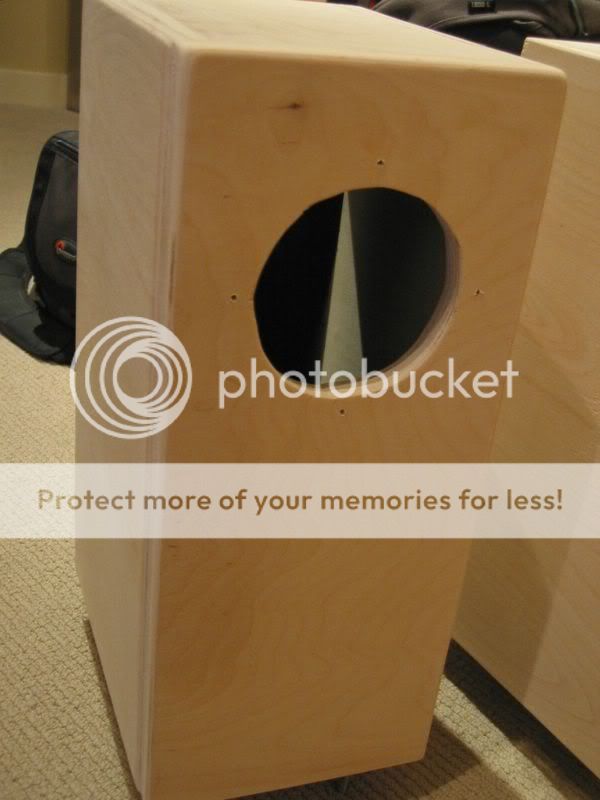
Fast forward to tonight (I got so frustrated doing the woodworking inside my univ apartment that I completely forgot to take pictures). Here's the spirals, inserted in the pipes (via lots of free-flowing epoxy, FUN ), being glued to the half-finished cabs

And yes I did all the woodworking in my living room! In Canada we got public healthcare so I might as well put it to good use by abusing my lungs
NOTE: LePage's No More Nails works miracles! I really sticks to absolutely anything withing half an hour of setting time! Pus it fills gaps while drying and doesn't expand when it's fully dried. Latex based glue rules! I'm using it on everything now.
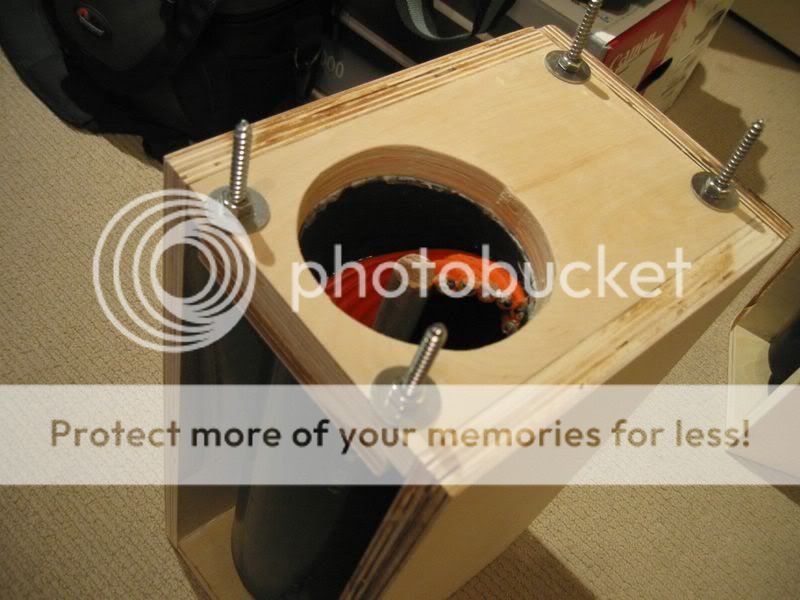
Close-up on the inside of the tubes

Front shot of the cabs, halfway-sanded

Full frontal nudity (insert "bare wood" jokes here)
A shot of the bottom. Note the ghetto speaker feet/spike arrangement. $5 at Homedepot instead of $50 at Partsexpress
And that's where I stand tonight. After I post this I'll glue up the backs and sand it down nice and smooth.
I'm thinking of skipping the painting, as I'm digging the looks of bare wood combined with the elusive looking FR125S. I think that a couple layers of sprayed and buffed varnish is all it needs. The only problem is that my desk is also naturally finished and the shade of the veneer on the cab plywood doesn't match the shade of the stain used on my desk, but I'm too chickensh*t to stain the cabinets to match
Anyways, hoped you guys enjoyed it. More updates to follow in a few days.
At the eve of Geek making some progress on his FR125S project, I thought I'd share where I stand as well. With pics too! 🙂
First step is building the spirals while I wait for the Home Depot guys to cut some wood for me. This is the initial mess
I bought this for my cabtire cable. Cheap ($20 cad) extension cord that'll last me till eternity building these spirals.
Taping the 2 dowels up so I can draw straight lines. An architect's T-ruler really helps
3 windings down. I find that with this cable 5 winds is just about right to fit a 4" ID ABS sewage pipe, which is what I used...and...
Ding! The mailman arrives with a package from planet10. I open it up to find my FR125Ses! As reputed, planet10 is a really nice person and I felt great buying form him. You get measured T/S params for every driver. Plus, as he had neumerous pairs on hand, he sent me matched ones.
The finished spirals. The one the top left is the first one I did, and you can obviously see how much the winding has improved when I did the second one. Winding these suckers definately gives you a crash course in sweatshop labour. Now I feel like I'm ready for some trannys
I should point out that cabtire winding is a fairly suitable method in that it is easy to get materials for it and it's fairly easy in its implementation. The only trouble is that the cable is perfectly round (I can't find clat ones) so I had to struggle to get a "feel" of how to wind it perfectly parallel in every tangential plane.
The speghetti aftermath. I figuer I got enough cables left for 2 more pairs.
Fast forward to tonight (I got so frustrated doing the woodworking inside my univ apartment that I completely forgot to take pictures). Here's the spirals, inserted in the pipes (via lots of free-flowing epoxy, FUN
), being glued to the half-finished cabs
And yes I did all the woodworking in my living room! In Canada we got public healthcare so I might as well put it to good use by abusing my lungs
NOTE: LePage's No More Nails works miracles! I really sticks to absolutely anything withing half an hour of setting time! Pus it fills gaps while drying and doesn't expand when it's fully dried. Latex based glue rules! I'm using it on everything now.
Close-up on the inside of the tubes
Front shot of the cabs, halfway-sanded
Full frontal nudity (insert "bare wood" jokes here)
A shot of the bottom. Note the ghetto speaker feet/spike arrangement. $5 at Homedepot instead of $50 at Partsexpress
And that's where I stand tonight. After I post this I'll glue up the backs and sand it down nice and smooth.
I'm thinking of skipping the painting, as I'm digging the looks of bare wood combined with the elusive looking FR125S. I think that a couple layers of sprayed and buffed varnish is all it needs. The only problem is that my desk is also naturally finished and the shade of the veneer on the cab plywood doesn't match the shade of the stain used on my desk, but I'm too chickensh*t to stain the cabinets to match
Anyways, hoped you guys enjoyed it. More updates to follow in a few days.
And yes I did all the woodworking in my living room! In Canada we got public healthcare so I might as well put it to good use by abusing my lungs
Bwahahahahahaaaa! Love it! 😀
Brilliant use of materials. I pondered on many objects to use, but that pliable extention cord wasn't one of them.
Those cabs look great 😎
Before finishing them with anything, checkout the use of sanding sealer - it'll reduce your headaches quite a bit. For stain, Behr brand oil stains are pretty goof-proof.... even I can use them 😉
Look forward to your updates!
Wonderful -- using the orange firehouse for the spirals instead of the common use of speaker wire is inspiring.
🙂
dave
🙂
dave
nice work, looking forward to hearing your impressions of the final result, especially if you get a chance to compare to a 'standard' BR configuration
morbo said:nice work, looking forward to hearing your impressions of the final result, especially if you get a chance to compare to a 'standard' BR configuration
Unfortunately, I glued the spiral tubes to the base, so right now there's no way to convert them to a normal BR
The BR closest to this project is the one Geek just built. It's similar in construction method and size, except one is BR and one is spiral horn. Maybe there will have to be another BCer FR125S party arranged for some shootouts 🙂
eVITAERC said:Maybe there will have to be another BCer FR125S party arranged for some shootouts 🙂
Yeah, I'm game 😀
I'd love to but I'm not sure I have the room or the equipment to run them on.
What about Al? He didn't seem to host the November meeting this year.
What about Al? He didn't seem to host the November meeting this year.
- Status
- Not open for further replies.
- Home
- Loudspeakers
- Full Range
- The FR125-Spiral project has begun!