Step 1) Parts ordered today. Madisound needs to build the crossovers, but should have it out tomorrow.
Went with premium crossovers fwiw.
I will update this thread with pictures and what I learn, hopefully it will give other newbies (of which I am certainly one) a starting point. Plus I can share all my mistakes, and maybe save some folks the same.
Patrick
Went with premium crossovers fwiw.
I will update this thread with pictures and what I learn, hopefully it will give other newbies (of which I am certainly one) a starting point. Plus I can share all my mistakes, and maybe save some folks the same.
Patrick
Oh, good to know. I decided to use 3/4" plywood in place of mdf. It will cost more, and be heavy as all get out, but stiffer. I did some reading and it didn't seem like ply vs mdf would change the audio properties. Honestly, the weight doesn't matter to me and since I am un-married ") I can stick two huge boxes in my living room and not really need to move them around.
I can stick two huge boxes in my living room and not really need to move them around.
I can stick two huge boxes in my living room and not really need to move them around.Step 2 - Buy Supplies, speakers arrive
I have been remiss in updating this as quickly as I hoped, but here we go.
The speaker kit arrived via UPS from Madisound only 3 days after ordering. Everything was packed very well, no damage to anything, and everything was there. The only question I have was that while the wiring diagram is drawn for bi-wiring and they sent two single cups instead of one bi-wire cup (so 2 cups per speaker). Anyone have any thoughts as to why? I know that is how the original Thor kit was designed, but is there some electronic reason of which I am not aware?
The Seas drivers are quite lovely and look (obviously, but its worth saying) very well built. The cones are a little more grey than a lot of the pictures I have seen indicate - not that there is really any importance, just an observation.
The next step was to go buy wood and stuff. I decided to use 3/4" ply, opting for the oak panel. Build supplies:
2 x 3/4" sheet oak 7 ply (39.99) = $79.98
1 x wood glue = $4.88
1 x qt red mahogany stain = $5.87
1 x qt gloss = $11.98
Total = $102.71
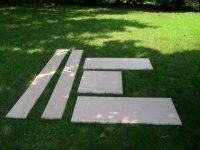
We had Lowe's do the major long cuts on the ply sheets for the side, front/top/back/bottom, and inner braces, which should save a little time at home. Some of the pieces are in the image, you are looking at 2 sides, an internal brace, and 9" strips for fronts and backs.
I have been remiss in updating this as quickly as I hoped, but here we go.
The speaker kit arrived via UPS from Madisound only 3 days after ordering. Everything was packed very well, no damage to anything, and everything was there. The only question I have was that while the wiring diagram is drawn for bi-wiring and they sent two single cups instead of one bi-wire cup (so 2 cups per speaker). Anyone have any thoughts as to why? I know that is how the original Thor kit was designed, but is there some electronic reason of which I am not aware?
The Seas drivers are quite lovely and look (obviously, but its worth saying) very well built. The cones are a little more grey than a lot of the pictures I have seen indicate - not that there is really any importance, just an observation.
The next step was to go buy wood and stuff. I decided to use 3/4" ply, opting for the oak panel. Build supplies:
2 x 3/4" sheet oak 7 ply (39.99) = $79.98
1 x wood glue = $4.88
1 x qt red mahogany stain = $5.87
1 x qt gloss = $11.98
Total = $102.71
We had Lowe's do the major long cuts on the ply sheets for the side, front/top/back/bottom, and inner braces, which should save a little time at home. Some of the pieces are in the image, you are looking at 2 sides, an internal brace, and 9" strips for fronts and backs.
Attachments
Step 3 - Cut stuff with a saw
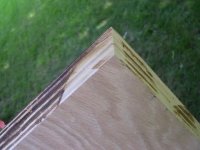
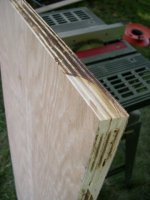
We (my dad and I) decided to join all the corners on a 45° angle, making nice sharp corners all around, so we ripped off all edges except those for the bottom. This will leave us with a nice oak to oak finish, hiding the ply. During this process we also started to match sides, choose fronts, and realize that with the 3/4" ply we probably will not need two internal cross braces.
We (my dad and I) decided to join all the corners on a 45° angle, making nice sharp corners all around, so we ripped off all edges except those for the bottom. This will leave us with a nice oak to oak finish, hiding the ply. During this process we also started to match sides, choose fronts, and realize that with the 3/4" ply we probably will not need two internal cross braces.
Attachments
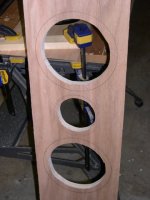
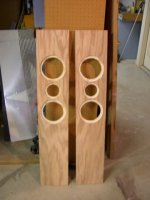
Layout Holes
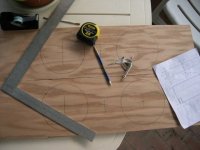
The next step after all the edges were cut down to 45° was to choose a pair of fronts and layout the speaker holes. We took the two that had the nicest grain and no filler, as opposed to picking the ugly ones I guess. Going to the Seas site and downloading the spec sheet for the speakers (links below) gave us the cut out dimensions, and using the plan we had the locations. Since we did not have a super accurate metric ruler we used the bisecting a line method from 9th grade geometry. Yeah baby, who says school was a waste? This gave us the radius to set the compass and off we went.
Spec Sheets from Seas
T25CF-002 (E011) Millennium tweeter
W18E-001 (E018) 7" magnesium cone woofer
Attachments
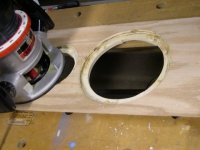
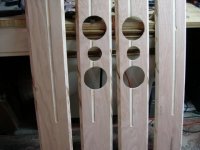
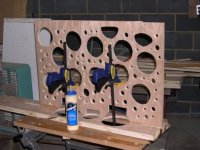
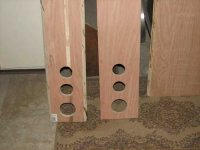
Cutout Holes
Not having large hole drills, we cut out the holes using a reciprocating saw after drilling starter holes. Taking it nice and slow produced good results, and a little sanding will make them pretty close to perfect. And, they will never be seen, so it is not 1000% critical. Having a large hole saw on a drill press would have been nice for this, but unless you are making lots of speakers, or have extra money laying around I was pretty happy with the results of this method.
Not having large hole drills, we cut out the holes using a reciprocating saw after drilling starter holes. Taking it nice and slow produced good results, and a little sanding will make them pretty close to perfect. And, they will never be seen, so it is not 1000% critical. Having a large hole saw on a drill press would have been nice for this, but unless you are making lots of speakers, or have extra money laying around I was pretty happy with the results of this method.
Attachments
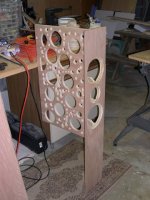
Route speaker recesses
After all six holes are cut out, the next step is to route the speaker recesses. This is where we are currently. Got through 2 holes before we burnt through his old bit. We have since bought a shiny new carbide bit, but I haven't made it back over there to continue. Here is the first two cut outs. We talked about making templates, but only doing 4 holes of one size, and 2 of the other we decided it wasn't worth it. Were I making any more than 1 pair I would say make templates for routing, totally worth it. Otherwise it just takes a lot of patience and concentration. Oh, and don't sneeze.
I will now admit the first f'up of the process much to my embarrassment, but I hope it will save someone else the same. When you are test fitting the drivers in your recesses to check the depth - remove the shipping supports from the driver screw holes. They stick down and will prop the driver up too much. Sounds simple, but it wasn't until we got part way through the deepening of the recess that we both smacked ourselves in the head. No worries, it’s an easy fix; we will use a ring of wood (or several) to prop up the driver in that one recess. So there’s a tip that is worth the price of admission.
Attachments
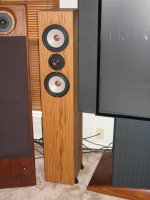
Short Thor
I finished the short Thor's and you will love them. I was lucky and found a specialty "hardwood" lumber company here in town. I used solid Red Oak to make my Thors............ overall they turned out very well. Spend the extra time to do the bracing, it's worth it!
I finished the short Thor's and you will love them. I was lucky and found a specialty "hardwood" lumber company here in town. I used solid Red Oak to make my Thors............ overall they turned out very well. Spend the extra time to do the bracing, it's worth it!
Attachments
Busy busy...
Well, it's been longer than I wanted, but my schedule is a pain, but progress has been made - quite a bit in fact since the last update!
After the fronts were cut out we decided the next step was the front-back braces. So we made a rough template and cut them out. This image is a brace leaning against a side panel. I tried to get all fancy figuring out if we had taken out enough material. Trying to estimate surface area removed. That is silly. Much easier would be to weigh the panel before and during drilling. Reduce the weight by 35-50% and you have hit your target. Note that the panel is too long to fit inside the speaker, and will be trimmed to fit later, hence holes don't go all the way to the back.
Attachments

We made the decision to route a groove in the front, back and top for the main brace. This would provide more glue area and hopefully tie everything together better. This image is a set of fronts and backs grooved. Also note that the brace is not centered, as per the design.
Attachments
The next step after all the grooves were routed, brace holes sanded, and cutting the internal braces to length was to glue the brace to the front. We used our excellent brace gluing jig, aka some clamps and a carpenters square to make sure it was perpendicular.
Attachments
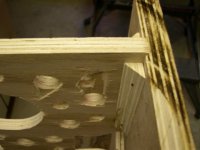
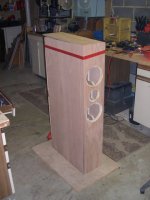
After gluing both here is what you get. A front panel with a brace. You can see the damage done to the ply when it was drilled through. In places where several holes are close 1-2 layers was lost. All this was sanded to remove burrs and loose debris. The size of the speaker started to become aparent for the first time at this stage. These are going to be rather large.
Attachments
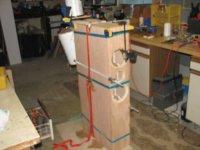
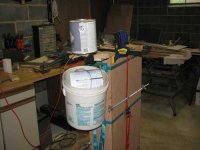
Fancy clamping system. This is the bucket lever 9000, availabe at your better hardware stores. Now we wait for the glue to dry on this one, and the second will be glued hopefully tomorrow. At that point it will be time to start the soldering of the crossover, and the finishing of the boxes.
Attachments
- Status
- This old topic is closed. If you want to reopen this topic, contact a moderator using the "Report Post" button.
- Home
- Loudspeakers
- Multi-Way
- Short Thor Build Thread