After many months, it's now 95% finished ")
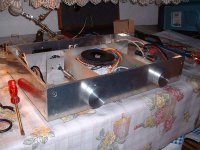
I'm using a TDA7294 with Peter's IGC schematic. Basic metal film resistors, a wima coupling cap, FC supply caps.
The toriod is a 2*18V 225VA, made by Velleman. The diodes are MBR10100 (schottkys).
Signal wire is shielded monacor OFC. Supply wire is a basic 0.75mm² one. Output is Qed Quoudos (not sure about the spelling)
The chassis required a lot of work. A lot! It's made from 6mm aluminium plates. Self made knobs and feets.
More pictures will come during the next few days.
I have 4 solder points to do, and it's finished and fully working.
After this, I'll have to totally finish the chassis (adding damping material under the feets and a led)
I'm also thinking about anodising it, because you can see every fingerprint on it. But I would have to dismount everything...
Attachments


Carlos, where do you see a ground loop?
I'll post a diagram of the grounding when I'll find the time.
There are 3 local grounds in the amp:
-2 power grounds, one on each chip
it's very close to the chip, at the point where the 2 caps meet. They are connected to: the caps, the speaker+, (the muting and stdby circuits ground) and to the diode bridge's ground (this point is the star ground)
-a signal ground, where all the RCAs ground go to. The pot is connected to it. The non inverting inputs are connected to it. And all the signal cable shields. This point is connected to the diode bridge's ground
I can see no loop.
As for the power supply, I twisted the +/- wires together
joensd said:Very nice chassis!
Where did you get your metal parts from?
Cheers
Jens
I got it from a local company who does aluminium windows
Bricolo,
In my experience, it's much better to keep the two chips close one from the other, joint the two power grounds (the caps) and make it the star ground.
It's a question of centimeters, the more you move them apart, the more noise you have.
Close together as I say, the amp is dead quiet.
It's better to join the grounds locally than run a wire from each chip to the PSU.
That is with one transformer.
I switched the scope on.
The amp looks quiet. More than when I tested it without chassis.
Before, I had small 100Hz peaks on the output, now I don't see them anymore.
I have some 50Hz, but the case isn't grounded (when I touch the case, the 50Hz is doubled), and I my portable cassette player has always be an antenna...
The amp looks quiet. More than when I tested it without chassis.
Before, I had small 100Hz peaks on the output, now I don't see them anymore.
I have some 50Hz, but the case isn't grounded (when I touch the case, the 50Hz is doubled), and I my portable cassette player has always be an antenna...
Ouch!
I turned the thing on, and got signal on the right channel, but not in the left one.
They were both connected to 2 10R 10W resistors in //
After 10 secs, I saw (and smelled) some smoke. I immediately switched it off.
After some verifications, the left channel's +in wasn't connected to ground anymore, it was floating. The left channel was oscillating like mad, it burned my 2 10W resistors! (they still work, but they'r not green anymore but 50% green 50% brown)
When I had fixed everything, and controlled twice, I switched it on and the left channel didn't work, no signal. Oh, man! The left channel is probably fired
But I was lucky, it seems that the protection don't simply switch off when you unpuwer the chip. After 2 minutes it worked again
I think it's enough for this evening, I'll continue tomorrow
I turned the thing on, and got signal on the right channel, but not in the left one.
They were both connected to 2 10R 10W resistors in //
After 10 secs, I saw (and smelled) some smoke.
I immediately switched it off.After some verifications, the left channel's +in wasn't connected to ground anymore, it was floating. The left channel was oscillating like mad, it burned my 2 10W resistors! (they still work, but they'r not green anymore but 50% green 50% brown)
When I had fixed everything, and controlled twice, I switched it on and the left channel didn't work, no signal. Oh, man! The left channel is probably fired
But I was lucky, it seems that the protection don't simply switch off when you unpuwer the chip. After 2 minutes it worked again
I think it's enough for this evening, I'll continue tomorrow
My guess is that it didn't work until after 2 minutes because it might have needed to cool down. Could have been thermal protection at work. If that's the case the chip should be undamaged.
I've fried several chips just before the project was finished, it's never fun. Glad to hear you escaped that...
I've fried several chips just before the project was finished, it's never fun. Glad to hear you escaped that...
I'dl like to apply a finish, yes.
Untreated aluminium can't be used as it. I thought I could, but it's not possible.
You see everything on it, a fingerprint, dust, everything!
And it's so easilly scratched! You could even put a screw on it, make it roll, and see a trace (that's just a little exageration).
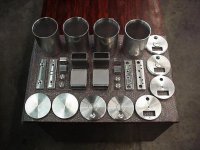
Compared to that, look at the L shaped plates on the inside. They are anodised aluminium, and heavilly anodised. I tried with a cutter and didn't see a mark on it, just one time when I really pressed hard.
But I must find a company that can anodise it. And at last but not least, I must dismount everything :/
So, I think It will stay so for some months. I'll clean it regularely with alcool
Untreated aluminium can't be used as it. I thought I could, but it's not possible.
You see everything on it, a fingerprint, dust, everything!
And it's so easilly scratched! You could even put a screw on it, make it roll, and see a trace (that's just a little exageration).
Compared to that, look at the L shaped plates on the inside. They are anodised aluminium, and heavilly anodised. I tried with a cutter and didn't see a mark on it, just one time when I really pressed hard.
But I must find a company that can anodise it. And at last but not least, I must dismount everything :/
So, I think It will stay so for some months. I'll clean it regularely with alcool
JoeBob said:My guess is that it didn't work until after 2 minutes because it might have needed to cool down. Could have been thermal protection at work. If that's the case the chip should be undamaged.
I've fried several chips just before the project was finished, it's never fun. Glad to hear you escaped that...
I also thought about that, thermal protection. But it wasn't so hot.
It looks undamaged, I hope it is. Now I've got an output signal, but only with the scope I can't tell if it's distorded (at least, I don't see any clear distortion nor clipping)
I'll test with the frequency generator, but I have to find a way to adapt BNC to RCA
Bricolo said:Ouch!
They were both connected to 2 10R 10W resistors in //
my 2 10W resistors! (they still work, but they'r not green anymore but 50% green 50% brown)
I think it's enough for this evening, I'll continue tomorrow
Watch it now, you have two 51 Ohm resistors in paralel for load.
GregGC said:
Watch it now, you have two 51 Ohm resistors in paralel for load.
Lol!
My DMM says 10.0 for both, nice
BTW, I've always been lucky with burnt resistors.
When I first tested the amp with a friend, we only got 2 10R, bur 1/4W. So we tested with them, looked at the output with the scope.
He said:
"Whao, nice for a little chip and 2 tiny caps"
So we put the volume up, worked OK, still up, and up, and up
And at the end, there wat a lot of smoke. OOPS
, we put 50W instead of the 0.5W maximum.The small resistors were metal film, now they are true carbon resistors, 100% pure
And still measure 10R!
That's for my experiences with resistors
Netlist said:Bricolo
Very nice and shiny amp.
Why is the axe of the right attenuator longer than the left one?
Hope you get things right with that burned channel.
/Hugo
The left one is the input selector switch, the right one is a stereo volume pot
Bricolo said:I'dl like to apply a finish, yes.
Untreated aluminium can't be used as it. I thought I could, but it's not possible.
You see everything on it, a fingerprint, dust, everything!
And it's so easilly scratched! You could even put a screw on it, make it roll, and see a trace (that's just a little exageration).
Compared to that, look at the L shaped plates on the inside. They are anodised aluminium, and heavilly anodised. I tried with a cutter and didn't see a mark on it, just one time when I really pressed hard.
But I must find a company that can anodise it. And at last but not least, I must dismount everything :/
So, I think It will stay so for some months. I'll clean it regularely with alcool
Hi Bricolo,
I know there's Aluminium polish available, that way you don't have to clean it that much. Go check at a kitchen supplier, they sell polish for stainless steel and there's a good chance they sell polish for aluminium pan's aswell. Here in holland we've got brand HG that delivers all kind's of polish for home use.
good luck,
Jerry T.
PS. nice work on your GC
- Status
- This old topic is closed. If you want to reopen this topic, contact a moderator using the "Report Post" button.
- Home
- Amplifiers
- Chip Amps
- Mi big gainglone