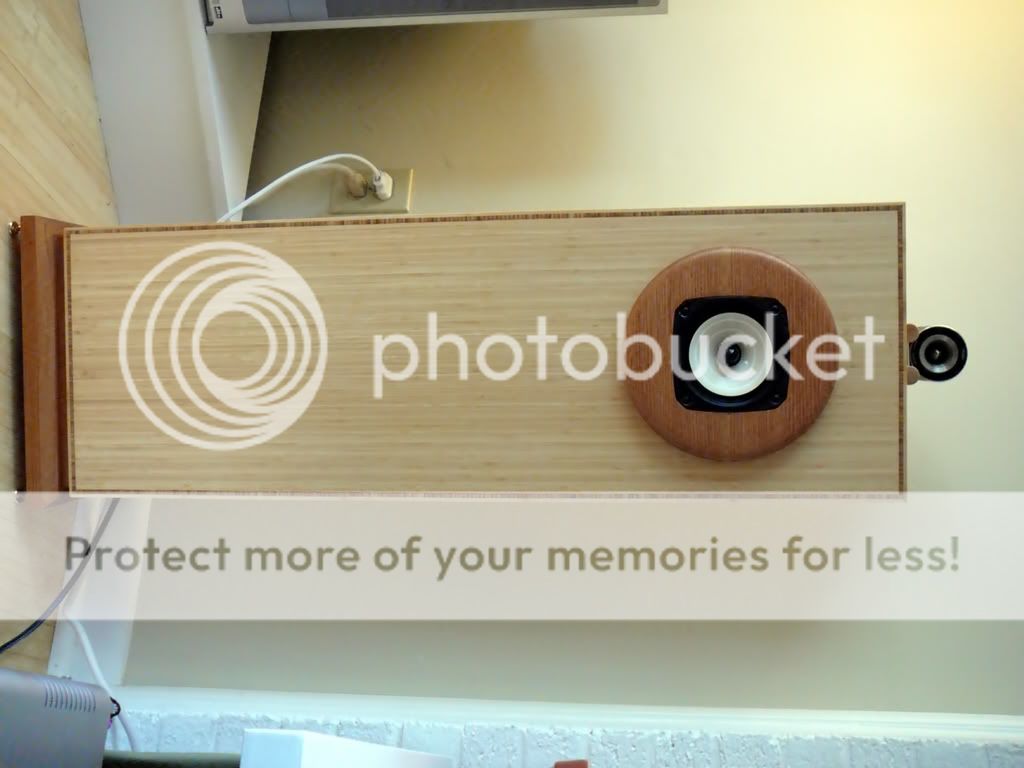
The PAWO is my fourth and final BLH. The first three were my own designs and were OK, but the problem with all three was size. The first pair was built around an 8" driver and was huge - as wide as the PAWO but nearly a foot taller and 36” deep. The second and third were built around 6" drivers and had more compromises in the horn, but were still way too large for my space. So, when I saw the PAWOs on Dave's website about the same time that we replaced our dog-destroyed carpets with bamboo floors, it was love at first sight. I was skeptical about its bass capabilities, but find that driven by the amazing Mike-Bittner-designed Sym-a-sym amp the PAWO has too much bass unless positioned just right. More importantly, the only sound leaving the side-firing mouth is true bass; there's no midrange doubling at all.
My decision to have Chris Bobiak construct a pair of PAWOs out of bamboo plywood turned out to be a good one, as the stuff warps quickly after cutting and the whole cabinet required both his tools and his skills to eventually get right. I can only imagine my dismay if I’d found the expensive plywood unusable a day or so after cutting it into panels.
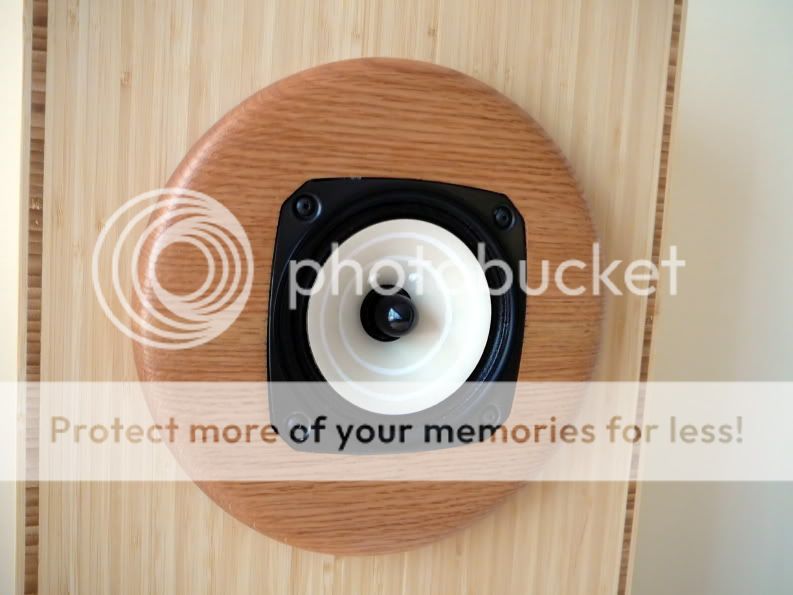
I asked Chris to machine the supra baffle out of red oak, as I’ve found that the combination of oil-finished red oak and “white” woods is both unusual and quite attractive. It also turns out that red oak is very similar in hue to the exposed plywood center ply. Unasked, Chris machined the pedestal base out of a single block of alder, which when finished (surprise, surprise) is almost indistinguishable from the oak. I finished the speakers with four coats of Arrow oil finish and six coats of Watco solvent wax.
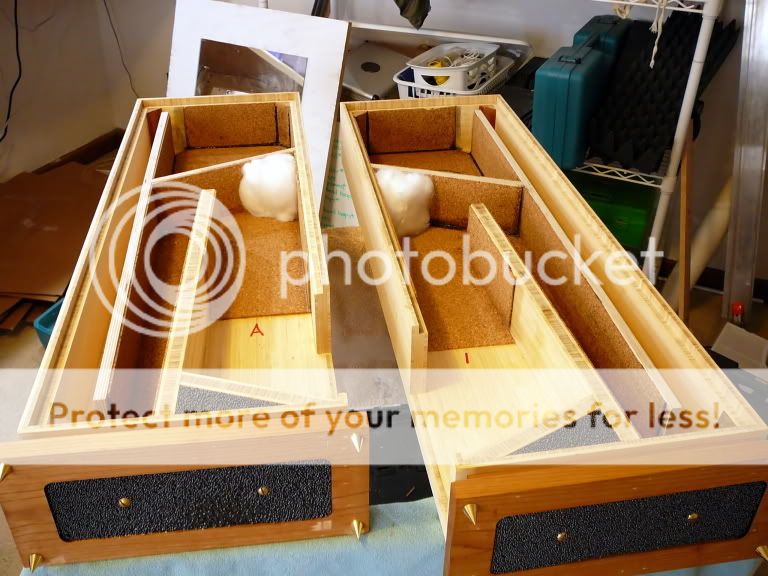
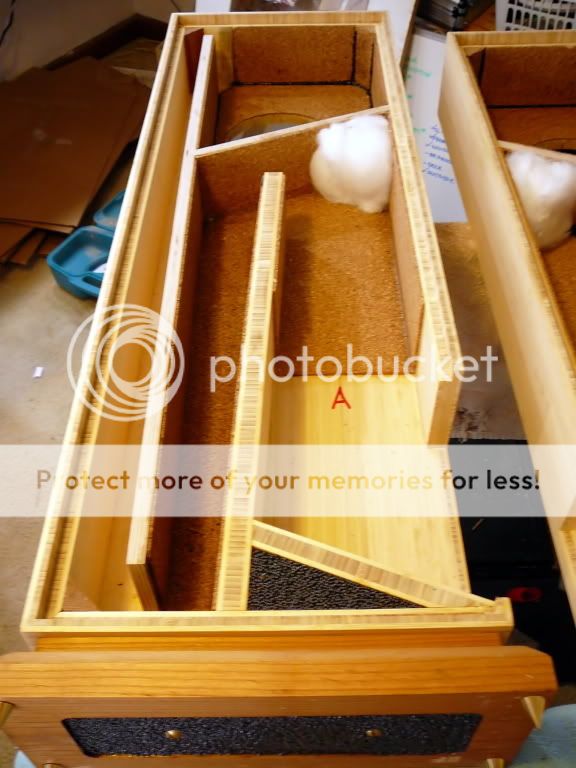
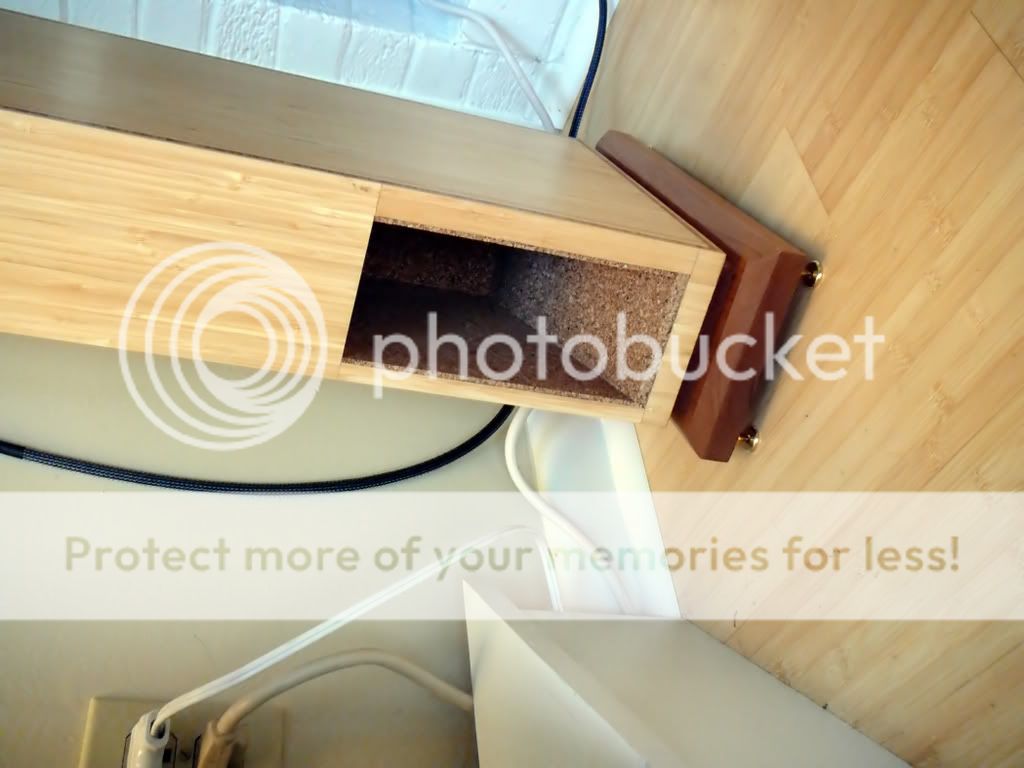
Even carefully balanced on brass cones, the PAWO is so shallow that it can prove tippy. So, after attaching the pedestal base to the cabinet with brass bolts and Titebond glue, I filled the cavity machined into its bottom side with # 9 lead shot embedded in epoxy resin. I also filled the void underneath the reflecting panel in the mouth with the same mixture. I then lined all the surfaces of the horn (except the first section) with 1/8” cork, and covered the entire rear surface of the compression chamber with Fostex reflectors. Underneath the reflectors are two sets of Cardas binding posts connected by Mundorf caps that cross in the Fostex T90A supertweeter at 40K.
Dave provided matched 127s for me, and I performed the following mods:
• drew two 3 mm wide circles on the cone at 9 and 17 mm from the outer edge with multiple coats of a high quality white Japanese ink. I’ve found that this ink penetrates deeply into the paper without bleeding, and when dry stiffens the paper considerably;
• applied three coats of Sobo glue thinned 50% with water in the area between the circles;
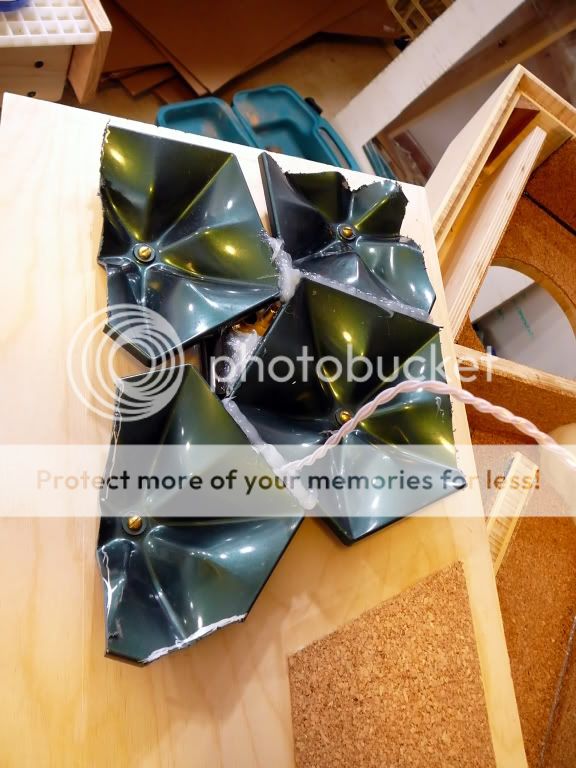
• removed the dust cap and glued wooden phase plugs (copied form Dave’s design) to the pole piece;
• applied 3/16” wool felt pads to the insides of the basket legs;
• applied rope caulk to the outsides of the basket legs;
• applied Ductseal to the underside of the basket flange;
• covered the sides of the magnet with rubber-embedded cork;
• covered the back of the magnet with 3/16” wool felt; and
• very lightly oiled the spider with thin silicone oil.
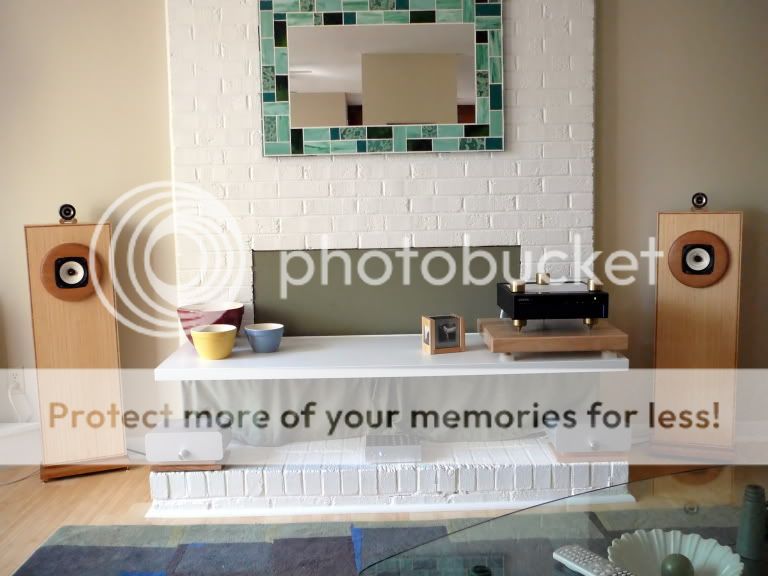
The links are to pictures of the PAWOs during assembly, when finished and in line with the rest of my system, which consists of a modified Meridian 500 transport, a high-resolution, high-output d’Ack 2.0 and Sym-a-sym monoblocs. A PS Audio UPC-200 provides protection and AC conditioning for the amps and an Ultimate Outlet provides conditioning for the transport. All connections are made with Stereovox Studio Series cables.
The combination of the PAWOs and the Sym-a-syms is more than synergistic; it’s incredible. I’m being treated to the most dynamic, focused, timbrally accurate and resolved (while at the same time “relaxed”) approximation of a recorded event I’ve ever heard. And, like no other system I’ve put together, including one employing my beloved triode-wired Quicksilvers (which I still kick myself for selling in order to buy a pair of SETs that never went for more than two weeks without breaking down), the approximation is so immediate and “real” that when I play a good vocal recording my dogs growl and slink out of the room. And, finally, for the first time in over forty years of audio neurosis, can I detect no distracting system artifacts in the sound; within fifteen seconds of hitting "Play" I’m totally entranced by the music.
Thanks, Dave. Thanks, Chris. My quest is over. I don’t believe that it would be worthwhile to waste any more listening time trying to better the PAWO/Sym-sym combination.
George
My decision to have Chris Bobiak construct a pair of PAWOs out of bamboo plywood turned out to be a good one, as the stuff warps quickly after cutting and the whole cabinet required both his tools and his skills to eventually get right. I can only imagine my dismay if I’d found the expensive plywood unusable a day or so after cutting it into panels.
I asked Chris to machine the supra baffle out of red oak, as I’ve found that the combination of oil-finished red oak and “white” woods is both unusual and quite attractive. It also turns out that red oak is very similar in hue to the exposed plywood center ply. Unasked, Chris machined the pedestal base out of a single block of alder, which when finished (surprise, surprise) is almost indistinguishable from the oak. I finished the speakers with four coats of Arrow oil finish and six coats of Watco solvent wax.
Even carefully balanced on brass cones, the PAWO is so shallow that it can prove tippy. So, after attaching the pedestal base to the cabinet with brass bolts and Titebond glue, I filled the cavity machined into its bottom side with # 9 lead shot embedded in epoxy resin. I also filled the void underneath the reflecting panel in the mouth with the same mixture. I then lined all the surfaces of the horn (except the first section) with 1/8” cork, and covered the entire rear surface of the compression chamber with Fostex reflectors. Underneath the reflectors are two sets of Cardas binding posts connected by Mundorf caps that cross in the Fostex T90A supertweeter at 40K.
Dave provided matched 127s for me, and I performed the following mods:
• drew two 3 mm wide circles on the cone at 9 and 17 mm from the outer edge with multiple coats of a high quality white Japanese ink. I’ve found that this ink penetrates deeply into the paper without bleeding, and when dry stiffens the paper considerably;
• applied three coats of Sobo glue thinned 50% with water in the area between the circles;
• removed the dust cap and glued wooden phase plugs (copied form Dave’s design) to the pole piece;
• applied 3/16” wool felt pads to the insides of the basket legs;
• applied rope caulk to the outsides of the basket legs;
• applied Ductseal to the underside of the basket flange;
• covered the sides of the magnet with rubber-embedded cork;
• covered the back of the magnet with 3/16” wool felt; and
• very lightly oiled the spider with thin silicone oil.
The links are to pictures of the PAWOs during assembly, when finished and in line with the rest of my system, which consists of a modified Meridian 500 transport, a high-resolution, high-output d’Ack 2.0 and Sym-a-sym monoblocs. A PS Audio UPC-200 provides protection and AC conditioning for the amps and an Ultimate Outlet provides conditioning for the transport. All connections are made with Stereovox Studio Series cables.
The combination of the PAWOs and the Sym-a-syms is more than synergistic; it’s incredible. I’m being treated to the most dynamic, focused, timbrally accurate and resolved (while at the same time “relaxed”) approximation of a recorded event I’ve ever heard. And, like no other system I’ve put together, including one employing my beloved triode-wired Quicksilvers (which I still kick myself for selling in order to buy a pair of SETs that never went for more than two weeks without breaking down), the approximation is so immediate and “real” that when I play a good vocal recording my dogs growl and slink out of the room. And, finally, for the first time in over forty years of audio neurosis, can I detect no distracting system artifacts in the sound; within fifteen seconds of hitting "Play" I’m totally entranced by the music.
Thanks, Dave. Thanks, Chris. My quest is over. I don’t believe that it would be worthwhile to waste any more listening time trying to better the PAWO/Sym-sym combination.
George
Thanks, Resident and Steve.
I am very pleased with the way they look, but I can't take credit for it. My sole contribution, design-wise, was to specify red oak for the supra baffle. On the construction end, the most woodworkerly things I did were to attach the bases, supra baffle, back, and one small piece of bamboo laminate at the mouth, and then apply the finish.
The credit for the way they look and sound should go to Tom Zurowski, who designed the PAWO, to Dave Dlugos, who recognized the value of the design and, I'm sure, consulted with Chris Bobiak in designing the supra baffle and in the choice of bamboo plywood, and Chris himself, the real woodworking hero of the piece.
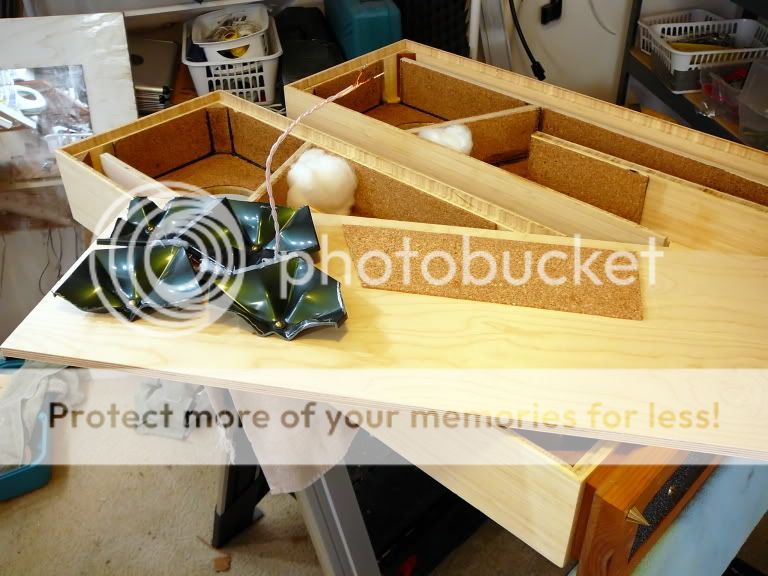
Except for the small pieces you can see in the photo of the mouth, there was no laminate used in the construction. The front, sides, bottom, and several of the interior baffles are 3/4" bamboo plywood. This extraordinary stuff is made by adhering long, roughly 1/4" square bamboo strips together in three layers, the middle layer strips oriented at 90" to the outer layers. The middle layer is what you see along the edges (which is great way to get the decorative value of inlay without all the work). It's extremely strong, stiff but musically resonant, and a bear to work with. I can also imagine that it requires a lot of hand labor to make, which is why it costs $600 - $800 for a 4' by 8' sheet.
The cork is an old Japanese BLH-maker's trick. It absorbs mid to upper range resonances without interfering much with bass resonances. It works quite well.
George
I am very pleased with the way they look, but I can't take credit for it. My sole contribution, design-wise, was to specify red oak for the supra baffle. On the construction end, the most woodworkerly things I did were to attach the bases, supra baffle, back, and one small piece of bamboo laminate at the mouth, and then apply the finish.
The credit for the way they look and sound should go to Tom Zurowski, who designed the PAWO, to Dave Dlugos, who recognized the value of the design and, I'm sure, consulted with Chris Bobiak in designing the supra baffle and in the choice of bamboo plywood, and Chris himself, the real woodworking hero of the piece.
Except for the small pieces you can see in the photo of the mouth, there was no laminate used in the construction. The front, sides, bottom, and several of the interior baffles are 3/4" bamboo plywood. This extraordinary stuff is made by adhering long, roughly 1/4" square bamboo strips together in three layers, the middle layer strips oriented at 90" to the outer layers. The middle layer is what you see along the edges (which is great way to get the decorative value of inlay without all the work). It's extremely strong, stiff but musically resonant, and a bear to work with. I can also imagine that it requires a lot of hand labor to make, which is why it costs $600 - $800 for a 4' by 8' sheet.
The cork is an old Japanese BLH-maker's trick. It absorbs mid to upper range resonances without interfering much with bass resonances. It works quite well.
George
Invitation
I've got to get back to my parts sale, and my mail server has been balky for the last couple of days, and I'm somewhat embarrassed by this post, so I'll try to be brief (not my forte).
For 40 of my 60 years I did semi-pro vocal work. Mainly chorus, but occasionally a lieder solo or two. As any vocalist will tell you, that means I both hear and listen pretty well. I've also found that two things put me in direct touch with God - backpacking in mountainous wilderness and music. So, for me, listening to music is an intensely important and meaningful activity, and I am very sensitive to anything in the sound that distracts me from the spiritual/emotional experience.
Most of the components of my system were still new when I finally got the Sym-a-sym monoblocs working, so one thing I can tell you is that I'm now a believer in the "breaking-in" phenomenon. (It makes sense, I guess, the flow of current slowly "repairing" the myriad metallic fractures and discontinuities that occurred during the manufacturing/construction/setting-up process.)
But I really wasn't ready for what I'm (not?) hearing now, or the fact that something is better about the sound every day that I listen. And it's not just me. Yesterday, I was sitting on the sofa, transfixed, until out of the corner of my eye I noticed that my Border Collie and Greyhound were both sitting up, necks extended, ears erect. They were listening. I know they were listening because they were turning theirs heads slightly in order to follow the creatures and machines moving between the speakers on one of the musical tracks of my old Chesky test disk.
Anyone who ventures close to Cary (Raliegh), NC, please drop me a line and I'll tell you how to get here. I need some human assurance that I'm not going crazy.
George
Beautiful system, well done! How much difference do you think your driver mods made from the stock?
Yup, I think there are one or two people waiting for answers!")
I've got to get back to my parts sale, and my mail server has been balky for the last couple of days.
Yup, I think there are one or two people waiting for answers!
Re: Invitation
But the credit goes also to you that wanted to build sth like this and add all the mods you have in mind!
Yes, in the beginning I was wondering where the letter "ef" has gone!Colescuttle said:
The credit for the way they look and sound should go to Tom Zurowski, who designed the PAWO, to Dave Dlugos, who recognized the value of the design and, I'm sure, consulted with Chris Bobiak in designing the supra baffle and in the choice of bamboo plywood, and Chris himself, the real woodworking hero of the piece.
But the credit goes also to you that wanted to build sth like this and add all the mods you have in mind!
I need some human assurance that I'm not going crazy.
Re: Re: Invitation
If you're referring to the walnut inlaid logo*, that pair is residing in Alert Bay, BC (on the very wet coast) . There is quite a story behind the combination of supra baffle and FE127E in this design.
*= graphic representation of "phi" - ask Dave for the phull story
resident said:
Yes, in the beginning I was wondering where the letter "ef" has gone!
But the credit goes also to you that wanted to build sth like this and add all the mods you have in mind!
If you're referring to the walnut inlaid logo*, that pair is residing in Alert Bay, BC (on the very wet coast) . There is quite a story behind the combination of supra baffle and FE127E in this design.
*= graphic representation of "phi" - ask Dave for the phull story
pinkmouse said:How much difference do you think your driver mods made from the stock?
PM: From the experience i have had with the FE127s i have been modding (similar tacts -- and George took his further in some respects), you cannot listen to the stock drivers after being exposed to modded ones.
As well, EnABL takes them a further step up the quality ladder.
From Jesse (the other fellow with bamboo PAWOs -- and, IMHO, he doesn't mention the biggest plus which is increased downward dynamic range):
The EnablED drivers are in. They DO sound better – MUCH!
Cleaner in the upper regions, more solid in the lower-mid. Better tonal balance.
As far as I am concerned, this is an A+ upgrade.
George: A recent accident with some dust caps had us installing phase plugs (i'm now 2 for 6 with the brave help of the FE127 PP thread). Initial results seem to have the plugged FE127s easier to overload in the bass. Have you found this at all?
dave
resident said:the Greek letter "phi" ! ... is anyone from Greece over there?!
The phi comes from the name that a buddy & I attached to our 1st speaker building enterprise when we were in University -- Gork & Merkle McPhee Audio. Not much of that could be resonably retained in today's enterprise. When i went searching for a logo, the combination of that, my only trip off the North American continent which was 2 weeks with Greek friends on Cyprus (Greek Cypriots consider themselves more Greek than Greeks) where i made a habit of reading any sign i could (best word in the Greek alphabet is hamburger), and that phi is the symbol for the golden number (i am a math major) all lead to the adoption of the phi as a corporate logo.
dave
It can be dealt with.
Yes. I think because there are holes in the former that are designed to allow the dustcap to depressurerize, and when there's no dustcap it's like having unintended vents into your compression chamber. This seems to allow the cones to over-excurd (God, I love tech talk). I pretty much fixed the problem by wrapping vinyl tape around the base of the phase plug until there is only a tiny gap between the taped section of the plug and the walls of the former, which cuts down on the venting. There's still leakage, but you can drive the bass harder without over-excurding the little drivers. However, I still filter out any sub-20 Hz signal when re-recording my CDs.
BTW, I discovered early on that the best way to remove the dust cap on the 127 is to first cut a small "window" in the top of the cap. That will allow you to see inside the cap and avoid cutting into the the top edge of the former (where those delicate leads are).
George
planet10 said:
George: A recent accident with some dust caps had us installing phase plugs (i'm now 2 for 6 with the brave help of the FE127 PP thread). Initial results seem to have the plugged FE127s easier to overload in the bass. Have you found this at all?
dave
Yes. I think because there are holes in the former that are designed to allow the dustcap to depressurerize, and when there's no dustcap it's like having unintended vents into your compression chamber. This seems to allow the cones to over-excurd (God, I love tech talk). I pretty much fixed the problem by wrapping vinyl tape around the base of the phase plug until there is only a tiny gap between the taped section of the plug and the walls of the former, which cuts down on the venting. There's still leakage, but you can drive the bass harder without over-excurding the little drivers. However, I still filter out any sub-20 Hz signal when re-recording my CDs.
BTW, I discovered early on that the best way to remove the dust cap on the 127 is to first cut a small "window" in the top of the cap. That will allow you to see inside the cap and avoid cutting into the the top edge of the former (where those delicate leads are).
George
Re: It can be dealt with.
Pretty much the way i've always done it... the 1st batch of FE127s that we killed all had the black glue from attaching the dustcap splattered on the inside of the dustcap... death came from cleaning that up so it wouldn't interfere with the phase plugs.
dave
Colescuttle said:BTW, I discovered early on that the best way to remove the dust cap on the 127 is to first cut a small "window" in the top of the cap. That will allow you to see inside the cap and avoid cutting into the the top edge of the former (where those delicate leads are).
Pretty much the way i've always done it... the 1st batch of FE127s that we killed all had the black glue from attaching the dustcap splattered on the inside of the dustcap... death came from cleaning that up so it wouldn't interfere with the phase plugs.
dave
Re: Re: It can be dealt with.
So Dave, are you now prepared to offer PP-ed FE127E's?
(*including the other "standard" mods)
If so, what price?
Doug
planet10 said:
Pretty much the way i've always done it... the 1st batch of FE127s that we killed all had the black glue from attaching the dustcap splattered on the inside of the dustcap... death came from cleaning that up so it wouldn't interfere with the phase plugs.
dave
So Dave, are you now prepared to offer PP-ed FE127E's?
(*including the other "standard" mods)
If so, what price?
Doug
PPed are still under evaluation -- that bass capability is compromised they may have to be considered mid tweeters -- the new treatment also adds another variable. EnABLed 127s are in the works (126s to follow) A limited number of drivers with the old treatment will be offered up EnABLed at no extra charge (they are at least 95% as good as drivers will be with the new treatment). The new updated drivers will be more expensive, but improved enuff that they will offer even better value.
dave
dave
- Status
- This old topic is closed. If you want to reopen this topic, contact a moderator using the "Report Post" button.
- Home
- Loudspeakers
- Full Range
- Serendipity: PAWOs and Sym-a-syms