
How thick/number of plys? Regardless, unless you use 2/3-3/4 cab length vertical strips [~3/4" x 21/2"] turned on edge with interlocking tie bars to create the 'X', then bracing locations follow the same as for driver, vents, i.e. ~1/3rd, 5ths.
Ideally, the top plate [bottom also if spaced up] needs to be rigid/massive, so adding a massive top plate [removable for heavy cabs] is a good plan. For WAF, heavy potted plants and/or slate, marble work well, which I make small recesses to Velcro [industrial grade] them on.
GM
Ideally, the top plate [bottom also if spaced up] needs to be rigid/massive, so adding a massive top plate [removable for heavy cabs] is a good plan. For WAF, heavy potted plants and/or slate, marble work well, which I make small recesses to Velcro [industrial grade] them on.
GM
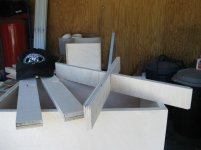
It looks like the ends of your braces are beveled. Are you putting the ends into the corners? The bracing needs to stiffen and subdivide large panel areas, not corners. Ideally into non-symmetric sizes.
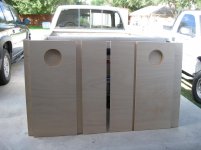
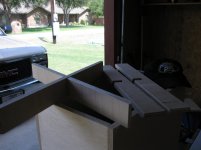
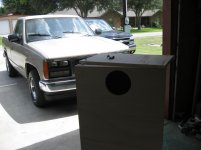
Made some interlocking x braces 2.5x 3/4". Cut top covers.
Are you saying to glue two 3 3/4" strips together. Then place it from top plate to bottom? I'm guessing it would go in the center of box. Or I can put two 3/4 x 2 1/2 x braces at Zd and Zp. Or do both?
No, I meant the stiffeners should be ~0.67x - 0.75x the internal cab height cut from either 1x3 stock or from scrap ply. Corner joints are ‘hot spots’ of rigidity, so no need to run the bracing the entire length and in theory it’s acoustically undesirable.
One would be glued on edge to each side wall and back and ideally offset in some golden or acoustic ratio to randomize [average out] panel resonances rather than sum them into a series of harmonic structures that may cause the cab to comb filter [‘sing along’] with the driver’s output.
If the cab’s panels are so large that dividing them in two yields one > ~12” wide, then a second set of vertical and/or ‘X’ frame braces is required. At this point, ‘window’ braces may be preferred from a construction POV.
The ‘X’ braces are tied to these at ~3rds and/or ~5ths to ensure the walls can’t ‘breathe’ regardless of driver, vent location. If the cab’s cross sectional area is > 12” square [> 144”^2], then do the same to the top and bottom plates as well as mass load them as required.
WRT vertical bracing to tie the top and bottom to the four sides, this is a good plan when the cab’s cross sectional area is > 12” square [> 144”^2] and again it ideally needs to be offset at some golden or acoustic ratio, so if also used as a driver brace, then ideally the driver should be offset on the baffle at the same ratio.
Since it’s also a good plan to offset the driver on the baffle to randomize its eigenmodes [standing waves], it seems reasonable that if the baffle is too narrow to offset the driver, then a centered vertical brace isn’t required either except as a driver support and even then it should be offset.
GM
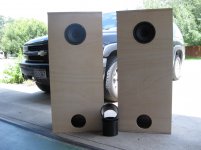
The cutout for flush mounting the BestyK is 1/4" deep x 8 5/16" dia. The cutout for the speaker is 7 3/8" dia. Metric is .625 deep x 211.138 dia. Speaker cut is 187.325. I cut the recess for the flush mount 1/4 deep. Then kept moving the jig smaller until the recess was 1/2" wide. Then cut the 7 3/8 cut.
I had to buy alot of tools. I bought some second hand. The jig I bought for the router sure made it easy to cut the port and speaker holes. Hope that helps.
Mark
BTW, I had 19mm plywood. You might have to adjust depth if you use thinner wood.
I had to buy alot of tools. I bought some second hand. The jig I bought for the router sure made it easy to cut the port and speaker holes. Hope that helps.
Mark
BTW, I had 19mm plywood. You might have to adjust depth if you use thinner wood.
Last edited:
The cutout for flush mounting the BestyK is 1/4" deep x 8 5/16" dia. The cutout for the speaker is 7 3/8" dia. Metric is .625 deep x 211.138 dia. Speaker cut is 187.325. I cut the recess for the flush mount 1/4 deep. Then kept moving the jig smaller until the recess was 1/2" wide. Then cut the 7 3/8 cut.
I had to buy alot of tools. I bought some second hand. The jig I bought for the router sure made it easy to cut the port and speaker holes. Hope that helps.
Mark
BTW, I had 19mm plywood. You might have to adjust depth if you use thinner wood.
Thanks, really helps!
In room testing has started. Impressed, you bet!!! The bass is clear no adjustments needed. I tried a few of my stronger bass heavy lp's Just to see if they boom. Clean and precise. I have them weighted down with 14.5 lbs. each. The betsy k's are new so I'm going to play them for a few days. I made some mistakes here and there and had to redo. For the outcome it's worth the time and materials. This was my first full speaker build. I have to give thanks to GM for all the info and help. And thanks to Fastbike1 for catching a mistake. Now when are they going to be finished?
Attachments
- Status
- This old topic is closed. If you want to reopen this topic, contact a moderator using the "Report Post" button.
- Home
- More Vendors...
- Wild Burro Audio
- MLTL- Betsy k