Hi all,
I had been searching for a td160 and rebuild a dual CS16. I did read Kevins threat and decided that for now I will spend some more money and buy one of those great vintige turn table designs.
Top on the list TD124, second Garrard 401 and third Garrard 301.


To my surprise I managed to buy a td124 in visual top condition all ready serviced.
It came in yester day it looks super as for beying older then 42 years I am 43 years and also look yust as new as the td124 .
.
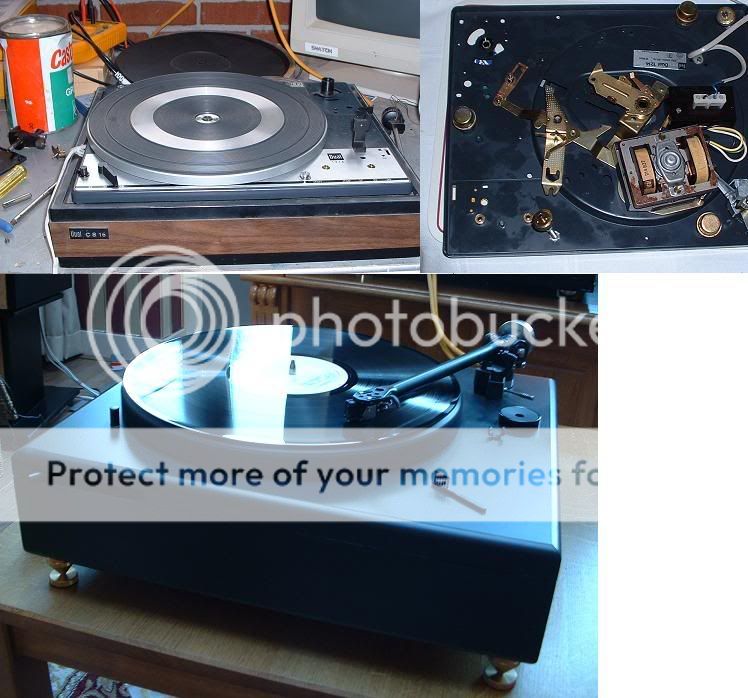
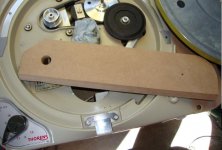
The service job on the TT wasn't more that a dusting one I believe I see a defective capacitor of 10nF it is become thicker like we all do when we grow older so he can't help it. And it just can not reach the right max-speed. I already did some eddy-current break adjustment it isn't enough jet. Maybe the idle wheel is worn-down in diameter.
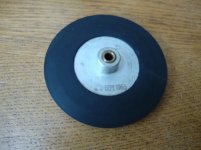
When cleaning the top of the turntable the rubber-plate was made black whit some black polish to look new I removed it right away. Without it look nice semi-gloss.
I just went to my favorite hobby shop they alway do a great job sawing parts precise to my specification and at a normal price.
And see here the RB301 arm came of my first TT project and has "van den Hul" silver tonearm wires.
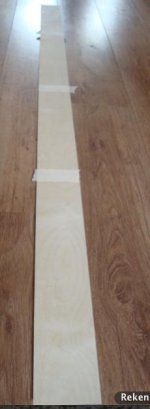
So now I need a template to cut the 5 hardwood plywood plates to create a nice heavy plinth.
The outside is birch plywood the top and bottom is TRESPA a hard material witch will be painted black.
The arm board is of mdf to have the right thickness.
Mann I have to get to work I have to finish my tube amp and build the plinth for the thorens.

I had been searching for a td160 and rebuild a dual CS16. I did read Kevins threat and decided that for now I will spend some more money and buy one of those great vintige turn table designs.
Top on the list TD124, second Garrard 401 and third Garrard 301.
To my surprise I managed to buy a td124 in visual top condition all ready serviced.
It came in yester day it looks super as for beying older then 42 years I am 43 years and also look yust as new as the td124
.The service job on the TT wasn't more that a dusting one I believe I see a defective capacitor of 10nF it is become thicker like we all do when we grow older so he can't help it. And it just can not reach the right max-speed. I already did some eddy-current break adjustment it isn't enough jet. Maybe the idle wheel is worn-down in diameter.
When cleaning the top of the turntable the rubber-plate was made black whit some black polish to look new I removed it right away. Without it look nice semi-gloss.
I just went to my favorite hobby shop they alway do a great job sawing parts precise to my specification and at a normal price.
And see here the RB301 arm came of my first TT project and has "van den Hul" silver tonearm wires.
So now I need a template to cut the 5 hardwood plywood plates to create a nice heavy plinth.
The outside is birch plywood the top and bottom is TRESPA a hard material witch will be painted black.
The arm board is of mdf to have the right thickness.
Mann I have to get to work I have to finish my tube amp and build the plinth for the thorens.
Attachments
Last edited:
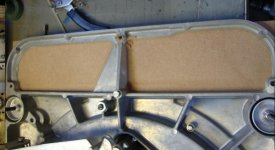
Arm board
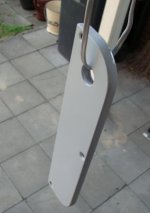
After cutting a 71-322 mm piece of 12mm mdf.
At the inside I made a 30 degree angle.
Then I drilled the two holes at the outside. Mounted the board and at the bottom drilled the third hole for perfect fit.
With the router a copied the radius of the td124 frame. And then copied it to the arm-board.
Now i need a template to place the hole for the RB301.
Attachments
Last edited:
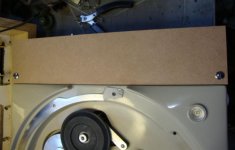
Next step tone arm mount hole and paint.
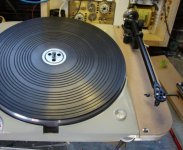
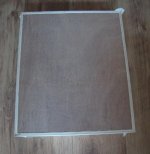
first picture the template with the right radius to mount the rb300. Big hole is the hart of the main bearing and the small hole the center for the tone arm. Fist very nice the VTA will be very near ideal with a lp thickness added.
The no nonsense shape off the RB301 fits the TD124 perfect.
first picture the template with the right radius to mount the rb300. Big hole is the hart of the main bearing and the small hole the center for the tone arm. Fist very nice the VTA will be very near ideal with a lp thickness added.
The no nonsense shape off the RB301 fits the TD124 perfect.
Attachments
-
 Schermafbeelding 2011-05-21 om 17.23.31.jpg50.1 KB · Views: 140
 -
 Schermafbeelding 2011-05-21 om 17.21.49.jpg52.8 KB · Views: 115
 -
 Schermafbeelding 2011-05-21 om 17.21.16.jpg50.7 KB · Views: 130
 -
 Schermafbeelding 2011-05-21 om 17.23.56.jpg56 KB · Views: 139
 -
 Schermafbeelding 2011-05-21 om 17.19.06.jpg17 KB · Views: 135
Last edited:
Congratulations with your TD124 - it's a wonderful deck. Requires some attention - think sports car that has to be tuned, lubed and properly fueled, and then it really delivers wonderful music.
I have found a number of variables that influence sound and playback - and the Thorens restoration thread here was really helpful in that respect, with lots of good advice.
My idler wheels for my MKII are old, and I can't guarantee that they haven't been ground true again, but the diameter is 79mm.
I have found a number of variables that influence sound and playback - and the Thorens restoration thread here was really helpful in that respect, with lots of good advice.
My idler wheels for my MKII are old, and I can't guarantee that they haven't been ground true again, but the diameter is 79mm.
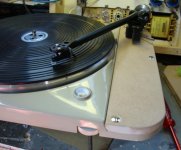
Ok now after this day of work.
Made a design for the plinth gone to the hobby shop and got me what I needed.
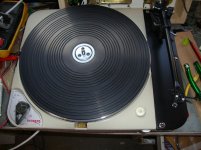
First made the tone arm board. Sanded and painted it, solved the speed problem I only hat to remove the motor and oil the bearings of it. The idler wheel of mine is 80mm. So here the result tonearm plate ready.
I wil make a plan now how to cut out the inside of the hardwood body.
Made a design for the plinth gone to the hobby shop and got me what I needed.
First made the tone arm board. Sanded and painted it, solved the speed problem I only hat to remove the motor and oil the bearings of it. The idler wheel of mine is 80mm. So here the result tonearm plate ready.
I wil make a plan now how to cut out the inside of the hardwood body.
Attachments
Last edited:
Some points to consider.
1. Belts are not just belts. Their rubber composition and tension influence the speed, noise and stability of your deck. With one belt I have a whispering engine, but variable speed; with another I have a little engine whirr, but perfect stability and speed control; with a third I have reduced whirr, but some variation in speed during an evening's play.
2. Clean belts, pulleys, spindle wells, shafts - get rid of old oil, use new high viscosity oil.
3. Find a good balance between belt, the run of your drivetrain (after cleaning and lubing), and the position of the eddy pull magnet. You don't want the magnet interfering too much with the free run of the step pulley.
And here's a 64.000 dollar question:
My step pulley inside does not have the dark semi-circle of dark paint that one sees on a lot of step pulleys. I suspect this is paint that contains ferrous particles, to further increase the effect of the eddy pull magnet - but I'm willing to stand corrected. Someone's cleaned that off my step pulley.
Helmuth:
welcome to the club!
It looks like you are well on your way to having a nice example of the breed.
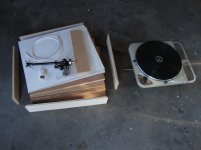
Below is a shot of my first TD124 after initial disassembly and clean-up....including my first motor maintenance session. I was using an upgraded Rega RB250 tonearm mounted to a painted mdf armboard. And a standard Denon DL-103R lomc cartridge. That combination proved to be very good, btw.

I was using the open box plinth that came with the TT. Constructed of 3/4 inch thick plywood. And mushrooms. Many TD124 owners still prefer this type of setup. It did have excellent energy output in this orientation.
Since this photo was taken I have learned to improve the turntable in many small but significant ways. Now it is substantially better than it was on that first "early" listening session.
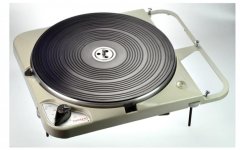
With regard to idler wheel diameters,the exact diameter of that wheel is not critical. Small differences in idler wheel diameter won't affect platter rpm. Platter rpm is determined by the motor rpm,drive pulley diameter, the diameters on the driven step pulley, and finally the inside diameter of the driven platter rim.
On the other hand, condition of the idler wheel is critical. The roundness (circularity) of the outer surface of the tire needs to be good. Fortunately, most of these idler wheels have survived well over the decades.
happy spins...
-Steve
welcome to the club!
It looks like you are well on your way to having a nice example of the breed.
Below is a shot of my first TD124 after initial disassembly and clean-up....including my first motor maintenance session. I was using an upgraded Rega RB250 tonearm mounted to a painted mdf armboard. And a standard Denon DL-103R lomc cartridge. That combination proved to be very good, btw.
I was using the open box plinth that came with the TT. Constructed of 3/4 inch thick plywood. And mushrooms. Many TD124 owners still prefer this type of setup. It did have excellent energy output in this orientation.
Since this photo was taken I have learned to improve the turntable in many small but significant ways. Now it is substantially better than it was on that first "early" listening session.
With regard to idler wheel diameters,the exact diameter of that wheel is not critical. Small differences in idler wheel diameter won't affect platter rpm. Platter rpm is determined by the motor rpm,drive pulley diameter, the diameters on the driven step pulley, and finally the inside diameter of the driven platter rim.
On the other hand, condition of the idler wheel is critical. The roundness (circularity) of the outer surface of the tire needs to be good. Fortunately, most of these idler wheels have survived well over the decades.
happy spins...
-Steve
Last edited:
Steve,
A question - how does one influence the push of the idler wheel against the step pulley? Is this adjustable - there is a certain amount of spring load to the idler wheel assembly, laterally towards the step pulley, but as the idler wheel also connects with the platter wall, I would think that the amount of push against the step pulley was important - in order to avoid any slippage.
@Helmuth - It really looks like someone took very good care of the deck you got hold of. A beauty!
Last edited:
Helmuth:
welcome to the club!
It looks like you are well on your way to having a nice example of the breed.
Below is a shot of my first TD124 after initial disassembly and clean-up....including my first motor maintenance session. I was using an upgraded Rega RB250 tonearm mounted to a painted mdf armboard. And a standard Denon DL-103R lomc cartridge. That combination proved to be very good, btw.
I was using the open box plinth that came with the TT. Constructed of 3/4 inch thick plywood. And mushrooms. Many TD124 owners still prefer this type of setup. It did have excellent energy output in this orientation.
Since this photo was taken I have learned to improve the turntable in many small but significant ways. Now it is substantially better than it was on that first "early" listening session.
With regard to idler wheel diameters,the exact diameter of that wheel is not critical. Small differences in idler wheel diameter won't affect platter rpm. Platter rpm is determined by the motor rpm,drive pulley diameter, the diameters on the driven step pulley, and finally the inside diameter of the driven platter rim.
On the other hand, condition of the idler wheel is critical. The roundness (circularity) of the outer surface of the tire needs to be good. Fortunately, most of these idler wheels have survived well over the decades.
happy spins...
-Steve
Really am I a member now good to hear that.
Nice looking turntables User510. What kind of improvements do you mean witch helped to let the TD124 sound better?
Regards Helmuth
Really am I a member now good to hear that.
Nice looking turntables User510. What kind of improvements do you mean witch helped to let the TD124 sound better?
Regards Helmuth
re: member. Yup. Ownership creates an automatic membership. That way all "members" get to commiserate our triumphs and tradgedies.
re: improvements. That's a long list. And a lot of it is learning from what others around the web have done. I've chronicled my experiences with the TD124 at this link.
TD124 Dept
-Steve
Steve,
A question - how does one influence the push of the idler wheel against the step pulley? Is this adjustable - there is a certain amount of spring load to the idler wheel assembly, laterally towards the step pulley, but as the idler wheel also connects with the platter wall, I would think that the amount of push against the step pulley was important - in order to avoid any slippage.
@Helmuth - It really looks like someone took very good care of the deck you got hold of. A beauty!

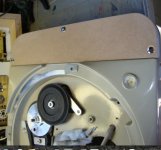
Good question. What holds the idler wheel in position against the driving capstan and the driven inner platter rim?
See above image. There is a position adjust for the cam follower on the large arm. Additionally, there is a long tension spring (pull type) that serves to help retain position of the arm when speed selection is disengaged. That and the rest of the speed selector assembly which serves to position the idler wheel against the selected speed capstain on the step pulley.


I'll let the photos do the talking for me.
-Steve
Last edited:
First thing is to clean and lubricate the motor bearings - this will require disassembly - you'll find all of the information you need to do this on my thread.
I recommend replacing the motor bearings, and Steve (User510) sells good ones. Alternately if they are in excellent condition the originals may be used after a thorough cleaning and relube. The table will not be speed stable, nor get up to speed quickly if you do not go at least this far.
The 10nF cap should be replaced - look for one that is rated for across line service (X, Y or XY cap).
Resist the temptation to adjust anything until you have cleaned and relubed everything (bushings, linkages, etc) - if the turnable is not functioning properly due to lubricant age in most cases once this is addressed further adjustments often aren't required. You'll know once everything works freely whether that is the case. (It was mostly the case with mine, and several of the others I have worked on.)
Welcome to the fraternity. I'm running a Schick 12" arm with ZU Denon DL-103-1 on my restored TD-124/II - I'm pretty pleased with the performance. Slate plinth should finish it soon.
First thing is to clean and lubricate the motor bearings - this will require disassembly - you'll find all of the information you need to do this on my thread.
I recommend replacing the motor bearings, and Steve (User510) sells good ones. Alternately if they are in excellent condition the originals may be used after a thorough cleaning and relube. The table will not be speed stable, nor get up to speed quickly if you do not go at least this far.
Hi Keven.
I haven't had any E50 motor bearings for sale since last October when I sold out my last batch. I have no plans to place another order. So it will have to be others who supply this kind of hardware.
-Steve
Hi Keven.
I haven't had any E50 motor bearings for sale since last October when I sold out my last batch. I have no plans to place another order. So it will have to be others who supply this kind of hardware.
-Steve
Bummer, I've used yours and a couple of others - I had more confidence in yours, but I will admit that the others seem to work just fine as well.
Thorens TD-124 E50 Complete Motor Rebuild Kit | eBay I've used these, they are NOT properly oil impregnated and need to be treated to a hot oil bath before installation or they will SEIZE. (Ask me how I know) These bearings perform very well once broken in.
Here is the other option: E50 Motor Rebuilding Kit for Thorens TD-124 Turntable | eBay I have not used this kit (yet) but have used a bunch of his other parts and so recommend this kit without reservations, and I believe these are ready to be installed without further work.
My experience with motors is that they can take up to 100 hours of running time to break in after a rebuild. I would recommend doing this before reassembling the table fully - and make sure it is WELL lubricated. (Check every day during the run in period) It may be wise to take it apart and clean and relube the bearings after run in - this is generally what all of the "professional" motor rebuilders do. Mine is now approaching 1K hours since the rebuild and I never have to adjust the speed.. EVER...
Last edited:
Some points to consider.
1. Belts are not just belts. Their rubber composition and tension influence the speed, noise and stability of your deck. With one belt I have a whispering engine, but variable speed; with another I have a little engine whirr, but perfect stability and speed control; with a third I have reduced whirr, but some variation in speed during an evening's play.
2. Clean belts, pulleys, spindle wells, shafts - get rid of old oil, use new high viscosity oil.
3. Find a good balance between belt, the run of your drivetrain (after cleaning and lubing), and the position of the eddy pull magnet. You don't want the magnet interfering too much with the free run of the step pulley.
And here's a 64.000 dollar question:
My step pulley inside does not have the dark semi-circle of dark paint that one sees on a lot of step pulleys. I suspect this is paint that contains ferrous particles, to further increase the effect of the eddy pull magnet - but I'm willing to stand corrected. Someone's cleaned that off my step pulley.
I have several TD-124 and not all of them have the red dots or that inside coating on the intermediate (step) pulley.. The earlier units with the integral bronze bearing in the pulley do not usually have the dot, and may or may not have holes, and that semi-circular stripe - my II has both, but the I which I own and uses the same arrangement does not have the dot. The two pre 13K serial numbers I have been restoring (slowly and with hiccups along the way) do not have red dots or holes.. I'm not sure what the purpose of any of these materials is, but I suspect it might be to balance the pulley. The eddy current brake works by inducing currents in the aluminum disk and the less shrouded the magnet is the more current is generated which creates an opposing magnetic field which increases the drag produced by the brake.
Belts are critical on the II, and on later I with the intermediate (step) pulley bearings in the chassis. I have however also discovered that there is a reason why the stuff on the Schopper site looks so shiny - polish the running surfaces until they are as smooth as glass and you get a quiet running machine.
I run tight belts for speed consistency and maximum torque delivery - after all this is what the TD-124 is about.
The most consistent and best performing belts I have identified came from this fellow: THORENS-TD-124,134,135,TURNTABLE BELT -2 for one sale-- | eBay I have installed these on a 4 different TD-124 and they are consistently good so far. They are also the cheapest which just goes to show that the most expensive part may not be the best. I've tried a lot of belts including the OEM replacement which has the nasty habit of degrading rapidly and leaving goo all over the running surfaces. I still have one of the original 40+ yr old belts which is what I use for comparison and is clearly superior despite age to most of the belts I've tried.
The belt will stretch significantly in operation and eventually everything should get pretty quiet if the running surfaces are quiet enough.
The 124 (not the II) benefits from the installation of a motor mount upgrade kit here: http://cgi.ebay.com/Motor-Conversio...262?pt=LH_DefaultDomain_0&hash=item5197f3d0ae The original mounting arrangement allow quite a lot of motor noise to couple into the chassis particularly if the mounting bushings have hardened up or are original.
Note that I have NO affiliation with any of these people and am just sharing what I use and have found to work.
The geltec bushings I am using may also be a worthwhile upgrade on the motor..
Last edited:
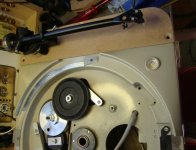
I just took off the belt and idler wheel.
So I have cleaned the pulleys and belt and idler wheel. The inside of the non-machnetic platter were the idler wheel runs hat some sharper spots. So a sand it very loose with a very fine sanding paper and cleaned it so it had a flat smooth surface.
I cleaned the bushing and axle of the idler wheel oiled it again.
And mounted the assembly I can not see signs of wear on this turntable it bin hardly used.
On the idler wheel is a date it maybe say something about the age of the turntable. It says 3 september 1963 it means the table is made between 1963 and 1966. So it would be 48-45 years old. If it is the original one.
Attachments
Last edited:
If you remove the motor capstan to apply oil to the top bearing, then make a note of where the capstan was on its shaft. The position of the capstan affects motor vibrations.
And don't trust the small libelle (level) on the deck. Check that it's true against a good level, used on top of the heavy platter (with the top platter removed). My small libelle was out of horizon by quite a few degrees. If they match, great - if they don't, go with the truer level, if affects drive train efficiency and spindle wear.
And don't trust the small libelle (level) on the deck. Check that it's true against a good level, used on top of the heavy platter (with the top platter removed). My small libelle was out of horizon by quite a few degrees. If they match, great - if they don't, go with the truer level, if affects drive train efficiency and spindle wear.
Last edited:
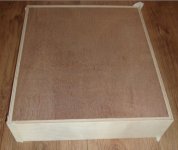
Assembly plinth outside rim of 10mm birch plywood.
First tape the outside to each other. Then turn the inside up bring on the glue. Now fold it together.
To get it perfect 90 degree finish I lay in the bankirai plywood filling just for good fit.
First tape the outside to each other. Then turn the inside up bring on the glue. Now fold it together.
To get it perfect 90 degree finish I lay in the bankirai plywood filling just for good fit.
Attachments
- Status
- This old topic is closed. If you want to reopen this topic, contact a moderator using the "Report Post" button.
- Home
- Source & Line
- Analogue Source
- TD124 mk1 RB301 new plinth and service