Doing these up in Baltic Birch. Had a furniture maker do the rips on his industrial table saw and they came out perfect. Been using my Delta compound sliding miter saw with a nice 80 tooth blade for the cross cuts.
Bought some of those $4 clamps at harbor Freight - boy what a life saver.
Bought some of those $4 clamps at harbor Freight - boy what a life saver.
Last edited:
Some thoughts thus far:
Had considered a plate joiner (biscuits) for joint integrity but this has proven to be unnecessary - yellow carpenter's glue and clamps make a rock solid joint.
Check your saws for square and adjust if needed. Consider having your long rips done by a woodworking pro. All the internal pieces on this build except for the main brace are 6" wide and it really helps if they are all that width.
I started by gluing the top and bottom to the side panel. Get it flush and square and when you go to gluing on the back it will fall into alignment easily.
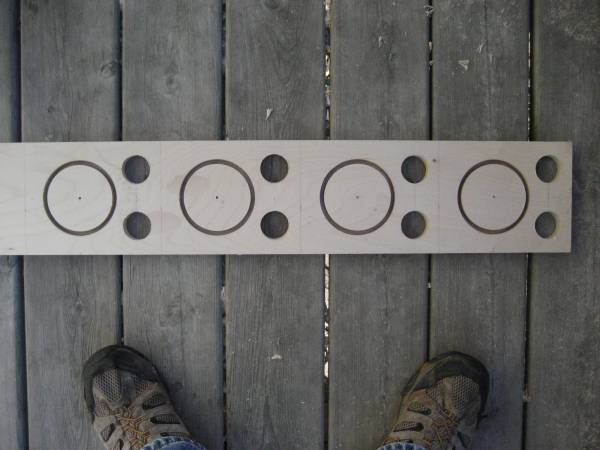
Driver cutouts - I got fancy and measured the rim on the CSS EL 70 driver and found it less than a 1/4" thick so I adjusted the depth on my first cut.
However, I forgot about the gasket and had to free hand the extra depth with my router. Turned out fine. Just do them 1/4" from the git go.
Had considered a plate joiner (biscuits) for joint integrity but this has proven to be unnecessary - yellow carpenter's glue and clamps make a rock solid joint.
Check your saws for square and adjust if needed. Consider having your long rips done by a woodworking pro. All the internal pieces on this build except for the main brace are 6" wide and it really helps if they are all that width.
I started by gluing the top and bottom to the side panel. Get it flush and square and when you go to gluing on the back it will fall into alignment easily.
Driver cutouts - I got fancy and measured the rim on the CSS EL 70 driver and found it less than a 1/4" thick so I adjusted the depth on my first cut.
However, I forgot about the gasket and had to free hand the extra depth with my router. Turned out fine. Just do them 1/4" from the git go.
Last edited:
Those are shaping up nicely! Great job! So great to have found a DIY community that's enabled all of us to build and enjoy our music in ways unimaginable just a few years ago. The development of cabinets and the new drivers is amazing! I remember the days of saying "for $500 i can build a pair of speakers that sound like a $1,000 pair in the store"... I think we could all agree that what's being built by so many of us is so much better than anything for $1,000! Keep us posted on your progress.
Nice build and lovely pics...just watch out for that carpet")
If it aint Hoppes it's TightBond.......................
Made a good deal more progress today. Yes, the internet is a marvelous resource for hobbyists. I maintain my motorcycles largely because of online knowledge bases.
More musings on the Coniston^2's...........
You can make identical parts for both speakers EXCEPT for the side baffles with the drivers in them - they need to be mirror images. Dope it out before you cut the driver holes.
This Baltic Birch ply is good stuff. The 5' x 5' sheets are a hand full but it's very stable and responds well to precision cutting. In that respect it is similar to the "other" popular speaker building material. It glues well too.
I'm pretty lucky with my "farm girl truck drivin wife" in that she let's me parkerize gun parts on the stove, re-jet carbs on the kitchen table and glue speaker cabinets up in the living room.
Last edited:
A few more pics...
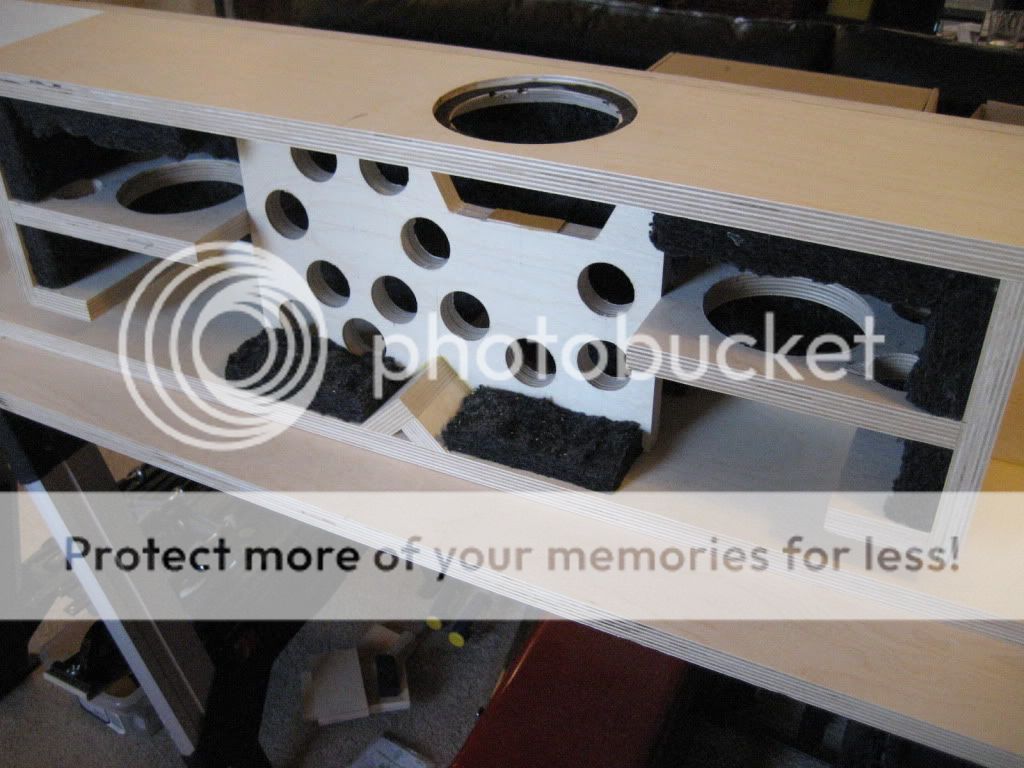
Sub assemblies glued in for front baffle.
Today I'll finish the holey braces. Layed the four smaller ones out and made the holes before cutting them into individual peices - makes it easier to hold the work. Was debating what to use for dampening material but decided yesterday to go with the felt. Have to order it from CSS. With all the work I've put in and the difficulty of trying to stuff through the driver cutouts, it makes a lot of sense to just follow the plan.
Last edited:
Used the router for the 4" holes and a 1-1/2" spade bit for the rest. Put a piece of scrap on the bottom and knelt on it while the bit "chattered" it's way through. Made the lines and extra 1/4" wide to allow for the "kerf" and a trim to fit with the main brace.
Last edited:
Those are shaping up nicely! Great job! So great to have found a DIY community that's enabled all of us to build and enjoy our music in ways unimaginable just a few years ago. The development of cabinets and the new drivers is amazing! I remember the days of saying "for $500 i can build a pair of speakers that sound like a $1,000 pair in the store"... I think we could all agree that what's being built by so many of us is so much better than anything for $1,000! Keep us posted on your progress.
The internet is a wonder for hobbyists! The means of production available to the masses. And all the boot strap businesses that are possible with a world wide customer base. I really like the international flavor of this site. From Scandinavia to the Balkans and over to Asia and down under, audiophiles sharing their knowledge and experiences.
Perhaps the most valuable aspect of forums like this is that they give people the inspiration and confidence to try. That is a very wonderful thing!
Well put!
You can make identical parts for both speakers EXCEPT for the side baffles with the drivers in them - they need to be mirror images. Dope it out before you cut the driver holes.
Yeah, that got me one time too. And you could get by with using the other side as long as you didn't already cut the counter sink or nail it to anything. It happened to me.
I'm glad to see someone else building a pair of these. I think I'm the only one on record who has (that I know of) and I really enjoyed them. The bass from these is just plain absurd. The top end took some time to come alive but after a few weeks it was very pleasant.
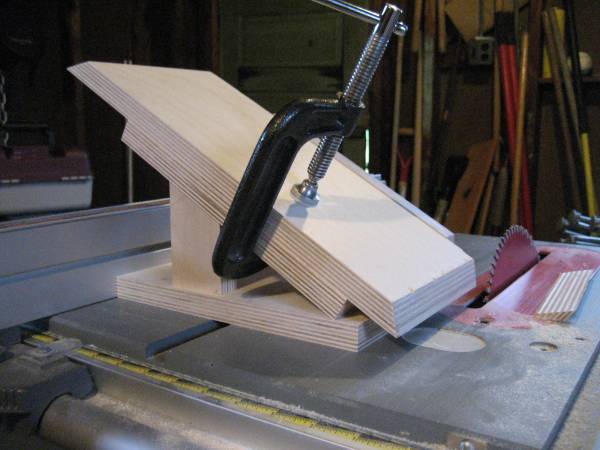
It was your build thread that made me decide on the Conistons. I did not make two identical side baffles. But almost!! Today I got some of the "fiddly" parts done. Made a 30 deg. "sled" for the top and bottom angle pieces so I could cut that 52 deg. angle on the one end. Worked out well. Also did the triangular pieces at the rear of the main brace. There is a way to cut these without losing fingers. I'll post some pics tomorrow.
Well into middle age ( but still game!! ), my hard earned talent for patience has stood me well on this project. The ability to shut it down for the day and think through the challenges is invaluable.
Well into middle age ( but still game!! ), my hard earned talent for patience has stood me well on this project. The ability to shut it down for the day and think through the challenges is invaluable.
Last edited:
Made this 30 deg. sled from scrap so I could cut the steep 52 deg angle on the upper and lower "deflectors". Have to trial fit the brace with the front driver installed. Still kicking around stuffing options. Thinking now about using No - Res on the sides opposite the drivers and then just bamboo cotton batting for tweaking which I can install or remove through the driver holes. Need to order binding posts as well.
Thinking I'll spit coat them with thinned polyurethane and try a tinted polyurethane varnish to match the wood work.
Thinking I'll spit coat them with thinned polyurethane and try a tinted polyurethane varnish to match the wood work.
Found a local source for wool felt. Got a 2' x 4' x 2" thick piece for $10. Was able to split the pieces in half after cutting yielding two pieces about 3/4" thick. Used a little less overall to compensate as the plan calls for 5/8" material.
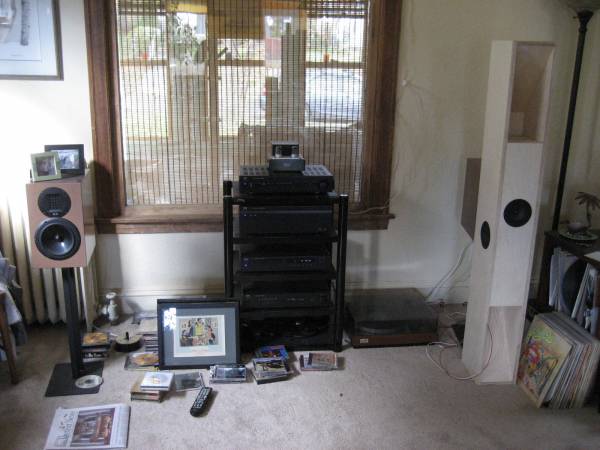
Got one cabinet finished and gave it a listen yesterday afternoon. Initial impressions are very positive. Amazing articulate bass emanating from the upper and lower "horns". Was surprised at how well the single Coniston^2 integrated with my GR Research N2X.
Played a wide variety of music and the speaker handled it all without issue. Phil Lesh's bass notes never sounded better - could actually hear his fingers on the strings sometimes which is definitely a first.
Indications of a wide and wonderful sound stage are there as well but with only the one speaker in play final determination on that will have to wait until I complete the other.
Very cool idea on the angle guide. More work than what I do but most certainly safer.
The way I do it is to set the blade for the complimentary angle (90-angle you want) and cut on the other side of the blade in a vertical alignment. I usually just bind (with my hands) the wood to another scrap piece of wood vertically, and then run them through.
The way I do it is to set the blade for the complimentary angle (90-angle you want) and cut on the other side of the blade in a vertical alignment. I usually just bind (with my hands) the wood to another scrap piece of wood vertically, and then run them through.
Very cool idea on the angle guide. More work than what I do but most certainly safer.
The way I do it is to set the blade for the complimentary angle (90-angle you want) and cut on the other side of the blade in a vertical alignment. I usually just bind (with my hands) the wood to another scrap piece of wood vertically, and then run them through.
The sled was easy to make and will be useful every so often. And the birch ply is perfect material for jigs and fixtures because it is so true and stable.
Necessity is the mother of invention but had I thought of your method I would have given that a try before making the jig.
Should be listening to both speakers later today. Listening to Pink Floyd's Meddle right now. Goose bumps...........
Last edited:
Here are a couple pictures showing where the magic come from ( the box & stuffing ).
I'm finding that I like the side drivers facing out. Improves imaging. There is a timbre and "tok" to the lower mid range that is extremely pleasing and I attribute this to the design of the box and the stuffing. Going to listen for a few weeks to learn their strengths and weaknesses. Can say there is some real good sounds emanating from these. Going to make bases for them today.
An externally hosted image should be here but it was not working when we last tested it.
An externally hosted image should be here but it was not working when we last tested it.
I'm finding that I like the side drivers facing out. Improves imaging. There is a timbre and "tok" to the lower mid range that is extremely pleasing and I attribute this to the design of the box and the stuffing. Going to listen for a few weeks to learn their strengths and weaknesses. Can say there is some real good sounds emanating from these. Going to make bases for them today.
Last edited:
- Status
- This old topic is closed. If you want to reopen this topic, contact a moderator using the "Report Post" button.
- Home
- Loudspeakers
- Full Range
- Coniston^2 Build