Greetings from Wyoming,
I just completed my first DIY tonearm/turntable project. I'll put this up in multiple posts, since there's a fair number of photos.
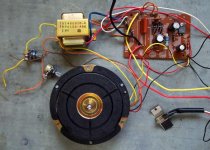
The platter and motor used were scavenged from a Marantz 6170 yard sale find. The Marantz tonearm had issues and I was not impressed with the cheesy plastic and MDF plinth, so I set out to build a 'better' turntable... or at least have fun trying.")
Stripping the 'good parts' out of the Marantz.
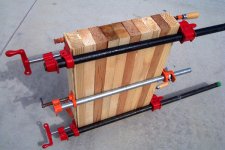
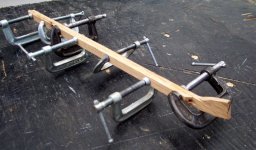
Glueing up pieces of scrap 2x4. The pieces were rough-sized and squared up with my table saw and planer prior to laminating.
I just completed my first DIY tonearm/turntable project. I'll put this up in multiple posts, since there's a fair number of photos.
The platter and motor used were scavenged from a Marantz 6170 yard sale find. The Marantz tonearm had issues and I was not impressed with the cheesy plastic and MDF plinth, so I set out to build a 'better' turntable... or at least have fun trying.
Stripping the 'good parts' out of the Marantz.
Glueing up pieces of scrap 2x4. The pieces were rough-sized and squared up with my table saw and planer prior to laminating.
Attachments

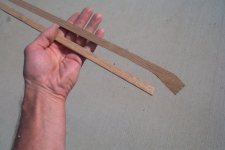
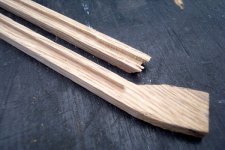
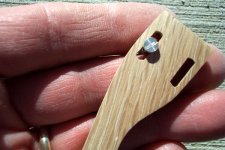
I have a well-equipped shop, but lack a metal lathe. So I opted for a wood tonearm, using oak, since I had some scrap material at hand.
Tonearm wand halves were grooved using a router, prior to laminating. This creates a hollow tonearm, reducing weight and providing a channel for tonearm wires.
Tonearm wand halves were grooved using a router, prior to laminating. This creates a hollow tonearm, reducing weight and providing a channel for tonearm wires.
Attachments
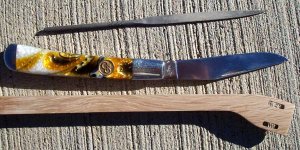
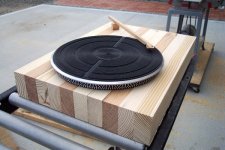
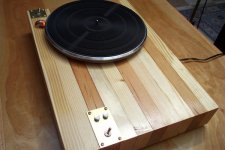
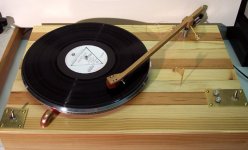
Plinth with platter and tonearm wand resting on it, for a quick visual perspective.
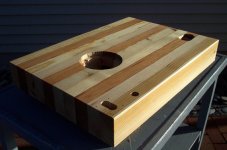
Five coats of Tung Oil finish applied.
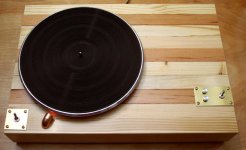
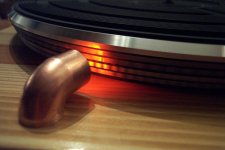
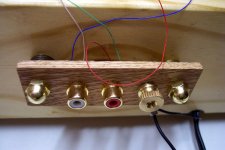
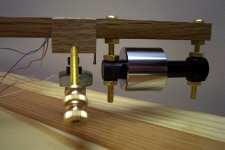
Motor/platter and controls in place. Works great! On/off switch to left. The strobe light is housed in a common copper plumbing fitting. 33/45 speed adjust and selector to the right.
Five coats of Tung Oil finish applied.
Motor/platter and controls in place. Works great! On/off switch to left. The strobe light is housed in a common copper plumbing fitting. 33/45 speed adjust and selector to the right.
Attachments
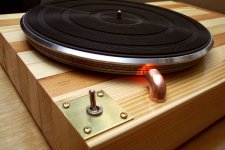
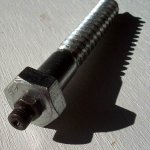
Most parts and materials were either scrap laying around the shop or common parts from the local Radio Shack & hardware store. The exceptions being Cardas tonearm wire and a jewel quality stainless steel pivot and matching sapphire vee bearing.
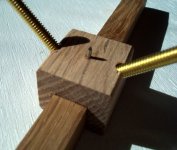
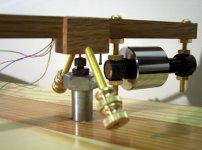
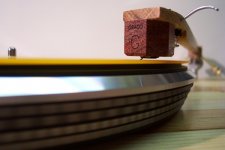
The pivot is securely attached to the tonearm. Pivot point and stylus tip are the same distance from tonearm tube centerline.
The vee bearing was epoxied into the head of an 8-32 socket head bolt. I drilled a deep pilot hole into the head of the monster lag screw and tapped it for 8-32 threads. Using the jam nut, the two bolts are firmly attached together.
Attachments
Tonearm in place.
The large lag screw driven into the plinth is very secure. The vee jewel bearing is adjustable up-down, allowing for variable VTA.
Brass thumbscrews on the outriggers can be adjusted to fine-tune azimuth setting.
The wire brad behind the pivot will provide an anchor point for string-and-weight for an antiskate device, yet to be installed.
The counterweight came from the Marantz tonearm. Note that it can be moved up or down, allowing for precise adjustment of center of gravity (COG). COG was adjusted to be slightly under the pivot point, providing stability without unduly affecting ability to track warped records.
Tonearm has an effective length of 12".
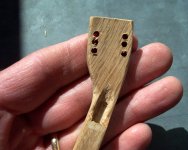
The small board with RCA jacks can be easily removed. A nice feature since my tonearm wires are soldered directly to the jacks.
The large lag screw driven into the plinth is very secure. The vee jewel bearing is adjustable up-down, allowing for variable VTA.
Brass thumbscrews on the outriggers can be adjusted to fine-tune azimuth setting.
The wire brad behind the pivot will provide an anchor point for string-and-weight for an antiskate device, yet to be installed.
The counterweight came from the Marantz tonearm. Note that it can be moved up or down, allowing for precise adjustment of center of gravity (COG). COG was adjusted to be slightly under the pivot point, providing stability without unduly affecting ability to track warped records.
Tonearm has an effective length of 12".
The small board with RCA jacks can be easily removed. A nice feature since my tonearm wires are soldered directly to the jacks.
Attachments
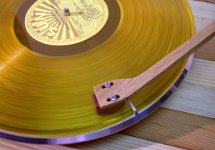
Grado platinum reference cartridge in place and spinning vinyl!
As soon as the needle hit the groove, I knew I had a winner. Excellent clarity and detail to the sound. How does it compare to a 'known quantity?'
I had done vinyl to WAV transfers from two 45 rpm 12" singles by The Cult, and a Classical piano solo LP, using my fully-modded KAB Technics SL-1200 w/Grado cartridge a few days ago. I made the same transfers using the DIY turntable. IMO, the transfers from the DIY turntable exhibit a bit more sharpness or precision to the sound compared to the Technics. Both sound very good. That my DIY tonearm can produce results equalling my Technics thrills me to no end.
I also had my wife, her friend, and our six-year-old great niece sit in for a 'blind' A:B test of the WAV files. They could not detect any difference between the classical piano selections. With The Cult's single "Lil' Devil" they preferred the Technics, citing 'a bit smoother'.
I'm very happy overall with the project, but became aware of a design flaw well into the process. That being the configuration of the headshell. I realized that ideally, the stylus should be positioned precisely in line with the center of the tonearm (COG). In theory, as it was actually built, riding warped records could produce a side-to-side rocking motion, altering azimuth angle. However, in actual practice that is not the case, as the mass of the tonearm is sufficient to resist this effect.
A fun project that was completed within three weeks time.
Attachments
Hi Cactus
Love the TT and unipivot.
Am doing a TT refurb myself at the moment.
I have an arm to use on it, but would love to have a go at one of my own.
Great photos, have saved them in my gallery.
Very inspiring.
Cheers Simon...
Hi Simon and thanks for the comments.
If you're halfway handy with tools, give it a shot. It was a fun project and it's very satisfying to be hearing the results.
Interesting, where did you get the sapphire bearing and how much does it cost?
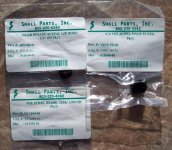
The pivot and matching vee bearing were from Small Parts, Inc. I think if you scroll up and look at the photo of the parts (in plastic bags) you might make out the part numbers. Cost was minimal as I recall, dunno if I could locate the invoice. I bought the parts a couple years ago, and have had this project in the back of my mind for some time. I also bought a small idler pulley from them and plan to use it for string-and-weight antiskate device.
I'm very happy overall with the project, but became aware of a design flaw well into the process. That being the configuration of the headshell.
An excellent turntable,as I can tell by the pictures.But speaking of flaws,there is one more.Why do you use a parallelogram beam for the main tonearm? A quick study in motional physics,will show that ,it is the worst shape for a tonearm,resonance wise. By using a round tube,wooden, metal ,plastic,the resonances generated in the tonearm ,are distributed on the walls in a linear manner and safely routed to the base.
The rectangular tube behaviour in resonance is uncontrolable,it twists the beam and creates problems to the lateral stability of the arm ,in relation to pivot and the cartridge.
B.L.
B.L.,
Thanks for the input, it is appreciated.
As I began this project, it quickly became evident that the laws of physics were an important consideration. Factors such as balance, distribution of mass, and center of gravity, etc.... I lack formal training in physics, so I proceeded based on intuition and 'gut feeling' more than anything else.
Admittedly, the lateral stability of the tonearm could stand to be improved upon. As we know, virtually every record made exhibits some degree of warp and off-centeredness. So, as a record plays on this turntable, there is a slight side-to-side rocking motion to the tonearm, ranging from barely noticeable to more pronounced, depending on the quality of the record and degree of warp. Azimuth is constantly changing as a result, albeit to a very small degree. I'm hard-pressed to notice any audible changes related to azimuth, but that's not to say they don't exist. Overall, it is a very fine-sounding tonearm.
Now that I've successfully built an unipivot tonearm, I'm eager to begin the second tonearm, improving upon the first and further refining the design. So many factors come into play, for example, optimizing the design while accomodating different cartridges which themselves vary in size, shape, weight and position of stylus tip in relation to mounting holes. Type of material to be used? Wood (different types of wood), metal, carbon fiber, or plastic. So many questions, so many choices. But I suppose that's what makes it challenging and fun.
The pivot and matching vee bearing were from Small Parts, Inc. I think if you scroll up and look at the photo of the parts (in plastic bags) you might make out the part numbers. Cost was minimal as I recall, dunno if I could locate the invoice. I bought the parts a couple years ago, and have had this project in the back of my mind for some time. I also bought a small idler pulley from them and plan to use it for string-and-weight antiskate device.
Further information.
Website:
SmallParts.com: The Hardware Store for Researchers and Developers
Cost two years ago was $17.50 for the vee bearing and $4.65 for the pivot.
I was very impressed with the quality of this bearing. During the building process, I had the big lag bolt (w/vee bearing) held in the vise out in my shop. The tonearm (sans tonearm wire) was in place, with cartridge mounted and balanced perfectly. I blew gently on the cartridge. This set the tonearm in motion, spinning very slowly. It rotated for a full five minutes before coming to a stop.
Very impressive.
B.L
Howdy CactusCowboy - Congrats on a great build!!
I'm guess'n you have have seen this linked thread - but juuuuust in case..... http://www.diyaudio.com/forums/analogue-source/173861-my-latest-iteration-nanooks-219-tonearm.html
Nanook has a good thing going here and it looks to be right up your alley for your phase II build.
I'm guess'n you have have seen this linked thread - but juuuuust in case..... http://www.diyaudio.com/forums/analogue-source/173861-my-latest-iteration-nanooks-219-tonearm.html
Nanook has a good thing going here and it looks to be right up your alley for your phase II build.
"Tonearms should be made of wood." my father always said.
Hi Cactus
My father was an engineer in materials and electronics and a big music lover.
He was very much a DIYer in a lot of things (cars, furniture, photography etc. not diyAudio though), and I for sure got the make it yourself bug from him and my grandfather who made his own cameras.
"Make your tonearm out of wood son, t'will be much better."
I think I would conceptualy have to agree.
I have at home a set of well made commercial wind chimes.
They have a nice decay to them, but make no audible sound unless struck by the chimes mallet (not strictly true actualy, you can get a slight organ pipe/flute effect if the wind happens to catch them right).
I thought it would be interesting to make some wind chimes with a much lower frequency and longer decay.
Three chimes were made each 182cm long, in 1 1/2", 2 1/4" & 3 1/2" diameter aluminium alloy tube.
With holes for a hanging wire 1/4 way down the tubes, which I figure is a ideal distance to get them resonating nicely, very low, long decay frequencys were produced easily.
Thought I'd have a go at a cowbell and woodblock next, forgeting the cowbell for now, the wood block proved impossible to get any amount of decent resonance or sound from despite trying various shapes deliberately designed to try and promote this.
Anyway to cut a long story short, if you hang a 2x4 a dowel or a log next to the ally tube wind chimes and give them a bash with a mallet, what do you get resonance or sound wise,
THE SWEET SOUND OF NOTHING.
Cheers Simon...
- Status
- This old topic is closed. If you want to reopen this topic, contact a moderator using the "Report Post" button.
- Home
- Source & Line
- Analogue Source
- DIY oak unipivot tonearm