Hi all,
I got convinced and switched from building Gchangs to Sachikos as my first fullrange speakers.
I have been working on them for three days now. Just getting the plywood cut took me the better part of two days. i am working with just a circular saw so it was slow work. i think i've managed to get my cuts pretty accurate though.
Managed to glue up most of one speaker today (will take photographs tomorrow and post) and am quite excited. i do have a few questions though:
The FE206E datasheet specifies a 185mm cutout for the driver. is this what most people go with? i don't have the drivers with me just yet and don't want to wait to make the cutout.
I have also been wondering about where to put the binding posts. i think the Sachiko is a tough design for internal wire routing; i am thinking of avoiding binding posts that come with a plate and just using two separate posts just below the deflector wedge. is this a good place? i would like some advice on this. where would it interfere least with the horn?
A question for Indian Diyers: Where can i get good quality binding posts in New Delhi? I am based in Bombay and am used to just popping across to Lamington Rd. for everything i need. Doing this build in Delhi and feeling quite lost.
will post again with tomorrow's progress
Cheers,
Mymindinside
Hi Dave,
Thanks, the cutout size measured from an actual driver would be really helpful.
Yes, that's what i was thinking about the posts. one place i had thought of was about 2 feet off the ground so that they are hidden from view by the front baffle but accessible by just bending down and reaching into the lower mouth.
what do you think..
mymindinside
I found the binding posts!. they are quite similar to the parts express ones posted in misterpig's sachiko binding post thread.
Dave, i read that you use a single wire (each for +ve and -ve) run of cat5e cable as your speaker cable for fullrangers. do you reccomend this as the internal wiring as well?. i think you said they were configured as a spaced pair but i'm not sure. could you clear this up as well
thanks for all the help
mymindinside,
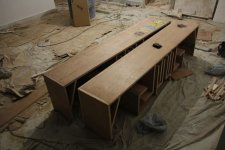
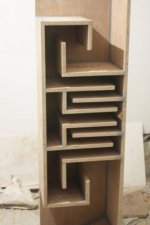
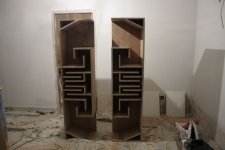
So finally took some photos. Dont have any of the actual build but have attached a few of the cabinets all glued up with one side open..tomorrow i will cut out the driver holes, and the holes for the binding posts..will only get the drivers by next week so cant seal them up till then.
cheers
mymindinside
cheers
mymindinside
Attachments
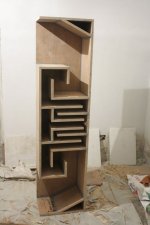
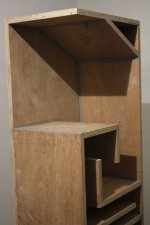
Great job and you got to this stage pretty quick too!
Did you leave out the "holey brace" part of the A pieces
by choice?
I can check the driver cutout dia and post tomorrow. But
isn't it going to be harder to cut this, now that you have it
all glued up? (unless you have access to a router).
Where are you located in India?
Did you leave out the "holey brace" part of the A pieces
by choice?
I can check the driver cutout dia and post tomorrow. But
isn't it going to be harder to cut this, now that you have it
all glued up? (unless you have access to a router).
Where are you located in India?
Last edited:
Hey thanks quadtech,
i used fevicol to glue the enclosure together and nails to hold it in place. not the most elegant i know but i have no tools and no experience in carpentry. how did you do your sachikos? also, what did you use to caulk the seams? i am using soft cut putty (duco putty) on the seams, and will also use it as a filler before i duco paint the entire enclosure.
yes i know it'll be tougher to do the driver cutout now but in my enthusiasm i started glueing up before thinking the whole thing through. i dont have access to a router and will have to figure out how to do the cutout. i have a circular saw, a handsaw and a drill. i will make the holey brace with 2 additional pieces glued to the 'A' piece. didn't have the drivers with me so i didn't want to guesstimate the size of the brace. i live in mumbai, but am doing this build in delhi.
cheers
mymindinside
I used the same - fevicol (white PVA), wood screws and
some greenish wood putty to seal the seams. Your build
looks much better and accurate than mine.
You should be able to find a local carpenter with a router.
Many of carpentry shops here have routers.
But they don't have circle jigs though, but you
can rig up a quick circle jig. It's
nothing more than a length of 6mm mdf attached to
the router base, with a pivot pin (use a nail) at the
proper spacing (roughly half the dia of 7" for the FE206E).
will try and find someone willing to lend me their router,
i dont think i'm more than an mm off anywhere...i just hope that everything seals up tight when i glue the other side in. i dont know how to caulk those seams. any ideas?
thanks again for all the help people, honestly i would never have done something so complex as my first project without the major resource base that is diyaudio.
cheers,
mymindinside
The FE206E datasheet specifies a 185mm cutout for the driver. is this what most people go with?
Mymindinside
I just measured my cutout and the diameter is 187mm.
The couple of extra mm are probably saw kerf or my error.
It would be good to use T-nuts or threaded inserts to
mount the driver.
Locally, the smallest size ones I could find are 6mm, for
which you will need to slightly drill out the holes on the
Fostex driver.
Or, when you order the drivers, just order 8 of these too -
Screw #10: 1.5" Bolt & Nut (TNUT10-24) from Madisound
Last edited:
i'm not sure i can get either of those locally...
will try at the hardware store today. what exactly does a threaded insert look like?
EDIT: found it dave: have attached a photo
an unexpected change of plans means that the drivers will be with me by this afternoon! will do the cutouts and also wire them up. should i use speaker cable (18 or 16 ga.) or a single run of cat5e?
cheers,
mymindinside
Last edited:
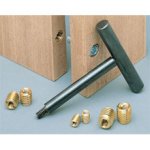
Threaded Inserts, Specialty Fasteners, Fasteners - McFeely's
dave
An externally hosted image should be here but it was not working when we last tested it.
dave
They stay in place much better... it only takes one instance of a t-nut spinning loose to turn you off of them forever. A real catch-22... you can't fix the t-nut with out getting the driver out, and you can't get the driver out without fixing the t-nut. Much searing ensues.
dave
BTW: an extra bolt or 2 & a washer can be used as a substitue for the tool.
dave
BTW: an extra bolt or 2 & a washer can be used as a substitue for the tool.
- Status
- This old topic is closed. If you want to reopen this topic, contact a moderator using the "Report Post" button.
- Home
- Loudspeakers
- Full Range
- Sachiko Builld Thread