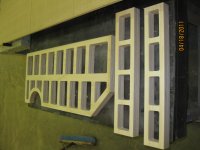
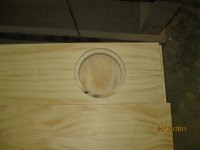
Hey guys, just wanted to start a build log for my Mark Audio Alpair 10.2 Super Pensil cabinets. I just took these photos and will continue to post more each day as I progress with the build. It may take a week or two to be completely finished due to my hectic schedule so stay tuned for finished photos.First, I programmed the parts on my CNC router and cut them out of 13-ply void free plywood. The speaker cutout is perfect and all parts are accurate to 1/1000th of an inch. After cutting everything out I realized that I didn't calculate for a removeable back (I have no more material). I'll be putting the recommended .75ft^3 of stuffing per cubic foot inside and hoping for the best. Or if anyone has any input and would like to comment pleaes do so. I've only got one shot at this and I'd like to get it perfect.
Edit: For some reason I'm not allowed to post photos. If anyone could offer some advice please let me know.
Edit: For some reason I'm not allowed to post photos. If anyone could offer some advice please let me know.
Edit: For some reason I'm not allowed to post photos. If anyone could offer some advice please let me know.
Hi Steve,
You should be OK to load photos. Make sure the file size is not so big (up to 200kb is usually OK)
Thanks
Mark.
Hey Mark,It must be something to do with my low post count or something. In the "addition options" part of the post reply in the "attach files" section there is nothing for me to click. All it states is the valid file extensions but there's nowhere to upload files. All I can do is wait for a mod or someone to reply to the email I sent about this problem.
This is my favorite image-hosting service: imgur: the simple image sharer
It's faster and easier than attaching to the diyaudio.com messages, and it saves site bandwidth too!
It's faster and easier than attaching to the diyaudio.com messages, and it saves site bandwidth too!
Mark Audio Alpair 10.2 Super Pensil cabinets
Do you mean Alpair10.2 Pensil build
or Alpair12 Super Pensel build?
No A10.2 Super Pensil (that i am aware of)
Attachments are currently broken (i suspect a side effect of tuning happening elsewhere..
dave
The big drawback is that in a couple of years they probably won't be hosted anymore or removed by the owner. And then this thread becomes useless.It's faster and easier than attaching to the diyaudio.com messages, and it saves site bandwidth too!
Indeed I did mean regular Pensil. My mind must've been somewhere else when I posted that title. I guess since my Pensil 10.2 has identicle internal bracing as a Super Pensil I was thinking it was "Super". Hahaha, my mistake. Progress was made on my lunch break. I put a 1/4" roundover on all internal parts and bracing openings (minus the sides that join to the outside walls, of course). I glued and nailed together all of the internal bracing and will move along with the build after work (in about 4 hours) I've been taking photos of my progress but will not post them until the kinks get worked out on this site. As Bas Horneman stated once the files are uploaded on this server they'll be a permanent fixture of the build log instead of a temporary fix like the various image hosting services.
Last edited:
Zia, I haven't started breaking in my drivers yet. I'm waiting for my amplifier to come back from the reapair shop. It's a Pioneer SA-7800. It had zero output from either channel and I couldn't figure it out on my own. I've been without a sound system at all for over 2 months now and I'm very very ready to get my equipment back.As for the internal bracing. I drew the bracing in AutoCAD and sent it to my CNC router to cut out. So all-in-all, the bracing was fairly easy. All I had to do was slap a piece of plywood on the table and watch it cut. My cut out as well as flush cut for the speaker was also done on my CNC. When using the CNC you don't have to worry about uneven cuts like on a table saw, or the danger of using one. I have a slight advantage in production due to this. If I really wanted to, I could do a Dado'ed construction (or non) of this Pensil or any Pensil and pump out about 100 pairs per 8 hour day with this machine.
Zia, I haven't started breaking in my drivers yet. I'm waiting for my amplifier to come back from the reapair shop. It's a Pioneer SA-7800. It had zero output from either channel and I couldn't figure it out on my own. I've been without a sound system at all for over 2 months now and I'm very very ready to get my equipment back.As for the internal bracing. I drew the bracing in AutoCAD and sent it to my CNC router to cut out. So all-in-all, the bracing was fairly easy. All I had to do was slap a piece of plywood on the table and watch it cut. My cut out as well as flush cut for the speaker was also done on my CNC. When using the CNC you don't have to worry about uneven cuts like on a table saw, or the danger of using one. I have a slight advantage in production due to this. If I really wanted to, I could do a Dado'ed construction (or non) of this Pensil or any Pensil and pump out about 100 pairs per 8 hour day with this machine.
careful dude, you could be asking for trouble - just keep in mind to cut for friends & forum members for local pick-up only - packing for safe transit and freight charges could give everyone sticker shock
Hi SteveZ, Guys,
Looks like there's a problem with the system or server. I think Jason (admin) will be on to it as I type. I'll ask him if there's a way for images to be attached to your existing posts.
Steve, maybe we have to delete this thread and start again. Let's see what Jason suggests to fix.
Save all your pics guys, I'm confident we can get them on soon.
Cheers
Mark.
Sounds good Mark. If I need to delete this thread and start a new one that's no problem at all. I ended up finishing the cabinets this afternoon. Total cutout and build time was exactly 2 hours. Not too bad. I'll be ordering some veneer tomorrow, perhaps ribbon striped mahogany or some variant of maple (curly, burly, birds-eye). Stay tuned guys, we'll get the photo situation worked out and I'll be posting the build progress soon.
careful dude, you could be asking for trouble - just keep in mind to cut for friends & forum members for local pick-up only - packing for safe transit and freight charges could give everyone sticker shock
Hahaha it's alright. I don't plan on reproducing these cabinets to sell. I was just stating the machine capabilities. If anything I'd only build a pair for my father, and maybe my brother but that's about it. Though I will say this, if Mark or someone else who has designed enclosures would want me to mass produce some cabinets or even offer flat packs I'd be more than willing to work a deal.
")
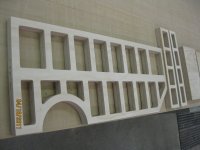
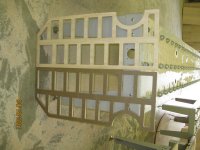
Looks like the problem has been resolved. Here are the first pictures of the raw material after being cut out. I'll upload a couple more when I get some more time.
Attachments
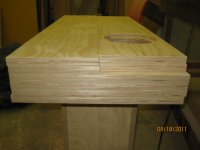
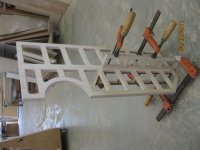
Nice work Steve - particularly on the grain alignment on fronts & back - how much juggling did it take to get yield above 60%
With our commercial CADCAM software ( CutPlanner), it's more of a fight to override the yield optimization for any grained material than to just hand bomb the layout for grain /pattern matching. Of course if post veneering, you've just transferred that issue to another material .
The ribbon grained mahogany with natural lacquer or conversion varnish would make for a stunning look on these - that's likely what I'll be doing with an upcoming FH32 build in the next few weeks. With any luck, some pictures of the build this time.
Last edited:
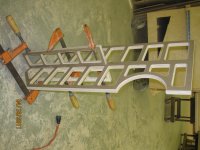
I actually didn't bother with alignment of the grain. Though it did take a few minutes to place by hand all of the parts on the sheet correctly. Here are a few more pics. I'll upload the completed photos in a couple of hours.
Attachments
- Status
- This old topic is closed. If you want to reopen this topic, contact a moderator using the "Report Post" button.
- Home
- More Vendors...
- Planet 10 hifi
- Steven's Alpair 10.2 Pensil Build Log