The 1st flat-pak went out today -- behind expectations but a start. I will be working to catch up. Chris & i went thru and sorted and prepared sets today. A few more baffles need to be made (to accomodate the actual driver distribution as opposed to our inital guess).
Here with Bonita (the pro) and Tiffany (the trainee)
An externally hosted image should be here but it was not working when we last tested it.
Trivia: Each flat-pak eats up about 2 1/2 rolls of packing tape.
More: If we made these with all 18mm they would exceed the max dimension allowed.
dave
it could take longer to unpack them than to assemble - (I jest)
sir, just insert your chip and wait for the beep
it could take longer to unpack them than to assemble - (I jest)
If you discount the time for glue to dry and the finish, it could take less time to assemble. Chris assembled the beta flat-paks in less time than it took me to pack the one you see on the scale (and they are harder than the current versions to do).
dave
The 1st flat-pak went out today
And arrived in Florida today... 5 or 6 days depending on how you count. 3 others in transit and 2 more in my truck to go to the post today. Half-way thu the back log.
dave
Any thoughts on how an early (pre-2007) CSS FR125 would work in this?
And does the assembled box require any finishing?
Looks great!
Other than the unfortunate behavior when excursion limit is reached, they should work fine.
Flat pak material is shop grade Baltic Birch plywood - 15mm for cases and 18mm for front baffle. Best efforts were made to select cleanest face for exterior surfaces, but there may still be minor pin-knots or foot-ball patches, and a thorough scraping to remove glue squeeze out and sanding after assembly down to at least 220G would be recommended for direct finish.
BB takes a clear top coat ( lacquer / polyurethane / shellac / natural oil ) quite nicely, but if planning on staining, a pre conditioning sealer would be recommended to avoid blotchiness.
They are machined with dadoes to position internal panels in one side, and all 3 external panels (top/front/bottom) on both. The internal faces could be masked off and prefinished before or during assembly (as I did with current pair)
Maybe when Dave next comes up for air he could post another photo or 2 from our assembly mock up session.
Last edited:
Maybe when Dave next comes up for air he could post another photo or 2 from our assembly mock up session.
Related Downloads
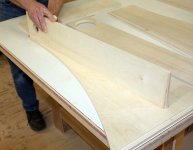
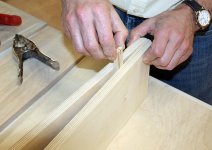
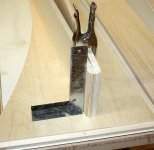
Chris came up with a clever way to deal with the choke point.
1/ the rebated side with the choke point
2/ fitting the back
3/ back & internal divider in place
Note: the fitment here ranges from tight to really tight depending on actual panel material thickness, If real tight just take it slow & steady
4/ the extra little bit to provide more glue surface and proper spacing
5/ clamped up for the 1st "wait for the glue to dry".
Note: it is very hard to install these and not have them perpendicular, but you should check anyway.
dave
Attachments


Addendum: despite somewhere, somewhen recently posting that it was hard to precision CNC BB, be very careful handling the pieces. Corners are sharp enuff to cut (i had all sorts of nicks after we did pre-pack bundling on the kits... and if you get a sliver, you will be screaming.
Addendum 2: in the pictures in the previous post, you;ll see numbers on the pieces in some of the pictures. These were to keep track of pieces to try to get the best matches for surface character
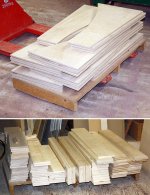
Attached is a stack of paks (3 had already been taken away, and 2 sets of sides are still embedded in the sheets of plywood -- haven't been CNCed yet)
Next tutorial post >
dave
Addendum 2: in the pictures in the previous post, you;ll see numbers on the pieces in some of the pictures. These were to keep track of pieces to try to get the best matches for surface character
Attached is a stack of paks (3 had already been taken away, and 2 sets of sides are still embedded in the sheets of plywood -- haven't been CNCed yet)
Next tutorial post >
dave
Attachments
a couple of notes, probably to be included in the "full documentation set", but several kit builders could be finished before that happens:
The plywood is machined by CNC, and contrary to opinions expressed elsewhere, the edges can be as sharp as those on similarly machined MDF - as Dave if you can cut yourself -with the added benefit of some slivering on long or obliquely cross-grain directions. Some of those little buggers can be very thin, short and hard to find.
We've found a great nitrile glove that reduces this problem quite a bit. They are thin enough to permit dexterous handling, and are also much more durable than thin latex exam gloves when applying solvent based stains and finishes.

Widely available - Home Depot, KMS Tools (Canada) and probably most major auto parts suppliers.
next turorial post >
The plywood is machined by CNC, and contrary to opinions expressed elsewhere, the edges can be as sharp as those on similarly machined MDF - as Dave if you can cut yourself -with the added benefit of some slivering on long or obliquely cross-grain directions. Some of those little buggers can be very thin, short and hard to find.
We've found a great nitrile glove that reduces this problem quite a bit. They are thin enough to permit dexterous handling, and are also much more durable than thin latex exam gloves when applying solvent based stains and finishes.
Widely available - Home Depot, KMS Tools (Canada) and probably most major auto parts suppliers.
next turorial post >
Flat Packs Arrived Yesterday
The pack arrived yesterday..glad I missed the postal strike..
I was going to wait till the weekend to open the box, but I had to have a peek.
I was really impressed how professionally boxed all the pieces were in the box
with lots of tape . The quality of the wood pieces was excellent.
I can't wait to start gluing these together. Great work Dave!!
I'll wait though till you get some documentation and pix on the mock up
assembly. I can see though from most of the pix on the site they shouldn't be to bad to assemble. My questions will be where the wadding and insulation material gets placed inside.
Dan
Dan - there were photos taken of the insulation scheme during the same session - as the saying goes
watch this space
pix of insulation scheme
I did find some done in the beta folder. Is that pretty close, so have you guys done more tweeking since?
Dan
I did find some done in the beta folder. Is that pretty close, so have you guys done more tweeking since?
Dan
Dan - there were photos taken of the insulation scheme during the same session - as the saying goes
watch this space
I'll post the next series of pictures later when i get down to the puter with the pix.
The bad news is that they haven't sorted this. The good news is that they are starting with 24 hr localized srikes. Given strides in service improvement, every postie could strike one day a week and we'd still have better servce than 5 years ago.
I was on the midnight shift getting as many paks ready for the mail this AM as i could.
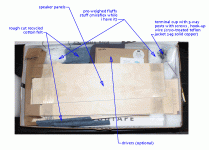
Here is a photo of the contents of one of the packs done last night with captioning.
dave
glad I missed the postal strike
The bad news is that they haven't sorted this. The good news is that they are starting with 24 hr localized srikes. Given strides in service improvement, every postie could strike one day a week and we'd still have better servce than 5 years ago.
I was on the midnight shift getting as many paks ready for the mail this AM as i could.
Here is a photo of the contents of one of the packs done last night with captioning.
dave
Attachments
Just a side note. In past cabinets I've done... one of the best cheap materials for cabinet linings is two or more layers of 100% wool army surplus blankets. Wash them and throw them in the dryer to felt them up to a higher density. But directly behind the driver you cannot beat Deflex for dampening reflections as most of you prob know. It's just amazing stuff.
")
From post #52
If you get a flat-pak that has the thick grey foam in it, keep the foam. This is the same stuff i use for damping in aperiodic vents.
dave
Here is a photo of the contents of one of the packs done last night with captioning.
If you get a flat-pak that has the thick grey foam in it, keep the foam. This is the same stuff i use for damping in aperiodic vents.
dave
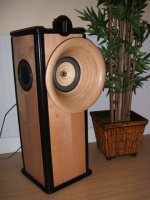
FH3 supra baffle
Question about a pseudo front-horn....
Once many moons ago just out of curiosity I bought a a pair of bamboo salad bowls from Target that had a contour that looked suspiciously like a horn profile (hey they were only 20 bucks). The base of which was almost exactly the same size as the cone diameter of the FE206. So I cut it out and blue-tacked it to the front of the driver in a Decware HDT cabinet. I don't think it was much of a horn effect because the bowls were only about 10" deep and maybe 15" in diameter if I remember. Not that it's important but I think the HDT is a transmission line. What I noticed was a slight raising of efficiency (a little louder) and a touch more lushness or presence (not sure how to describe it) in the midrange and without any detectable negative effects that I could hear. I liked it and thought it was an improvement.
What do you guys make of this? It must have something to do with a combination of pseudo-horn loading and baffle effect, no?
Could this type of thing be added to the FH3 to good effect?... assuming the proper size and contour "bowl" could be found, or made.
Last edited:
If anyone cares, here is the thread where I was discussing them... Decware DFR8 forum post #36
Post #39 May'06...
Post #39 May'06...
It sounds great! A little more efficient, more midrange detail (as if there wasn't enough already!) while still sounding smooth and not bright, midrange is more "juicy" for lack of a better word, and a hair better bass. Only downside I can see so far is you lose allot when not seated unless you're clear accross the room. Putting something under the fronts to tilt them back could help that.
While these are not large enough for a "true front bass horn" I think they are helping the mids by compensating for some baffle step loss.
Attachments
Last edited:
- Home
- More Vendors...
- Planet 10 hifi
- Frugel-Horn Mk3 flat-paks