(Assumming bitumen padding -- you did also say paint)
Actually it can be a mixed bag. You are adding damping, which will suck up energy that can cause the panel to resonate, but you are also adding mass without stiffness which both lowers the (potential) resonance frequency and lowering the Q, which means there is more energy to excite it, and lower Q resonances are more audiable. Since it is solid you are also reducing enclosure volume, so changing the design parameters.
dave
Hi Dave, I did think about that - but was also aware that the internal brace would decrease the internal cabinet volume.
I searched here and read that the cabinet dimensions woundn't need to be increased to compensate for the brace. So hopefully 3mm of bitumen
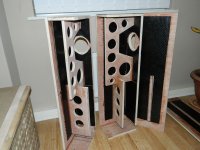
pads stuck to all internal surfaces wouldn't have any negative cabinet reducing effects. ? Also the bitumen rubber paint was used only at all the 90 degree joins to keep the whole internal areas uniform / damped.
( Correct me if I'm wrong, new to full range - very in experienced ). !
Also, I read your post about the wadding last night..makes alot more sense now after going away and thinking about it. Now I have a very good idea why uniform teased wadding is the key, rather than tightly packed dense dacron.
( Hope this is correct...? )..Tight - dense wadding won't reduce the ripple effect, It will simply block up the cabinets making the sound compressed and shouty and won't allow the Alpairs to breath and play to their full potential. ( Just my opinion after removing 90% of the tightly packed dacron last night )..All the best, Steve
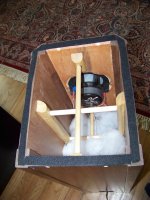
Picture below of bitumen, looks wierd I know ...
Attachments
Last edited:
That is because I accounted for the volume taken by bracing when I designed them. ")
Heavy damping will reduce pipe harmonic modes -it would be a physical impossibility for it not to Steve. However, it can also have additional less desirable traits: over-stuffing will eventually kill the fundamental mode, which in most cases is not desirable. Also, especially if placed too close to the driver, it can mass-load the power-train, causing it to temporarily distort under dynamic loads. Thus, evenly distributed material in lower densities can often be more effective. This is one of the design objectives for the pensil boxes: allowing the user to adjust this to suit their own requirements in taste, system, positioning &c.
The object behind using heavily braced plywood is to raise panel Fs above the operating BW of the enclosure to a point where there is little energy available to excite them. Damping with bitumen adds mass (as Dave notes) & drops the panel Fs down back toward the operating BW of the box where there is more energy available, thus can be counter-productive. It is very useful in some situations, but the pensils were not designed with it in mind. The volume taken up will have an impact, but it should not be severe in this particular case, since the pensils have quite a large Vb. It may need a little less damping to compensate for the small loss of volume & gain.
Last edited:
Thanks Scott, to be honest I'm loving the sound as is with absolute minimal damping but have ordered less dense non batt type dacron which will be teased and as uniform as possible.
I'm glad I read both Dave and Chris' earlier posts and can only thank them for thier advice regarding the internal brace, personally I think it's an essential part of the build.
Sorry to drag this away from the pencil pics topic !..and thanks for your advice Scott and a beautifull cabinet design. Steve.
( Lorienblack thanks again for the link for the stuffing ).
Last edited:
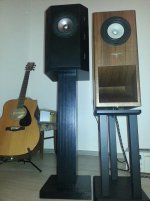
10P pensils in Walnut
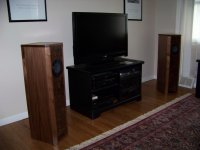
My new 10P Pensils are finally done!
Mine have removable tops to access the stuffing instead of removable backs.
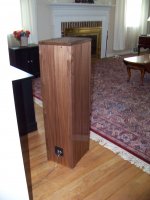
The construction is walnut veneer plywood for the sides and back, solid walnut corner blocks, and burl veneer over BB ply for the front.
The grilles are needed since one of the speakers is in a reasonably high traffic area. They are Parts Express 6" grilles. Add a few pieces of thin felt and they are a perfect fit.
My new 10P Pensils are finally done!
Mine have removable tops to access the stuffing instead of removable backs.
The construction is walnut veneer plywood for the sides and back, solid walnut corner blocks, and burl veneer over BB ply for the front.
The grilles are needed since one of the speakers is in a reasonably high traffic area. They are Parts Express 6" grilles. Add a few pieces of thin felt and they are a perfect fit.
Attachments
Last edited:
Top Mounting,
There are 2 pins under the front of the top going into blind holes in the front baffle and 2 screws through the back panel which solidly secures the top. I can take some pictures later.
Grille,
The grille comes as 2 peices, a mounting ring and the grille. I did not use the mounting ring. The outer grille piece is a loose fit on the speaker. I added 2 one inch wide pieces of thin self-stick felt to the inside of the metal grille to make it slide snugly over the speaker frame. The Mark Audio outer trim is also not used.
gasketed, I presume?Top Mounting,
There are 2 pins under the front of the top going into blind holes in the front baffle and 2 screws through the back panel which solidly secures the top. I can take some pictures later.
Grille,
The grille comes as 2 peices, a mounting ring and the grille. I did not use the mounting ring. The outer grille piece is a loose fit on the speaker. I added 2 one inch wide pieces of thin self-stick felt to the inside of the metal grille to make it slide snugly over the speaker frame. The Mark Audio outer trim is also not used.
that makes sense
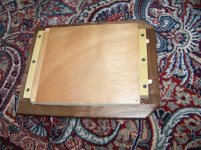
Removable Top
Here's a couple of pictures of my removable Pensil top.
On previous speakers, I had decorative screws going down through the top, or in from the sides, but here I wanted to have as few visible screws as possible while having a secure fit.
With the top off, you see the holes in the front baffle where the pins go. You also see the top of my bracing. Since the removable top doesn't tie the front to the sides or back, bracing above the speaker ( and all the way down, of course) is needed.
The underside of the top shows the solid wood block with the front pins, a second block for the screws from the back, and plywood filling out the space and making it a very tight fit. The pin block is not glued to the top which allows me to adjust the tightness with tape shims between the block and the cabinet top.
This left me with only 2 unobtrusive screws in the back, which was important since the back is also completely finished and clearly visible from my hallway.
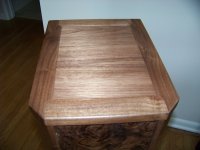
The last picture is simply to show off the the top's construction. Those joints were a bit of a challenge to build, but it came out nicely.
Here's a couple of pictures of my removable Pensil top.
On previous speakers, I had decorative screws going down through the top, or in from the sides, but here I wanted to have as few visible screws as possible while having a secure fit.
With the top off, you see the holes in the front baffle where the pins go. You also see the top of my bracing. Since the removable top doesn't tie the front to the sides or back, bracing above the speaker ( and all the way down, of course) is needed.
The underside of the top shows the solid wood block with the front pins, a second block for the screws from the back, and plywood filling out the space and making it a very tight fit. The pin block is not glued to the top which allows me to adjust the tightness with tape shims between the block and the cabinet top.
This left me with only 2 unobtrusive screws in the back, which was important since the back is also completely finished and clearly visible from my hallway.
The last picture is simply to show off the the top's construction. Those joints were a bit of a challenge to build, but it came out nicely.
Attachments
Chris,
There was some very careful layout to get the bookmatch centered on each panel.
The burl veneer on the fronts are successive flitches and are reversed on the other speaker for a symmetrical look.
It was worth the work since if I simply cut the pieces from the plywood, the off center bookmatch joints would stand out horribly and drive me crazy.
Next project, a matching stand for the components and TV to replace the ugly black MDF stand.
Another project, a tube amp to replace the HT receiver.
But first, I plan to sit back, listen, and enjoy.
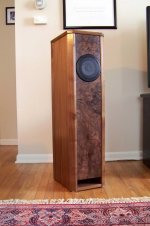
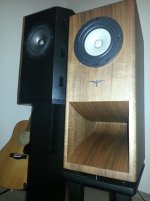
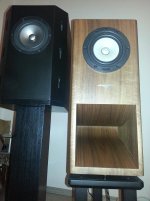
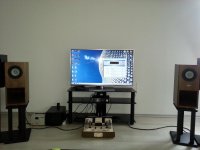
Hello may be this is not a correct place, but I would like to show my new acquisition, BVR with Alpair 10P. Until recently I had Onken with Alpair 10.2 which I crafted by myself, but after I bought 10P decided that I wanted a little more representative vision. So I ordered the design and construction of one of the best craftsmen in Bulgaria, Rumen Suvandjiev. The result is outstanding, balanced, natural sound with fast, tight bass extending pretty low. The simulations shows 42Hz/-5dB but actually in my living room I can hear normally 40hz. Unfortunately I do not have the opportunity to do measurements, but from what I hear already love them.
Attachments
бравоHello may be this is not a correct place, but I would like to show my new acquisition, BVR with Alpair 10P. Until recently I had Onken with Alpair 10.2 which I crafted by myself, but after I bought 10P decided that I wanted a little more representative vision. So I ordered the design and construction of one of the best craftsmen in Bulgaria, Rumen Suvandjiev. The result is outstanding, balanced, natural sound with fast, tight bass extending pretty low. The simulations shows 42Hz/-5dB but actually in my living room I can hear normally 40hz. Unfortunately I do not have the opportunity to do measurements, but from what I hear already love them.
Not so easy to design BVR, I could not handle it.
It was Rumen's idea, he simulates several different enclosures and finaly he recommend as optimal BVR and the result is truly outstanding. I listen them with a tube amp with 300B and sound that flows is a real pleasure.
I want to thank Mark for a great speaker, and 10.2 was good but 10P is just on another level.
- Home
- More Vendors...
- Planet 10 hifi
- Pensil Pics, lets show 'em!