Hi all,
I’ve highjacked Bengel’s thread enough already so it’s time to start a new one for my new segmented wire hybrid ESL project. All help and/or immoral support are appreciated.
Status:
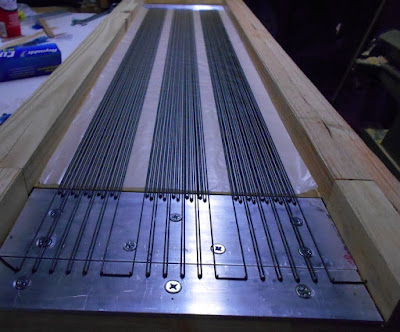
I’ve completed a wire stretching jig and got the wooden support lattice drawn but I also have a mile long honey-do list impeding my progress. Still, I hope to start making sawdust within a week.
Panel open area will be 10.5 x 46.5 inches with two vertical spacers dividing the diaphragm in to 3 sections. Each section driven by (30) 20awg single strand copper wires with .010 XLPVC insulation & .052 O.D.
The (90) wires will be segmented per symmetrical configuration 2 and consist of (15) 6-wire groups in (8) electrical segments (center segment + 7 segments on the left & right).
Total wire area is equivalent to 8.7” x 48”, the d/s is .062, sections are 8 and the X-over freq is 220Hz.
For these inputs, Bolserst’s calculator gives the feed resistor value at 120.41 Kohms.
I will use the 76:1 tandem 50VA 230V/2x6V toroids and 2.7KV bias supply that I already have, with a 1 Ohm resistor in front. Question: Will I still then need the .75R feed resistor on the center section?
Regarding stator mass:
I figure a perfect stator would have infinite mass for its charge to react against, driving the diaphragm. The much heavier steel perf stators I’ve built in the past vibrated when playing so my new and much lighter copper wire stators will no doubt vibrate even more and I’m wondering if the effects will be audible. Any thoughts on that?
Regarding the wave front:
Just wondering if my understanding is correct: While I grasp the relationship between emitter width and wavelength to dispersion, I’m not sure if the resulting wave front is truly being altered from planar to cylindrical, and if so, by the frequency dispersion alone-- or is the RC line progressively phase shifting the emitter sections and this is altering the shape of the wave front? I figure phasing can’t remain constant down the RC line. I would really like to understand how the wave front is shaped.
I’ve highjacked Bengel’s thread enough already so it’s time to start a new one for my new segmented wire hybrid ESL project. All help and/or immoral support are appreciated.
Status:
I’ve completed a wire stretching jig and got the wooden support lattice drawn but I also have a mile long honey-do list impeding my progress. Still, I hope to start making sawdust within a week.
Panel open area will be 10.5 x 46.5 inches with two vertical spacers dividing the diaphragm in to 3 sections. Each section driven by (30) 20awg single strand copper wires with .010 XLPVC insulation & .052 O.D.
The (90) wires will be segmented per symmetrical configuration 2 and consist of (15) 6-wire groups in (8) electrical segments (center segment + 7 segments on the left & right).
Total wire area is equivalent to 8.7” x 48”, the d/s is .062, sections are 8 and the X-over freq is 220Hz.
For these inputs, Bolserst’s calculator gives the feed resistor value at 120.41 Kohms.
I will use the 76:1 tandem 50VA 230V/2x6V toroids and 2.7KV bias supply that I already have, with a 1 Ohm resistor in front. Question: Will I still then need the .75R feed resistor on the center section?
Regarding stator mass:
I figure a perfect stator would have infinite mass for its charge to react against, driving the diaphragm. The much heavier steel perf stators I’ve built in the past vibrated when playing so my new and much lighter copper wire stators will no doubt vibrate even more and I’m wondering if the effects will be audible. Any thoughts on that?
Regarding the wave front:
Just wondering if my understanding is correct: While I grasp the relationship between emitter width and wavelength to dispersion, I’m not sure if the resulting wave front is truly being altered from planar to cylindrical, and if so, by the frequency dispersion alone-- or is the RC line progressively phase shifting the emitter sections and this is altering the shape of the wave front? I figure phasing can’t remain constant down the RC line. I would really like to understand how the wave front is shaped.
Last edited:
Update 3/9/16:
Most of the wooden pieces for the wire support lattices are cut. A few minutes ago I dry fitted the interlocking pieces for one of them (see below).
I plan to spray apply a coat of a light stain and a coat of satin polyurethane (while assembled, not glued). And then re-assemble and glue the pieces together, over the wires, in the stretcher jig.
The stators must fit within the frame of my existing beam splitter speakers and they had to be rather thin to clear the beam splitter during install.
It's a lot of work but I think they will look much better than my current welding rod panels.
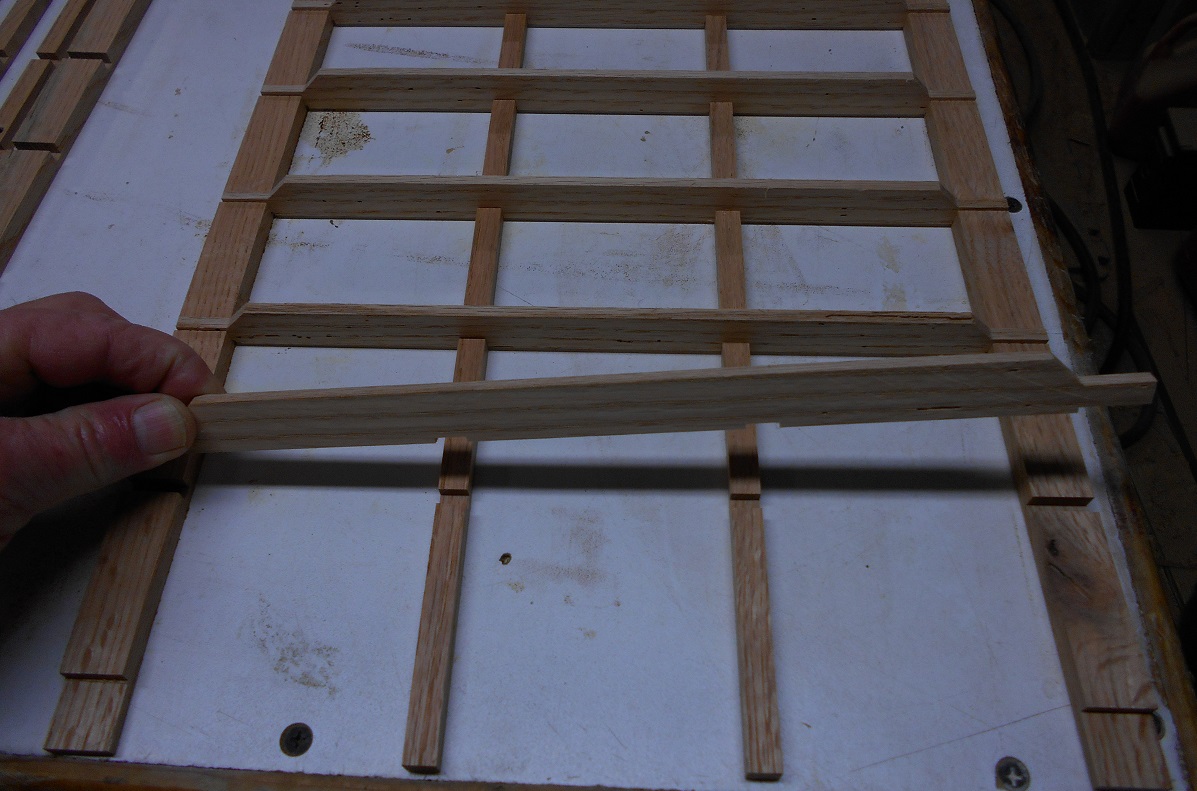
Charlie,
as hardwood flooring exercise tells me you would not be able to disassemble well fitted wooden pieces even after a light PU coat. The thing flows into minute slot(s) with such an ease. I would rather do parts separately with subsequent light sanding before final assembly. You have to sand first coat anyway do not you?
as hardwood flooring exercise tells me you would not be able to disassemble well fitted wooden pieces even after a light PU coat. The thing flows into minute slot(s) with such an ease. I would rather do parts separately with subsequent light sanding before final assembly. You have to sand first coat anyway do not you?
...I plan to spray apply a coat of a light stain and a coat of satin polyurethane (while assembled, not glued). And then re-assemble and glue the pieces together, over the wires, in the stretcher jig.
Looking good

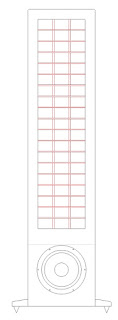
I wonder if you painted the two inner vertical spacers flat black to match the wires if it would impart a cleaner look to the panels?
The idea being that you would see wooden crossbars against a black background, rather than a lattice of wooden crossbars and spacers. I'm not sure....
Charlie,
as hardwood flooring exercise tells me you would not be able to disassemble well fitted wooden pieces even after a light PU coat. The thing flows into minute slot(s) with such an ease. I would rather do parts separately with subsequent light sanding before final assembly. You have to sand first coat anyway do not you?
All good points, Alexberg.
Applying the stain/paint with the pieces assembled may indeed bond them together.
The intent was to keep the stain/paint off the bond surfaces by applying it with the pieces assembled. To that end, and keeping in mind the points you made, I may attempt, on one lattice first, to mist the stain on so lightly that it sits in place without flowing, wait 8 hours and then mist on some thinned down satin poly in the same manner. Unlike a typical application on furniture, I won’t be sanding and applying a second coat, as I’m not concerned so much about sheen or wear thickness—just a light cosmetic seal to make the grain pop. The side support rails can’t be seen once the panel is installed so I could just mask those off. The center spacer supports will be the issue.
If that doesn’t work, one lattice is firewood.
Looking good
I wonder if you painted the two inner vertical spacers flat black to match the wires if it would impart a cleaner look to the panels?
The idea being that you would see wooden crossbars against a black background, rather than a lattice of wooden crossbars and spacers. I'm not sure....
I had given that some thought. On my old perf-metal panels, I think the vertical spacers were a nice contrast so I'm thinking likewise on the wood panels.
Oh No Charlie: Another cool project! Looking forward to reading about your impressions when you fire these up. My Jazzman Mark Vs are still alive and doing very well, thanks to you again, but I may have to rebuild them. I've noticed the stators are pulling away from the tape in several spots...The segmented panels with the rods and removable diaphragms by Ken Seibert look very interesting. I may have to try them. Hope you are well!
Oh No Charlie: Another cool project! Looking forward to reading about your impressions when you fire these up. My Jazzman Mark Vs are still alive and doing very well, thanks to you again, but I may have to rebuild them. I've noticed the stators are pulling away from the tape in several spots...The segmented panels with the rods and removable diaphragms by Ken Seibert look very interesting. I may have to try them. Hope you are well!
Yes, the psychosis got the best of me and I'm at it again. There is no cure.
If a perf metal stator isn't perfectly flat, any local high spots can cause it to separate from the spacer tape. But you can still save those panels:
In the center of the spacer, where it's separating, insert a hot awl or small nail thru a stator hole to burn a hole thru the foam tape spacer. Do this in two adjacent holes, then insert a small plastic zip tie thru the holes and pull it tight from the backside to close the gap.
Update Monday afternoon, 3/14/16:
Got the wooden lattices completed-- temporarily assembled them last night and today (with no glue) and sprayed on the light colored stain and satin clear coat.
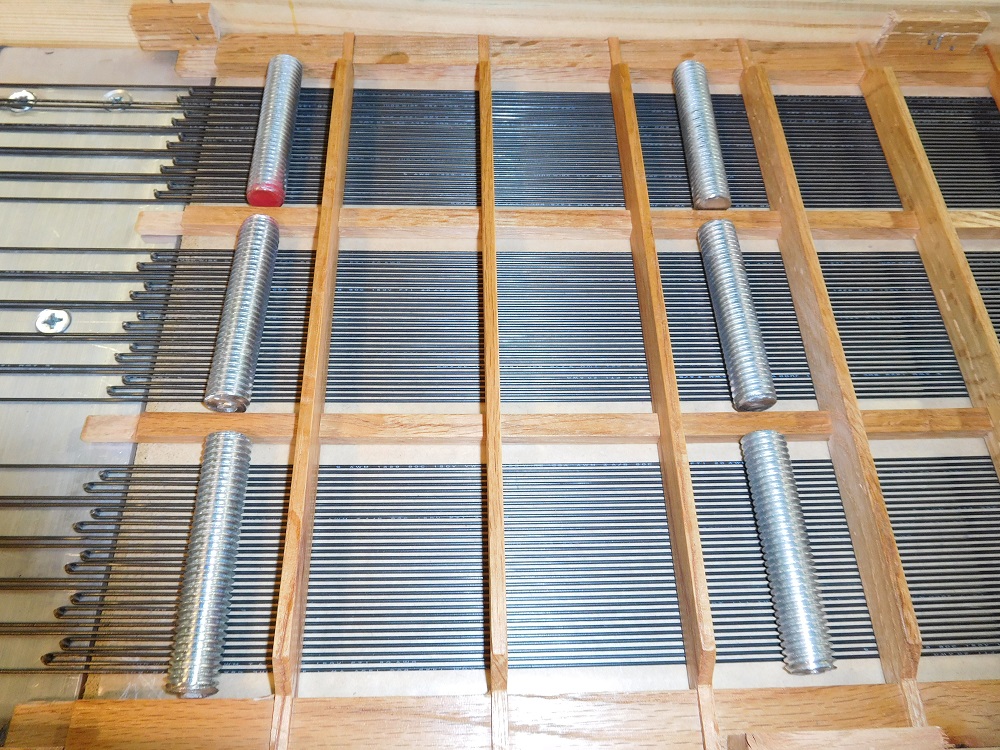
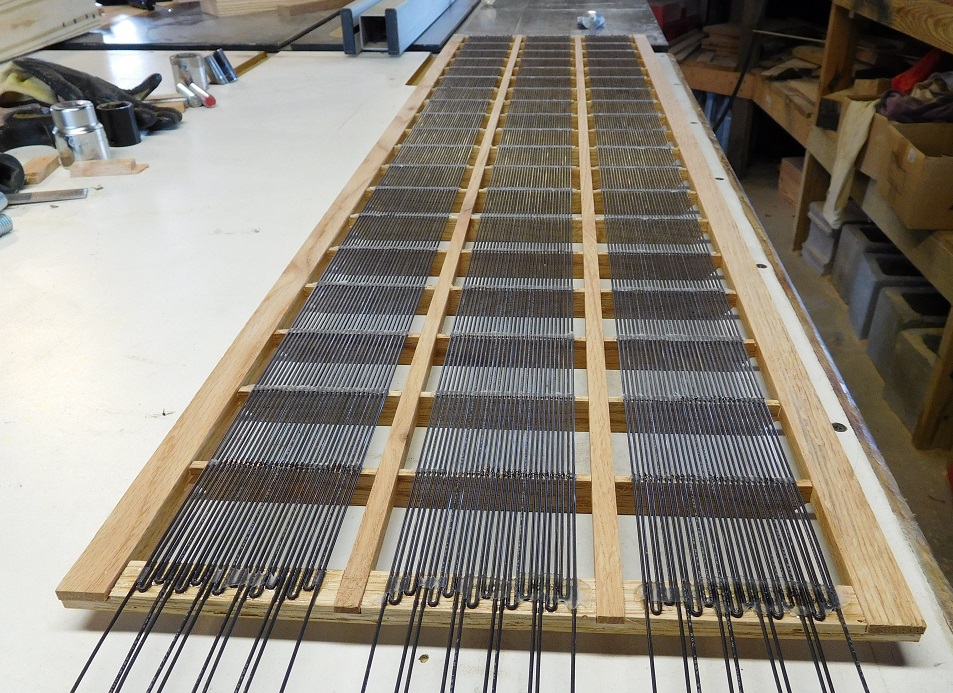
I've just started gluing up the first stator. The first photo shows all four lattices after stain/paint. The second photo shows the first stator being assembled in the stretcher jig-- the first 3 horizontal wire supports are glued in place over the wires.
I won't know for sure until I complete the first stator but it looks like this scheme is gonna work.
I stretched the 48" wires .50 inches, then relaxed almost all tension. I had to use larger diameter pins in my jig than what would have given correct wire spacing so I'm using threaded rods to get the spacing right.

Got the wooden lattices completed-- temporarily assembled them last night and today (with no glue) and sprayed on the light colored stain and satin clear coat.
I've just started gluing up the first stator. The first photo shows all four lattices after stain/paint. The second photo shows the first stator being assembled in the stretcher jig-- the first 3 horizontal wire supports are glued in place over the wires.
I won't know for sure until I complete the first stator but it looks like this scheme is gonna work.
I stretched the 48" wires .50 inches, then relaxed almost all tension. I had to use larger diameter pins in my jig than what would have given correct wire spacing so I'm using threaded rods to get the spacing right.
Jazz...this is a work of Art.....a vary nice work.....are the opening all the same size... are go from smaller to biger......thank for all your the time an pic....
Thanks Tyu,
I just hope it sounds as good as I think it will look.
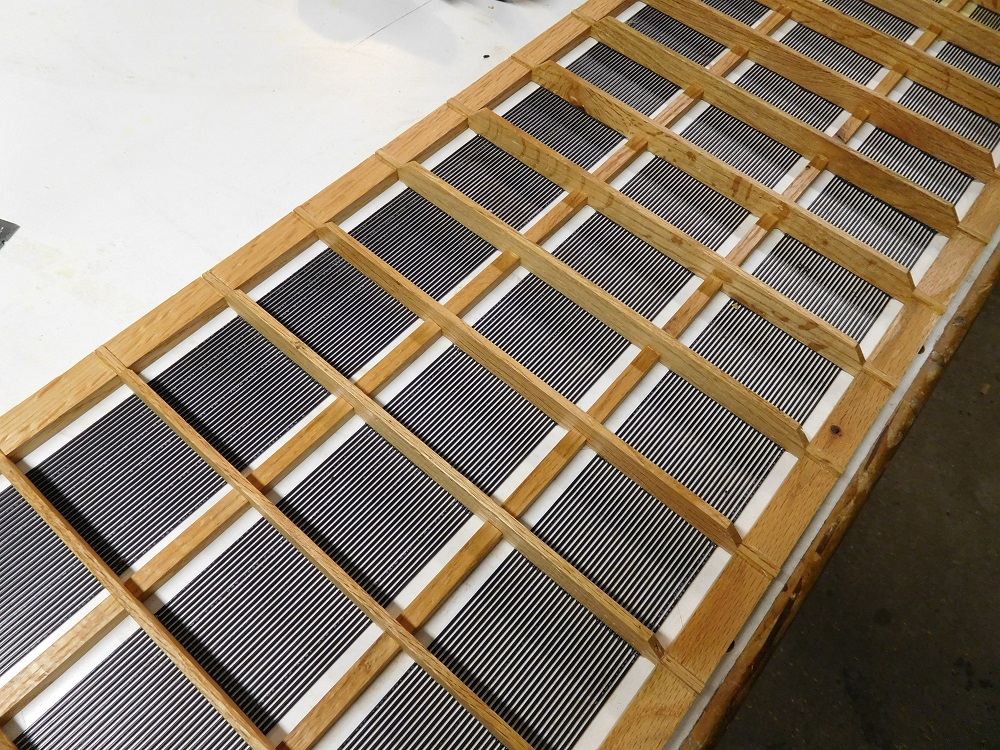
The 18 horizontal wire supports are equally spaced. Bear in mind here that the diaphragm support spacers are vertical, not horizontal, and those will be on the two 3/8" wide wood strips running vertically in the center of the panel. The diaphragm will be three equal sections running vertically.
More porn for the pervs:
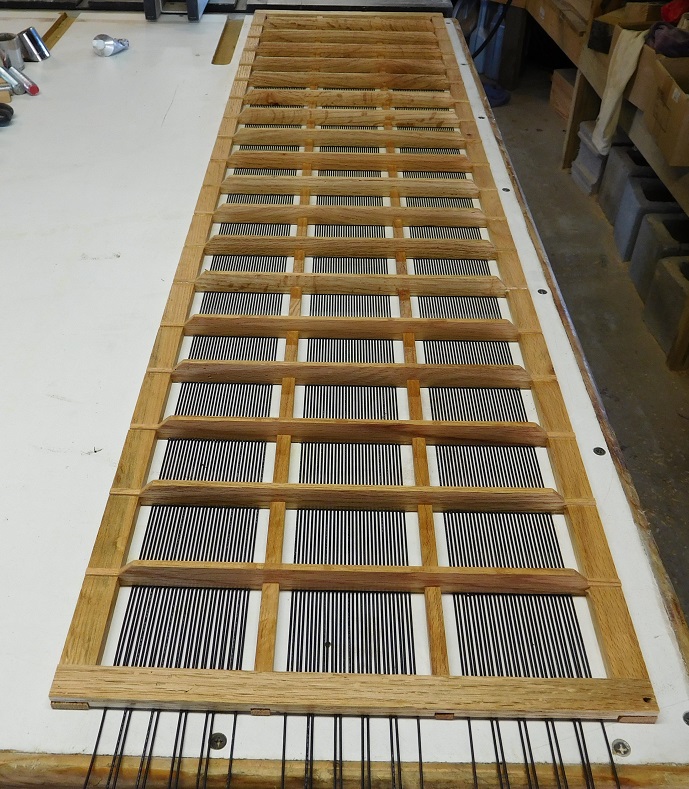
The first stator is completed... three more to go.
After that its on to bonding the spacers & diaphragms, coating the diaphragms, building the resistor networks and mount the new panels in my old beam splitter
speakers. I hope they sound as good as they look cause they were a 5hit load of work.
The first stator is completed... three more to go.
After that its on to bonding the spacers & diaphragms, coating the diaphragms, building the resistor networks and mount the new panels in my old beam splitter
speakers. I hope they sound as good as they look cause they were a 5hit load of work.
Wish I had the shop...the space...a wife that would let me do stuff like this....
Yeah... get rid of the wife was a good thing... too bad she didn't marry O.J. Simpson
Very Nice Build Charlie !!!!
jer")
Thanks Jer,
The new panels will look great but I’m really worried about their low mass and whether I used enough horizontal wire supports in the lattice.
These wood slat/copper wire stators are much lighter than any I’ve built before and I’m concerned that their vibrations might have audible effects.
Even the much heavier steel perf stators I used originally vibrated when playing so it’s a given these will vibrate more.
The wires are 20awg with .010 XLPVC insulation and the span between wire supports is about 2.150”.
I haven’t yet ordered the RC network resistors but I should have the panels assembled this weekend.
Jazz
- Status
- This old topic is closed. If you want to reopen this topic, contact a moderator using the "Report Post" button.
- Home
- Loudspeakers
- Planars & Exotics
- Yet another segmented ESL