well finally tomorow someone is so frendly to bring some rest HPL to my door for a small fee. he sells HPL 6mm 13 euro m2, wich is really cheap.
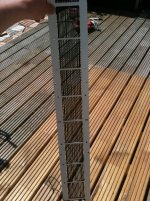
i got some grey and white for test purposes. the grey is for a final panels.
i tried today the teeth part where the wires go up and down instead of nails. with the new 2 mm cutter.
well as seen i have to increase the height of the teeth, theres no way i can bend it around this small teeth to go down again.
what did work in this test is the small pockets i milled so the wire will be spaced exactly 1 mm from eachother at every support! i might not even have to use glue, but with the 2mm cutter im not sure yet. maybe ill get a 1.8 mm cutter one day for this purpose , so i can clamb the wires at every support so i wont have to use glue at all.
picture taken with iphone has some light isues, as seen
i got some grey and white for test purposes. the grey is for a final panels.
i tried today the teeth part where the wires go up and down instead of nails. with the new 2 mm cutter.
well as seen i have to increase the height of the teeth, theres no way i can bend it around this small teeth to go down again.
what did work in this test is the small pockets i milled so the wire will be spaced exactly 1 mm from eachother at every support! i might not even have to use glue, but with the 2mm cutter im not sure yet. maybe ill get a 1.8 mm cutter one day for this purpose , so i can clamb the wires at every support so i wont have to use glue at all.
picture taken with iphone
has some light isues, as seenAttachments
![IMG_0811[1].jpg](/community/data/attachments/327/327881-c01d0120eaf4bb7179851f0668549e80.jpg)
![IMG_0812[1].jpg](/community/data/attachments/327/327894-b0483efbf7baf2600eb66765da42c14a.jpg)
Last edited:
ok well i tried one half of a frame, with the new HPL. first of this HPL makes much more dust the other i had left created nice curls. this is just verry unhealthy dust, of paper en epoxy resin. not cool.
well just close the door and hope for the best.
ofcourse i made serveral dumb mistakes that might had worked with the old HPL.
first i tried to fix the plate with screws so i did not had to grind al the holding tabs that hold the part in the plate so you can break it lose. to much screws needed i think and not worth the effort. so i wont do that again.
second i used a much bigger cutter to cut out the big parts, with a bigger cutter i can increase cut speed. but somehow this sounded afwull and created allot of dust. next time ill use my smaller cutter and wait a bit longer then.
third and foremost, i first cutted all the tiny slots that spaces the wires on every support. and ofcourse the verry last step was cutting the middle part out so only the supports stay. because i used a big cutter it ripped off all the tiny leftovers of the slots wich should space out the wires along the esl so i have to do this diferent next time, first cut out the midle parts for only half the depth, say 3.5 mm then cut the slots. or create a small barrier so the bigger cutter does not come in direct contact with the sensitive tiny parts.
well not a verry clean job this is, i have to cut a little deeper so there wont be tiny leftovers wich i have to break of or sand. ofcourse i want to let the machine do as much as possible.
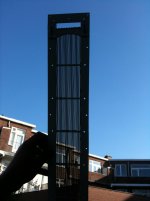
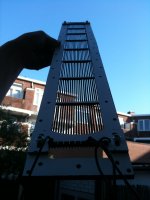
but here are some pictures, i first tried to wire it and after the first wire i thought ****, calvin is right i cant get the wire to make this rather exteme turns and be able to put some tension on it, without breaking the teeth. something i was afraid of already but tried anyways.
after i did the first 2 wires i got a little more confident it could handle some more jerking on the wire. after 4 or five i was able to create a good pre tension. because i wire this wile the esl is curved it will be even tighter when released to its normal shape. next time i bend the esl a little bit more and hand tight a little bit more as well, its prety pok for a first run, but can be a little bit tighter i think.
you can see that the slots in al spacers would help allot along the esl to get a really clean uniform spacing of the wires. without it its pretty ok but not super clean.
i just see i missed some holes to haha im so bad not making any mistakes every **** time.
here are some pictures, and small video milling the pocket for the teeth
http://youtu.be/jHBbMzn0pdg
the other i had left created nice curls. this is just verry unhealthy dust, of paper en epoxy resin. not cool.well just close the door and hope for the best
.ofcourse i made serveral dumb mistakes that might had worked with the old HPL.
first i tried to fix the plate with screws so i did not had to grind al the holding tabs that hold the part in the plate so you can break it lose. to much screws needed i think and not worth the effort. so i wont do that again.
second i used a much bigger cutter to cut out the big parts, with a bigger cutter i can increase cut speed. but somehow this sounded afwull and created allot of dust. next time ill use my smaller cutter and wait a bit longer then.
third and foremost, i first cutted all the tiny slots that spaces the wires on every support. and ofcourse the verry last step was cutting the middle part out so only the supports stay. because i used a big cutter it ripped off all the tiny leftovers of the slots wich should space out the wires along the esl
so i have to do this diferent next time, first cut out the midle parts for only half the depth, say 3.5 mm then cut the slots. or create a small barrier so the bigger cutter does not come in direct contact with the sensitive tiny parts.well not a verry clean job this is, i have to cut a little deeper so there wont be tiny leftovers wich i have to break of or sand. ofcourse i want to let the machine do as much as possible.
but here are some pictures, i first tried to wire it and after the first wire i thought ****, calvin is right i cant get the wire to make this rather exteme turns and be able to put some tension on it, without breaking the teeth. something i was afraid of already but tried anyways
.after i did the first 2 wires i got a little more confident it could handle some more jerking on the wire. after 4 or five i was able to create a good pre tension. because i wire this wile the esl is curved it will be even tighter when released to its normal shape. next time i bend the esl a little bit more and hand tight a little bit more as well, its prety pok for a first run, but can be a little bit tighter i think.
you can see that the slots in al spacers would help allot along the esl to get a really clean uniform spacing of the wires. without it its pretty ok but not super clean.
i just see i missed some holes to
haha im so bad not making any mistakes every **** time.here are some pictures, and small video milling the pocket for the teeth
http://youtu.be/jHBbMzn0pdg
Attachments
![IMG_0818[1].jpg](/community/data/attachments/329/329157-aff069837c99ac7440b3bcf29893c589.jpg)
![IMG_0819[1].jpg](/community/data/attachments/329/329139-f862f0ba443a86831163c8c0f3ae1954.jpg)
![IMG_0821[1].jpg](/community/data/attachments/329/329128-99a9834feac87e6fd4d3d44829d4a5f0.jpg)
Last edited:
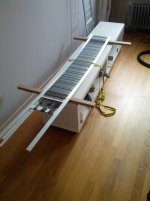
hmm failure.. i can indeed stretch the wires some more, and then when straighten the esl. BANG..... the whole teeth sectioin broke off. i was already afraid that might happen. since the piece is only 2.5 mm thick there. not gone wast the things already done so ill make an add on teeht section that you can slide to tension. not sure yet if ill do newer panels like this or just fix the Original design.
lets see if this works.
lets see if this works.
so small fix, not verry nice looking, but i like the idea of getting the stretch out of the wires this way. also glued the wire down to look if it worked.
next one will be without glue, but thats for tomorow.
Btw there is a diference in HPL so it seems , this new hpl cuts like crap. finish is awfull, and i got dust everywhere and a dull cutter. does not look good 14 euro for a cutter dul in 2 hours.
so i might adjust the design, cut the long pieces with a circular saw, then add the top and the wires adjuster as seen in here (bits smaller) and then ad supports with theeth that hold the wires sort of click the wires in, without any glue. hope this works. i might cnc a glue jig for the supports itself.
Attachments
Looks very nice. I had a bit of luck with the wires on my ESL stators. What I did was instead of wrapping one wire around "teeth" in your design, I drilled holes on both sides (didn't have a fancy CNC like you have ). Then, I cut the wire in pieces of a little more that the stator length, and made a knot at one end. Then, I pulled the wire through two opposing holes. The advantage is that one wire is easy to handle, stays on tension a bit when you stretch it. The connection is also very firm. Then I glued the non-knotted ends on the stator with a clamp and released the tension of the curved stator. Worked really well.
). Then, I cut the wire in pieces of a little more that the stator length, and made a knot at one end. Then, I pulled the wire through two opposing holes. The advantage is that one wire is easy to handle, stays on tension a bit when you stretch it. The connection is also very firm. Then I glued the non-knotted ends on the stator with a clamp and released the tension of the curved stator. Worked really well.Attachments
Looks very nice. I had a bit of luck with the wires on my ESL stators. What I did was instead of wrapping one wire around "teeth" in your design, I drilled holes on both sides (didn't have a fancy CNC like you have
Nice looking!!!, yes there are more roads that lead to rome
dont need a fancy CNC its not that fancy to be honest well i called around to find out why everything was cutting so crap!
and i found out that the chinese also invated the HPL market
the guy i spoke to told me right away , well you got urself some cheap chinese HPL it cuts verry badly and ur tools get dull easy. well exactly what i noticed. he said his material he used for CNC as well although he does not have a machine but he let someone else cut it for him when needed.so again i ordered for 50 euro HPL. god i hope this works or im 80 down the drain again with some HPL i cant use.
although when foiling the test stator i made yesterday i noticed that HPL is verry nice to stretch the mylar on. tape sticks nicely and cutting the mylar is verry easy. when finished tape is easy to remove. so its not all a waste
ill use it for the strectch and glue rig i guess.by the way the test stator is playing. but i cant get it to a verry high voltage because i do have some inregularty's in DC spacing.
my next desing will be with classic supports,, i will draw an image real quick.
here the difference in chips left from cutting.
To the left the **** HPL to the right the good HPL. you can clearly see difference in colour as wel in the sice of the chips, the black one has become powder wich does not feel good in ur troath. and brown one are warm chips, as it suppose to be get the heat into these chips preventing the bit getting hot and ur workpiece.
with the black crap the cutter gets verry hot and dull, so now even on the good HPL the edge sucks
i might have to change my Thread name into , how to make a ESL wich takes ages and cost allot of money with shitty results. with the use of a CNC machine noone has.
Attachments
![IMG_0832[1].jpg](/community/data/attachments/330/330661-f3ca1a57ee120f30928d25f8836aca60.jpg)
Last edited:
^ put tuning pegs on each like a guitar
Tension changes with time (fatigue) and temperature, why not?
A small threaded rod drilled through for the feed hole and slotted on the ends with two nuts to hold it to the frame and one stop/lock nut to hold the tension once set could be done rather inexpensively. All the while maintaining close wire spacing without the look of tuning pegs stick'n out everywhere. Just a thought
well i ordered some new HPL form the brand TRESPA, it came in and looked black as well
But i cut a test piece of 100mm x100mm and boy thats another story.
i used climb cutting so there would be les marks of the cutter going down 2mm for the next round. and yeah no toolmarks at all verry nice. edges are sharp as a knife no breaking of the formica. Even better is no dust but chips, also no screaming router just cutting noise. (still loud).
this looks good, i better start designing a stator again.
the picture is of the chips instead of the dust i had earlier.
Attachments

- Status
- This old topic is closed. If you want to reopen this topic, contact a moderator using the "Report Post" button.
- Home
- Loudspeakers
- Planars & Exotics
- Designing easy to use wire stator. with HPL and a CNC router.