Mounting the mylar -
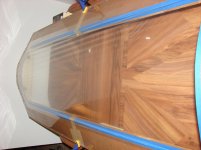
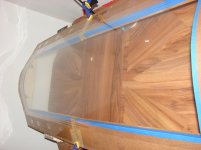
1. Make sure the mylar is squared to the jig. This makes tensioning MUCH easier.
2. Tape one end down, making sure there are no wrinkles along the taping edge. Start in the middle, working down one way, then the other. I used clear packing tape again, and I used 11 or twelve pieces per end.
3. Move to the other end. Start in the middle again, using spring-loaded tensioning gauge to stretch the mylar to 4kgs. Work down one way, then the other. Assuming the mylar was put on the jig correctly, this should take out nearly all the wrinkles and waves.
4. Start in the middle of the side. Tape down the side, and every 6" or so put down another piece of tape. Move to the other side and do the same, pulling very slightly to get remaining wrinkle and waves out.
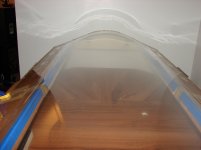
5. In this case I turned the jig with the mylar upside down, then put the stator down on the mylar. (Take the remaining backing off the tape first.) I put weights onto the stator, then made sure there were no wrinkles in the mylar. I smoothed the mylar down onto the tape, then cut the mylar around the stator with about 2" to spare, then put the stator on the table to do close trimming.
6. I put 1/4" copper tape on both sides of the stator (available from McMaster-Carr) then masked off the edges before I applied the conducting spray. This is important, since we don't want the very edges of the mylar to be conductive. (This can cause arcing)
7. I sprayed (Licron Crystal) and let it dry for 24 hours.
1. Make sure the mylar is squared to the jig. This makes tensioning MUCH easier.
2. Tape one end down, making sure there are no wrinkles along the taping edge. Start in the middle, working down one way, then the other. I used clear packing tape again, and I used 11 or twelve pieces per end.
3. Move to the other end. Start in the middle again, using spring-loaded tensioning gauge to stretch the mylar to 4kgs. Work down one way, then the other. Assuming the mylar was put on the jig correctly, this should take out nearly all the wrinkles and waves.
4. Start in the middle of the side. Tape down the side, and every 6" or so put down another piece of tape. Move to the other side and do the same, pulling very slightly to get remaining wrinkle and waves out.
5. In this case I turned the jig with the mylar upside down, then put the stator down on the mylar. (Take the remaining backing off the tape first.) I put weights onto the stator, then made sure there were no wrinkles in the mylar. I smoothed the mylar down onto the tape, then cut the mylar around the stator with about 2" to spare, then put the stator on the table to do close trimming.
6. I put 1/4" copper tape on both sides of the stator (available from McMaster-Carr) then masked off the edges before I applied the conducting spray. This is important, since we don't want the very edges of the mylar to be conductive. (This can cause arcing)
7. I sprayed (Licron Crystal) and let it dry for 24 hours.
Attachments
I put 1/4" copper tape on both sides of the stator (available from McMaster-Carr) then masked off the edges before I applied the conducting spray. This is important, since we don't want the very edges of the mylar to be conductive. (This can cause arcing)
Thanks for your time an info....
funny thing others have said this...but ML mylar conductive all over...even on the sides
I even take the stock panels apart an clean an run bias feeds on left an right sides good for another 2db output eze...once you hear good bias feeds on ML panesl i could never buy new panels from logan with the bias feed just on the right side....goodluck
How about the front panels....well you just leve as is....? thanks...
I do NOT ever gule the panels back togather...The front stock panels are glued at top an bottem only....
I have found that after about 6 weeks thay well gain from clening agin to get the best output with the stock mylar...but it works great...i have done this too 6 pr of ML...Even My pr of Prodigy..with there big 16"x 48"panels...No ML ever sounded better with the dule bias feeds...an clen mylar.
I think after a year with with the new ML... Most have lost up too -2-3db of output...But ESL are just so good that most dont hear it or no it.....Any other type speakers would sound way off....An have to be fixet
An about the price of the New panels...I Also have Ascent an SL3...same size panels AS Sq....That are $1k with shiping for new panels.....goodluck
- Status
- This old topic is closed. If you want to reopen this topic, contact a moderator using the "Report Post" button.