ok , this is a quick guide on how i made my small tweeters with some basics.
1. affordable
2. not difficult to find
3 no super special custom tools needed.
4. has to do his job from around 2K and up,
5. has nice horizontal of axis response in highs.
6. are small so you can stack them for required impedance and good vertical of axis response when using multiple pieces and place them in an angle no more then 5 degrees.
1. Get your stuff!
well we need the following
- Mylar, in this case the biggest problem for some people, here is a link where different kinds of mylar can be bought for pretty nice prices.
http://www.esl.hifi.nl/materialen.htm
- Metal perforrated plate, the air metal ratio is still uncertain for me , just try some diferent ones if possible. you can get it pretty cheap in a good metal store/hardware store. be sure to take metal not aluminum! about 10 euro.
- Board carton, its wood made of particles one side is covered in plastic. one plate you can make like endless tweeters there are sooo big and cheap 10 euro max. be sure to take acoording to magnet strips used thickness of magnet + 1 mm. i used 3 because my magnets are +- 2mm. can be find at any hardware store.
- Glue, any kind that can glue metal to wood. get it at hardware store
- tape double sided and really thin, a way beter way to tape ur foil then glue, after making allot of electrostatic panels i came to the conclusion you get much nicer results using this tape, also fast. it used to tape carpet to whatever, available at hardware store,about 3 euro
-Aluminum tape, this is used for taping of pipes for heaters i think. get a nice roll of it but be sure it has a paper back!!!! also hardware store cost around 6 euro
- And ofcourse magnets, well i used magnets form an old set of magnepans. the ones used for the bass section. these magnets can also be found in hardware stores to secure plexglass to another window. it comes in rolls of several meters.
usually the magnets are 2 rolls that wil stick together with the glue and paper backing to the outside.
2. Tools Used
- wel stanley knive, and also 2 replacement knives.
- package tape, if you dont have a stretching rig.
- saw , decopeer saw , i dont know how its called in english, just a plain electric saw to cut forms out of wood
- Ohm meter. for impedance, it will measure DC resistance so totally accurate its not but it gives an idea of the impedance. if anybody know another to do this right please let me know.
- stretching rig or just plain package tape to stretch mylar evenly on hard surface.
Lets begin
- Well first of all cut the steal plate in to pieces of 17 cm x 5cm
- cut the wood in pieces of 19 cm x 7 cm
- cut a hole into the piece 3 cm x 15 cm.
- glue the wood to the metal plate as seen in the picture
note mine looks really crappy, because i used the plate and the board a few times before to fiddle with it.
and the front side
http://j.peelen.myahk.nl/diy/DSC_1934.jpg
Well the magnets, these are the ones i have, cut them with a stanley knie in to pieces of 15 cm.
1. affordable
2. not difficult to find
3 no super special custom tools needed.
4. has to do his job from around 2K and up,
5. has nice horizontal of axis response in highs.
6. are small so you can stack them for required impedance and good vertical of axis response when using multiple pieces and place them in an angle no more then 5 degrees.
1. Get your stuff!
well we need the following
- Mylar, in this case the biggest problem for some people, here is a link where different kinds of mylar can be bought for pretty nice prices.
http://www.esl.hifi.nl/materialen.htm
- Metal perforrated plate, the air metal ratio is still uncertain for me , just try some diferent ones if possible. you can get it pretty cheap in a good metal store/hardware store. be sure to take metal not aluminum! about 10 euro.
- Board carton, its wood made of particles one side is covered in plastic. one plate you can make like endless tweeters there are sooo big and cheap 10 euro max. be sure to take acoording to magnet strips used thickness of magnet + 1 mm. i used 3 because my magnets are +- 2mm. can be find at any hardware store.
- Glue, any kind that can glue metal to wood. get it at hardware store
- tape double sided and really thin, a way beter way to tape ur foil then glue, after making allot of electrostatic panels i came to the conclusion you get much nicer results using this tape, also fast. it used to tape carpet to whatever, available at hardware store,about 3 euro
-Aluminum tape, this is used for taping of pipes for heaters i think. get a nice roll of it but be sure it has a paper back!!!! also hardware store cost around 6 euro
- And ofcourse magnets, well i used magnets form an old set of magnepans. the ones used for the bass section. these magnets can also be found in hardware stores to secure plexglass to another window. it comes in rolls of several meters.
usually the magnets are 2 rolls that wil stick together with the glue and paper backing to the outside.
2. Tools Used
- wel stanley knive, and also 2 replacement knives.
- package tape, if you dont have a stretching rig.
- saw , decopeer saw , i dont know how its called in english, just a plain electric saw to cut forms out of wood
- Ohm meter. for impedance, it will measure DC resistance so totally accurate its not but it gives an idea of the impedance. if anybody know another to do this right please let me know.
- stretching rig or just plain package tape to stretch mylar evenly on hard surface.
Lets begin
- Well first of all cut the steal plate in to pieces of 17 cm x 5cm
- cut the wood in pieces of 19 cm x 7 cm
- cut a hole into the piece 3 cm x 15 cm.
- glue the wood to the metal plate as seen in the picture
note mine looks really crappy, because i used the plate and the board a few times before to fiddle with it.
An externally hosted image should be here but it was not working when we last tested it.
and the front side
http://j.peelen.myahk.nl/diy/DSC_1934.jpg
Well the magnets, these are the ones i have, cut them with a stanley knie in to pieces of 15 cm.
An externally hosted image should be here but it was not working when we last tested it.
An externally hosted image should be here but it was not working when we last tested it.
oke what i do now is not nececary when bought new with glue on the back , mine had none because ripped out of magnepan so for the people that have a sticky side already to the magnet you can skip this part.
Stick them together like this so it will for one slap. and stick them on one side of the double sides tape.
Then it should look like this.
now slice the magnet in two halfs, i dit it just with an stanley knive and a ruler piece of metal also ok as long as it is straight.
what could help is to measure ur magnet width and create a marking of 1/2 of the magnet width on the ruler, for instance glue something underneath the ruler so you get the same cut everytime!
http://j.peelen.myahk.nl/diy/DSC_1945.jpg
after one slice turn the slap around and cut betweet the already cut magnet and the next one to cut the double sided tape without making cuts all over the place.
now you have this
Oke from here the guys who bought new magnets can step in.
pieal off the paperbacking of the magnets like this")
stick it on the metal in a straight line, now when placing the next one put something in between to create an equal distance between them, like carton 1mm. be sure that the magnets next to the other one wil atract each other, if not get another strip that will. Nort has to face south and the otherway around
get allong till you run out of space, this depends on you magnet width, you can ofcourse calculate ahead magnet width + 1 mm spacing etc etc.
so here they are all in place
Now comes the stretching part, that i did the day before , so i dont have any picture but this stretching is the same as you would do with electrostatic speakers. and i know for sure there is a nice topic about it on this side.
here a real fast one for the tape, slice of as many mylar you would need for the amount of panels you want to make plus a bit of extra.
now get a clean and evenly service like a glass plate or really flat table where tape will stick on.
here's a image how to stick the tape, also when putting on the opposite tape be sure to use some force to tension it a bit.
i tensioned my quite a bit , i sounded better this way , but who knows. try something out its not that much work.
start where it says 1 then 2 then 3 etc
then stick the double sided tape on the wooden surface of your panel, then get the paper backing of the tape and stick it fermly onto the mylar. bash it a bit or put some eight on it, when al panels are stuck on the mylar, cut them lose.
see if there are no ripless, now use you finger to realle attach the tape to the mylar and the wood just rub over it till you dont even see there is any tape on the wood.
Stick them together like this so it will for one slap. and stick them on one side of the double sides tape.
An externally hosted image should be here but it was not working when we last tested it.
An externally hosted image should be here but it was not working when we last tested it.
Then it should look like this.
An externally hosted image should be here but it was not working when we last tested it.
now slice the magnet in two halfs, i dit it just with an stanley knive and a ruler piece of metal also ok as long as it is straight.
what could help is to measure ur magnet width and create a marking of 1/2 of the magnet width on the ruler, for instance glue something underneath the ruler so you get the same cut everytime!
http://j.peelen.myahk.nl/diy/DSC_1945.jpg
after one slice turn the slap around and cut betweet the already cut magnet and the next one to cut the double sided tape without making cuts all over the place.
An externally hosted image should be here but it was not working when we last tested it.
now you have this
An externally hosted image should be here but it was not working when we last tested it.
Oke from here the guys who bought new magnets can step in.
pieal off the paperbacking of the magnets like this
An externally hosted image should be here but it was not working when we last tested it.
stick it on the metal in a straight line, now when placing the next one put something in between to create an equal distance between them, like carton 1mm. be sure that the magnets next to the other one wil atract each other, if not get another strip that will. Nort has to face south and the otherway around
get allong till you run out of space, this depends on you magnet width, you can ofcourse calculate ahead magnet width + 1 mm spacing etc etc.
An externally hosted image should be here but it was not working when we last tested it.
so here they are all in place
An externally hosted image should be here but it was not working when we last tested it.
Now comes the stretching part, that i did the day before , so i dont have any picture
but this stretching is the same as you would do with electrostatic speakers. and i know for sure there is a nice topic about it on this side.here a real fast one for the tape, slice of as many mylar you would need for the amount of panels you want to make plus a bit of extra.
now get a clean and evenly service like a glass plate or really flat table where tape will stick on.
here's a image how to stick the tape, also when putting on the opposite tape be sure to use some force to tension it a bit.
i tensioned my quite a bit , i sounded better this way , but who knows. try something out its not that much work.
start where it says 1 then 2 then 3 etc
An externally hosted image should be here but it was not working when we last tested it.
then stick the double sided tape on the wooden surface of your panel, then get the paper backing of the tape and stick it fermly onto the mylar. bash it a bit or put some eight on it, when al panels are stuck on the mylar, cut them lose.
see if there are no ripless, now use you finger to realle attach the tape to the mylar and the wood just rub over it till you dont even see there is any tape on the wood.
Now get your spare stanley knives , put them together with 0.5 mm carton between them and tape them together.
![url]](/community/proxy.php?image=http%3A%2F%2F%5Burl%5Dhttp%3A%2F%2Fj.peelen.myahk.nl%2Fdiy%2FDSC_1953.jpg%5B%2Furl%5D&hash=0394d70183ace8de99552e0894a3a04f)
Now when you cut you wil cut 2 times at ones so there will be a verry thin slice.
Get your aluminium tape this one
no lay your tape with the copper side down on a piece of glas or any other hard and smooth service.
now use your cutting tool and press with ur left had the tape to the table and as close as you can get to the cutting.
dont try to slice the whole roll in one take!, because it will rip in this way ! do 20 cm then move the roll up.so the cutting wil happen where you put down your left hand.
try to cut as close to the edge as possible if you want to use the roll more then 3 times.
(this is when you cut from left to right like i did ofcourse )
well after a while you ran out of tape and the result should look something like this.
well then just peal the paper backing of the coil, and stick it up the mylar like in the picture, be carefull its pretty fragile and also a bit sticky, a known shitty combination.
as you can see at the ends of the coils i just sticked some extra coil on the sides so i can squees a wire to it so it will make contact. ofcourse this aint the most beatifull solution, so maybe you can solder them alter on with aluminum solder or use any kind of thing to attacht that fragile little coil to a copper wire that with its own weght will snap the coil happend to many times.
Well attach the wires to a Ohm meter to get some idea of the resistance, mine whas like 1,6 ohm a bit on the low side but 3 in series will do.
here it is.
Remember normal amplifiers wont like the 1,6 ohm so dont krank them up with only one panel!!! it may dammage your amp.
also use a crossover !! dont put information in the panel lower then 2000 hertz it will start frying ur mylar at louder levels. it really smokes !
further im in no way responsible for any dammage or bla bla bla you know the drill.
hope i helped some people out , its a nice little project for verry little money. if you bought al the parts there should be enought material to make 8 or more of these things.
Happy building !!! and also any good ideas and improvements are welcome, but remember its a poor mans version !!! and material should be easy to get.
Greetings WrineX!
An externally hosted image should be here but it was not working when we last tested it.
Now when you cut you wil cut 2 times at ones so there will be a verry thin slice.
Get your aluminium tape this one
An externally hosted image should be here but it was not working when we last tested it.
no lay your tape with the copper side down on a piece of glas or any other hard and smooth service.
now use your cutting tool and press with ur left had the tape to the table and as close as you can get to the cutting.
dont try to slice the whole roll in one take!, because it will rip in this way ! do 20 cm then move the roll up.so the cutting wil happen where you put down your left hand.
try to cut as close to the edge as possible if you want to use the roll more then 3 times.
(this is when you cut from left to right like i did ofcourse
)An externally hosted image should be here but it was not working when we last tested it.
An externally hosted image should be here but it was not working when we last tested it.
well after a while you ran out of tape and the result should look something like this.
An externally hosted image should be here but it was not working when we last tested it.
well then just peal the paper backing of the coil, and stick it up the mylar like in the picture, be carefull its pretty fragile and also a bit sticky, a known shitty combination.
as you can see at the ends of the coils i just sticked some extra coil on the sides so i can squees a wire to it so it will make contact. ofcourse this aint the most beatifull solution, so maybe you can solder them alter on with aluminum solder or use any kind of thing to attacht that fragile little coil to a copper wire that with its own weght will snap the coil
happend to many times.Well attach the wires to a Ohm meter to get some idea of the resistance, mine whas like 1,6 ohm a bit on the low side but 3 in series will do.
here it is.
An externally hosted image should be here but it was not working when we last tested it.
Remember normal amplifiers wont like the 1,6 ohm so dont krank them up with only one panel!!! it may dammage your amp.
also use a crossover !! dont put information in the panel lower then 2000 hertz it will start frying ur mylar at louder levels. it really smokes !
further im in no way responsible for any dammage or bla bla bla you know the drill.
hope i helped some people out , its a nice little project for verry little money. if you bought al the parts there should be enought material to make 8 or more of these things.
Happy building !!! and also any good ideas and improvements are welcome, but remember its a poor mans version !!! and material should be easy to get.
Greetings WrineX!
if you can cut the , aluminum tape thinner as it is now to get it lighter, and as well meet the high impedance requird. it is possible. there are designs i believe that used this magnets. in a spiral kind of coil, because the magnets are fexible they made a spiral of the magnet as well, its a nice idea. maybe i try it sometime. it's a bit more work then this design
aslso i forgot to mension i used same magnet layout at the back so its a push pul system, i had almost an increase of 3 or 4 dB in sensitivity.
it now plays with a set of response one loudspeakers as seen in last photo, and had to decrease sensitivity of the tweeter by 4,5 dB in the active crossover.
Sensitivity is pretty ok, but this is with the current impedance of 1,7 Ohm so when doubled this wil problably rulle out the 4 dB headroom when 4 Ohm is playing, still enough to match with a + - 86 dB speaker. only one panel used by the way
ok well, although this thread is pretty low on replys, i still gone post my findings. because why not ? if anybody does wants to make a cheap planar midrange/tweeter they can read the thread .
well what if done in the past day, well after the normal doings on a weekday is de following.
Made a new one from scratch took me around 4 hours to build.
it has over twice the amount of magnet and width. the height stayed the same, also twice the amount of coil used offcourse wich gave me a healthy 3.8 DC resistance wich is prety easy to drive by any amp.
made it a pushpull wich wil increase output more or less around 3 dB more to the 4 because thats what i gave the bass speaker more to compensate.
another thing is before i ran the coil right from spacer (the wood) over the membrane over the spacer and made the turn. i now made the turn stil on the membrane just before the spacer. this solved extreme resonace in the low region of 1000 hetz. also it cleaned the sound up. the sound of the high notes is now way better then the original tweeter section of the Magnepans way more detail and i bet frequency reponse has extended also, they now even come really close to the sound of my former used solosound electrostatic speakers.
also i can cross them now at around 1500 hetz 6dB /oct
,but ofcourse i hope i can measure them one day.
Any input is welcome
.well what if done in the past day, well after the normal doings on a weekday is de following.
Made a new one from scratch took me around 4 hours to build.
it has over twice the amount of magnet and width. the height stayed the same, also twice the amount of coil used offcourse wich gave me a healthy 3.8 DC resistance wich is prety easy to drive by any amp.
made it a pushpull wich wil increase output more or less around 3 dB more to the 4 because thats what i gave the bass speaker more to compensate.
another thing is before i ran the coil right from spacer (the wood) over the membrane over the spacer and made the turn. i now made the turn stil on the membrane just before the spacer. this solved extreme resonace in the low region of 1000 hetz. also it cleaned the sound up. the sound of the high notes is now way better then the original tweeter section of the Magnepans way more detail and i bet frequency reponse has extended also, they now even come really close to the sound of my former used solosound electrostatic speakers.
also i can cross them now at around 1500 hetz 6dB /oct
,but ofcourse i hope i can measure them one day.
Any input is welcome
I can't add any input other than to say congratulations. I always admire those who take the extra step in DIY.
Very nice WrineX. Keep posting on this, some of us (west coast of North America) are just getting off work for the day (now 4:30pm) and will no doubt join in later.
Very nice WrineX. Keep posting on this, some of us (west coast of North America) are just getting off work for the day (now 4:30pm) and will no doubt join in later.
ok well tried to make a spiral today to maybe use in headphone, by etching the alumnium.
fist made an spiral ,printed it out on my laserjet and used the toner transfer method to aply it on my aluminum sheet, glued that to a piece of mylar. then etching , well this is the part where it really sucks! there is no way that the toner will stay on the aluminum foil, it does disolve after a pretty long time using stuff to unstuck a drain , no idea how you call it in english. the stuff works thats for sure , but my image is also gone, tried it even with vernis laquar for grafic wich used same method but here it will stay sometimes on the foil, but i cant draw that straight out of my wrist, i did clean the alu foil so that shoul not be the problem
will try to do it later on with the sticky alu tape method, i think that will work beter aldo its not as fancy as this one.
If you want to speed up the etching process a bit you can try ferric chloride. In fact, for aluminum, you'll probably want to dilute the ferric chloride solution that's usually sold for etching circuit boards because it may react too fast (and exothermically) with aluminum. I ran into problems with the aluminum getting so hot it melted the plastic substrate I was sticking the aluminum to, so I'd suggest starting with a dilute solution and then gradually increasing the concentration until you find something that works quickly but doesn't damage the project.
That doesn't solve your resist problem, though. If you could make a stencil with the right pattern you might be able to use it to guide the spraying of something (paint?) onto the aluminum that adheres to the aluminum and doesn't quickly come off as you etch in an aqueous solution. You might be able to use your double-blade trick to make the stencil. Just a thought--not something I've tested.
Few
thx for the info, well for the spiral it has to be etching double blade trick wont work have to use some foce and accuracy that wont combine i think.
well will try the stuff maybe because its faster the toner wil stil stay on. but ofcourse cant become to hot or it melts of again
well will try the stuff maybe because its faster the toner wil stil stay on. but ofcourse cant become to hot or it melts of again
hmm, well l the slightly bigger version i made still prety small 19 cm x 10cm and membrane only 6 x 15
can reach 500 hetz easy. i cant believe how they sound.
the push pull configuration helps allot, i can drive them with crossover at 500 hetz 12dB octave at ear splitting levels.
it think theres more to come.
can reach 500 hetz easy. i cant believe how they sound.
the push pull configuration helps allot, i can drive them with crossover at 500 hetz 12dB octave at ear splitting levels.
it think theres more to come.
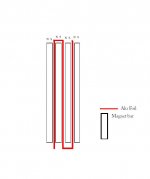
Ok well this image is just to show how the layout should look like, distances and amount of mangnet used an width of foil etc is all just way out of propotion. as you see on the images where i have al the this magnets glued or taped to the metal there are little gaps between the magnets 1 mm thick when aplying the thin foil it wil cover that gap, at the end of the magnet make a turn and go down again, then up the down then up then down until there are no gaps left
Attachments
well i played with them a bit, and come up with the folowing results.
its important tot make the turn on the mylar itself, when making the turns with the aluminum tape on the mylar instead of the spacer theres no resoanting aluminum tape, wich whas a problem whem played fullrange.
i can play 3 of them is series wich gave me a 5.4 Ohm DC resistance on a crappy meter. it can play fullrange without anything resonating, but ofcourse you wont have earth shaking bass. it will go as low as 250 - 150 easy. i should get some inprovemend when i stack some more of these panels, like 4 wich gave a healthy 7,2 ohm and another stack of 7,2 in paralel wich gives me 3,6 total DC so for the amp 4 ohm load could be driven by almost al amps. also gives an 6 dB increase in sound pressure 3 for the doubling of speakers and 3 dB of lowering the resistace witch results in a increase of power. handling will be the same as one stack in series at least for the speaker wires. so i think with these efficiency no smoking speaker wires on membrane , first it fries your ears then speakers. the amp is another story but my amp can handly it down to 2 ohms so no problem there.
Can you give a description of how these speakers sound? You stated that they can go down to 150 without problems, if you put three of them together—adding one more do you think it can get to 100 or jus a little lower? Do they give you a 3-d image? Are they holographic? More detail of what they sound like? What speaker’s do/would you compare them to?
i would compare them to esl, they have more detail then my magnepans, but i noticed some probs with resonance frequency of the foil, so finding the right tension is a must when using fullrange
further they give a nice 3d image the higher frequency are great, adding only one pannel wont get the frequency to 100 i think, think allot of air has to be moved for the lower frequency's
further they give a nice 3d image the higher frequency are great, adding only one pannel wont get the frequency to 100 i think, think allot of air has to be moved for the lower frequency's
- Status
- This old topic is closed. If you want to reopen this topic, contact a moderator using the "Report Post" button.
- Home
- Loudspeakers
- Planars & Exotics
- poor man's magneplanar tweeters.