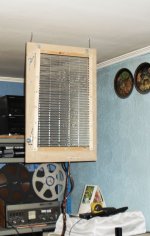
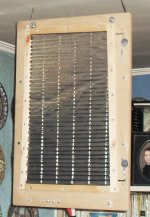
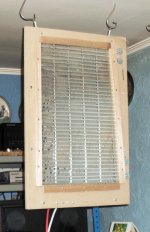
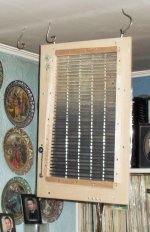
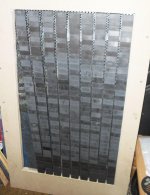
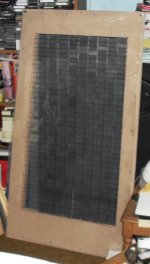
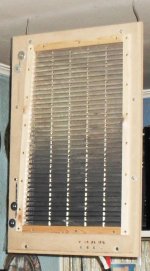
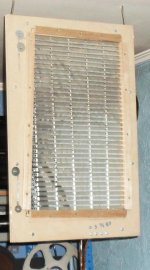
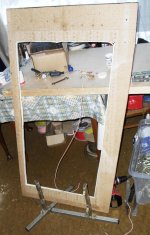
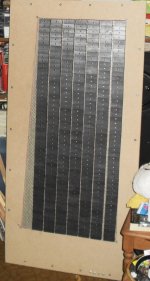
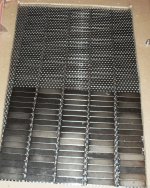
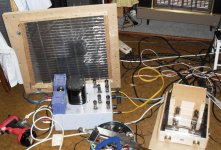
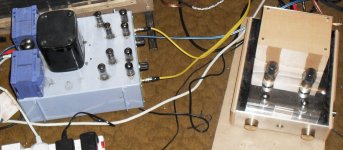
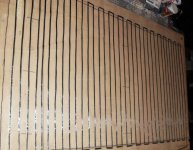
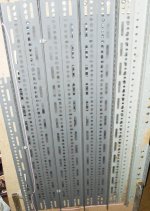
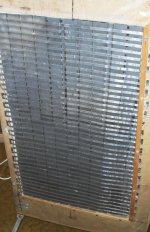
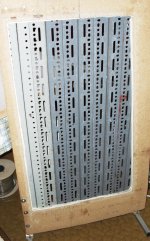
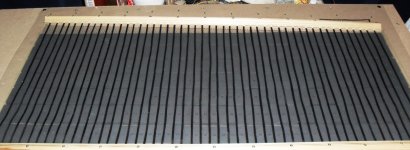
these are my latest rebuilds.
I have decided not to build any more push pull designs, because it is not worth the extra magnets or weight. I will just be rebuilding my old designs, using 23 micron mylar A polyester in the future.
I have decided not to build any more push pull designs, because it is not worth the extra magnets or weight. I will just be rebuilding my old designs, using 23 micron mylar A polyester in the future.
Attachments

Some more pictures for all those asking.
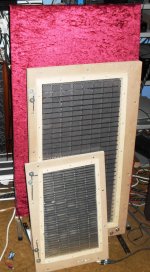
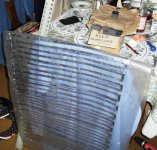
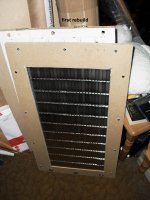
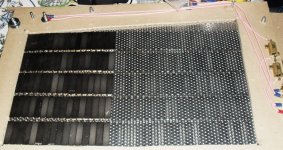
Afew more pictures showing neo and ferrite designs over the last 20 years.
Afew more pictures showing neo and ferrite designs over the last 20 years.
Attachments
-
 SAM_0519.JPG224.2 KB · Views: 152
 -
 SAM_0518.JPG249 KB · Views: 184
 -
 SAM_0517.jpg508.1 KB · Views: 941
 -
 SAM_0523.JPG399.3 KB · Views: 213
 -
 SAM_0522.JPG191.1 KB · Views: 213
 -
 SAM_0525.JPG210.6 KB · Views: 165
 -
 SAM_0539.jpg489 KB · Views: 370
 -
 SAM_0531.JPG819.5 KB · Views: 319
 -
 SAM_0526.JPG242.2 KB · Views: 161
 -
 SAM_0540.JPG292.6 KB · Views: 292
DITTO
Even more pictures for your perusal.
Even more pictures for your perusal.
Attachments
-
 SAM_0541.jpg490.8 KB · Views: 204
 -
 SAM_0542.JPG255 KB · Views: 98
 -
 SAM_0547.JPG182.9 KB · Views: 113
 -
 SAM_0545.JPG553.2 KB · Views: 109
 -
 SAM_0544.JPG622 KB · Views: 89
 -
 SAM_0549.JPG133.7 KB · Views: 93
 -
 SAM_0550.JPG146.1 KB · Views: 85
 -
 SAM_0551.JPG220.9 KB · Views: 95
 -
 SAM_0558.JPG875.5 KB · Views: 210
 -
 SAM_0560.jpg520.3 KB · Views: 110
Same again
Even more for you.
Even more for you.
Attachments
-
 SAM_0562.JPG268.4 KB · Views: 267
 -
 SAM_0563.JPG569.3 KB · Views: 194
 -
 SAM_0564.JPG211.5 KB · Views: 132
 -
 SAM_0567.JPG954.6 KB · Views: 160
 -
 SAM_0571.JPG648.6 KB · Views: 130
 -
 SAM_0570.JPG825.5 KB · Views: 112
 -
 SAM_0569.JPG666 KB · Views: 139
 -
 SAM_0572.jpg503 KB · Views: 142
 -
 SAM_0573.JPG360.9 KB · Views: 121
 -
 SAM_0574.JPG321.6 KB · Views: 123
PHEW!
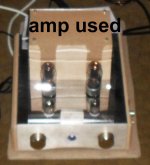
Still some more, hope I'm not boring you!?
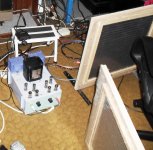
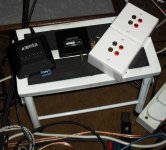
The amp is no longer being used the left hand channel packed in. So I am using one I built years ago. Still running good, unlike the one I bought.
Still some more, hope I'm not boring you!?
The amp is no longer being used the left hand channel packed in. So I am using one I built years ago. Still running good, unlike the one I bought.
Attachments
-
 SAM_0582.JPG539 KB · Views: 127
 -
 SAM_0577.JPG639.8 KB · Views: 127
 -
 SAM_0576.JPG303 KB · Views: 151
 -
 SAM_0583.jpg485 KB · Views: 115
 -
 SAM_0595.JPG165.2 KB · Views: 140
 -
 SAM_0596.JPG86.7 KB · Views: 188
 -
 SAM_0597.JPG387.8 KB · Views: 192
 -
 SAM_0598.JPG498.5 KB · Views: 195
 -
 SAM_0599.JPG572 KB · Views: 276
 -
 SAM_0600.JPG729.3 KB · Views: 280
Last edited:
I think this is all!!??
I hope so.
I hope so.
Attachments
-
 SAM_0603.JPG785.5 KB · Views: 174
 -
 SAM_0602.JPG768.2 KB · Views: 162
 -
 SAM_0601.JPG632.5 KB · Views: 202
 -
 SAM_0604.JPG918.5 KB · Views: 153
 -
 SAM_0605.JPG729.2 KB · Views: 142
 -
 SAM_0606.JPG529.5 KB · Views: 149
 -
 SAM_0609.JPG864 KB · Views: 221
 -
 SAM_0608.JPG895.7 KB · Views: 185
 -
 SAM_0607.JPG863.3 KB · Views: 135
 -
 SAM_0610.JPG846.3 KB · Views: 184
OH DEAR OOPS!
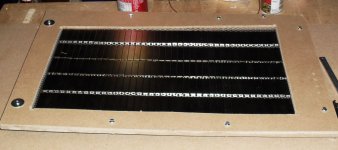
Even more!
Even more!
Attachments
-
 SAM_0611.JPG639.1 KB · Views: 141
 -
 SAM_0612.JPG905.7 KB · Views: 83
 -
 SAM_0613.JPG897.6 KB · Views: 81
 -
 SAM_0616.JPG699.4 KB · Views: 120
 -
 SAM_0615.JPG965.8 KB · Views: 113
 -
 SAM_0614.JPG968.1 KB · Views: 101
 -
 SAM_0617.JPG327.8 KB · Views: 122
 -
 SAM_0618.JPG362.5 KB · Views: 116
 -
 SAM_0619.JPG748.4 KB · Views: 89
 -
 SAM_0620.JPG853.2 KB · Views: 100
And more.
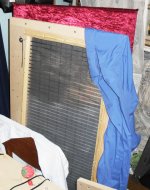
Sorry. The sewing is the hardest bit for me.
Sorry. The sewing is the hardest bit for me.
Attachments
-
 SAM_0621.JPG642.4 KB · Views: 128
 -
 SAM_0622.JPG685.2 KB · Views: 122
 -
 SAM_0623.jpg403.8 KB · Views: 121
 -
 SAM_0626.JPG963.6 KB · Views: 162
 -
 SAM_0625.jpg725.4 KB · Views: 178
 -
 SAM_0624.JPG827.3 KB · Views: 173
 -
 SAM_0643.JPG692.6 KB · Views: 182
 -
 SAM_0644.JPG757.4 KB · Views: 142
 -
 SAM_0645.JPG827.9 KB · Views: 108
 -
 SAM_0646.JPG433.1 KB · Views: 99
Nearly there.
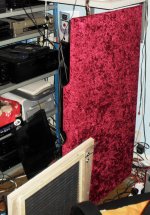
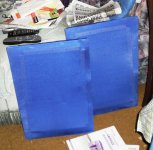
Not much longer.This is it for now got to crop some more and quite a lot of rebuilds, made the cover too small on the blue ones, need a lot more practise on the sewing machine.
Not much longer.This is it for now got to crop some more and quite a lot of rebuilds, made the cover too small on the blue ones, need a lot more practise on the sewing machine.
Attachments


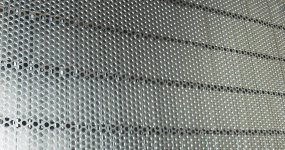
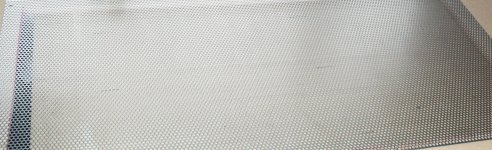
Hi there Henry: Your work, as depicted in the photos, is inspiring. Can you post photos of your method of tensoning the membrane. (I read your previous post for tensoning, but did not understand it.) I'm looking at 16 gage (0.0598-inches) 63% open perforated steel plate. Many thanks for the photos and information. ... regards, Michael
tensioning
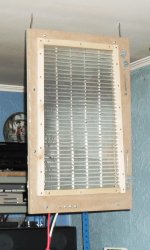
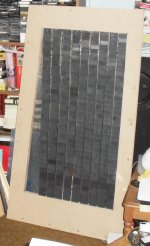
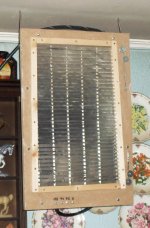
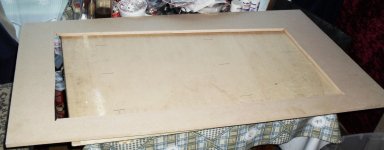
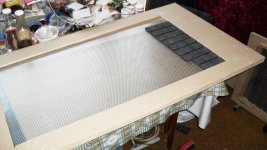
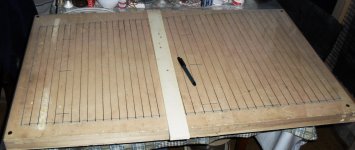
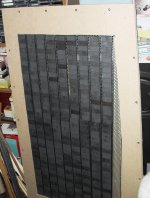
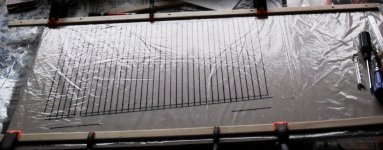
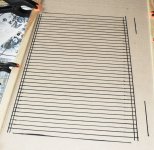
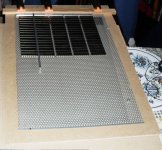
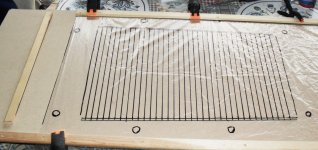
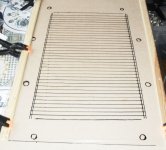
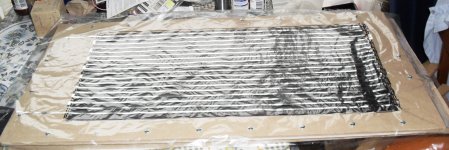
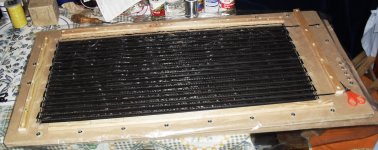
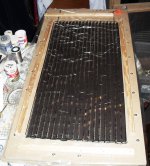
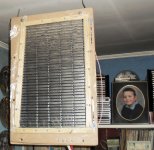
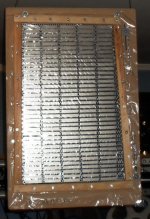
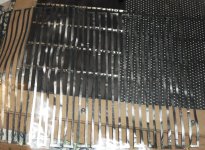
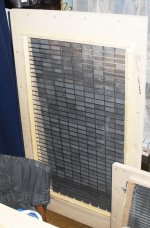
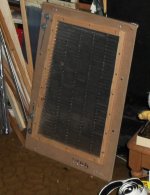
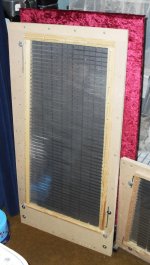
Place membrane in position over magnets making sure the tape is along the N/S axis. Cut holes where the screws or bolts go to hold the wood, which holds the membrane in position.
Place 3 screws or bolts in each piece of the 4 spread out, carefully introduce the points into the holes marked on the MDF base, and gently lower the wood into position, making sure you can still move the membrane easily.
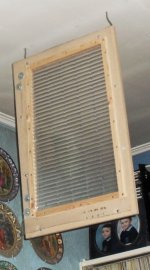
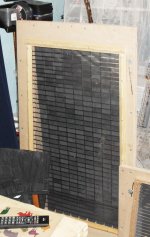
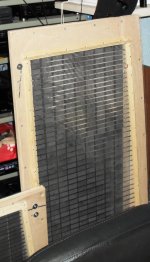
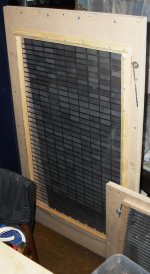
Position the membrane and tighten the screws gradually, whilst at the same time gently taking up the slack in the membrane. Working your way round and placing more screws or bolts in position. Gradually removing the ripples in the membrane.Tapping the membrane round the edges to check that it is taut all the way round. The middle should not be touching the magnets.If the membrane touches the magnets this will probably cause problems with the sound.
I hope this helps and the best of luck, patience is paramount when putting tape on membrane It is easily broken.Also be careful with magnets they can easily trap your fingers. I only use 3 mm thick neos. The total weight of the membrane is important the lower the better!
Place membrane in position over magnets making sure the tape is along the N/S axis. Cut holes where the screws or bolts go to hold the wood, which holds the membrane in position.
Place 3 screws or bolts in each piece of the 4 spread out, carefully introduce the points into the holes marked on the MDF base, and gently lower the wood into position, making sure you can still move the membrane easily.
Position the membrane and tighten the screws gradually, whilst at the same time gently taking up the slack in the membrane. Working your way round and placing more screws or bolts in position. Gradually removing the ripples in the membrane.Tapping the membrane round the edges to check that it is taut all the way round. The middle should not be touching the magnets.If the membrane touches the magnets this will probably cause problems with the sound.
I hope this helps and the best of luck, patience is paramount when putting tape on membrane It is easily broken.Also be careful with magnets they can easily trap your fingers. I only use 3 mm thick neos. The total weight of the membrane is important the lower the better!
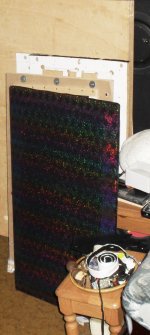
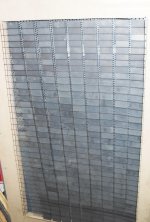
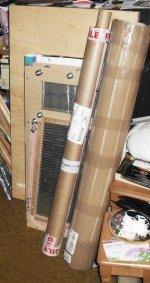
my last pictures
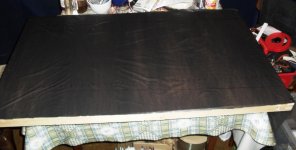
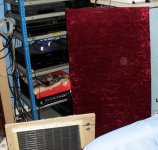
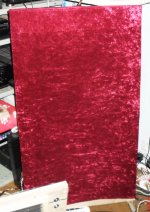
I have to do all my rebuilds next for more pictures. I shall probably cover them with material, better get practising with the sewing machine..
I have to do all my rebuilds next for more pictures. I shall probably cover them with material, better get practising with the sewing machine..
Attachments
-
 SAM_0552.jpg689.8 KB · Views: 929
 -
 SAM_0553.jpg515.1 KB · Views: 877
 -
 SAM_0556.jpg465.7 KB · Views: 833
 -
 SAM_0557.jpg532.3 KB · Views: 799
 -
 SAM_0559.jpg512.7 KB · Views: 784
 -
 SAM_0578.JPG733.5 KB · Views: 160
 -
 SAM_0568.JPG766.5 KB · Views: 134
 -
 SAM_0565.JPG900.4 KB · Views: 167
 -
 SAM_0579.JPG191.3 KB · Views: 154
 -
 SAM_0580.jpg410 KB · Views: 152
Hi Henry,
my greatest respect.... this is great and very inspiring!! I am tempted to build a couple myself.....
just a question - the electrostatics guys use clear (kitchen) film used for covering food, and that stuff apparently can be tensioned with a little bit of hot air from a hairdryer, have you ever looked into doing that? My guess would be that as the aluminum would not be shrinking, this might cause wrinkles. (or you would have to put the aluminum after tensioning the film....)
keep it up!
membrane shrinkage
Never tried shrinking with or without the aluminium foil, so cannot say whether it would work.You can tighten up by going round with the screws holding the 4 wood clamps as I have. Although they all corrugate the foil for ribbon speakers. If heating the membrane with foil on causes the foil to corrugate who knows it might work. But if it doesn't you can always do another membrane, as it doesn't cost much, only time and effort.
Never tried shrinking with or without the aluminium foil, so cannot say whether it would work.You can tighten up by going round with the screws holding the 4 wood clamps as I have. Although they all corrugate the foil for ribbon speakers. If heating the membrane with foil on causes the foil to corrugate who knows it might work. But if it doesn't you can always do another membrane, as it doesn't cost much, only time and effort.
perforated thickness
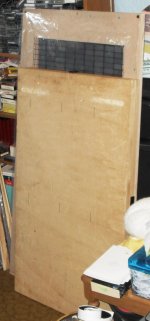
I use .25 mm, If you use thicker plate it would probably increase the field strength, although I have not tried it myself. I have enough rebuilds at the moment, if I did use a thicker sheet, that would mean even more rebuilds!!!I am in the process of rebuilding one of my original designs using ferrites, and I am trying different ideas in the rebuild. Have cut the MDF to size and shape, and will be putting the magnets on today. I stripped the old design yesterday, weight 80 lbs, too heavy for a man of my age to move about. Will be taking photos.
I use .25 mm, If you use thicker plate it would probably increase the field strength, although I have not tried it myself. I have enough rebuilds at the moment, if I did use a thicker sheet, that would mean even more rebuilds!!!
I am in the process of rebuilding one of my original designs using ferrites, and I am trying different ideas in the rebuild. Have cut the MDF to size and shape, and will be putting the magnets on today. I stripped the old design yesterday, weight 80 lbs, too heavy for a man of my age to move about. Will be taking photos.Hi there Henry: Thanks for the advice on the plate thickness. Your willingness to help others is admirable and your posts will be a long time contribution to DIY audio for permanent magnet flat panels.
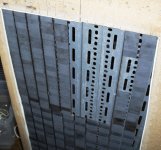
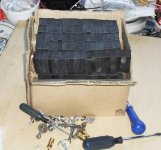
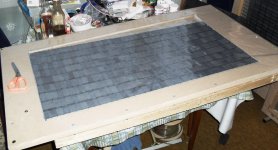
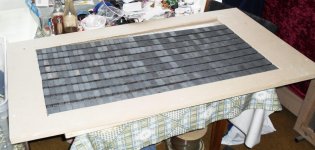
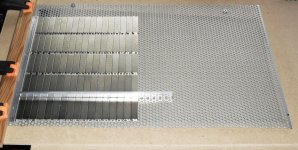
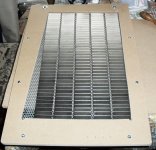
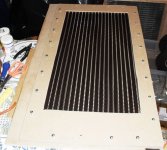
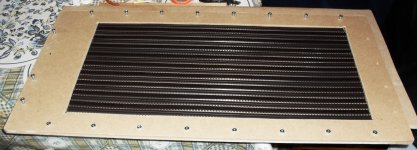
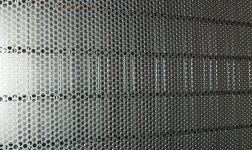
Your posts indicate that the NEO magnets you are using (50 mm x 12.7mm x 3mm) are magnetized through the 12.7mm sides, so that the columns are arranged ns-ns-ns-ns...ns. (Am I correct ?) With this arrangement, the magnets will attract each other as well as the preforated steel plate, leading to inherant magnet stability on the plate, (and no glue required) very cleaver design on your part! ...regards, Michael
Your posts indicate that the NEO magnets you are using (50 mm x 12.7mm x 3mm) are magnetized through the 12.7mm sides, so that the columns are arranged ns-ns-ns-ns...ns. (Am I correct ?) With this arrangement, the magnets will attract each other as well as the preforated steel plate, leading to inherant magnet stability on the plate, (and no glue required) very cleaver design on your part! ...regards, Michael
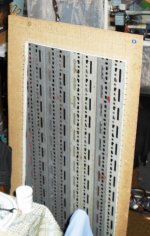
magnet layout on steel sheet
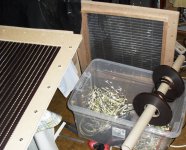
Yes the neo magnets don't need any glue, you have to slide them off and no chance of them moving unless you about 100G force!. Yes they are placed NSNSNSNS Next to each other, in columns or rows, so you can place the foil vertically or horizontally.It is slightly easier vertically as you don't have to make so many turns when placing the foil on the membrane.I didn't get round to putting the ferrites in position today. I planted some potatoes instead!Thank you for your kind words. I still have many neos left as I have turned the push pull designs into normal ones as I found out there was no difference in the sensitivity.
Yes the neo magnets don't need any glue, you have to slide them off and no chance of them moving unless you about 100G force!. Yes they are placed NSNSNSNS Next to each other, in columns or rows, so you can place the foil vertically or horizontally.It is slightly easier vertically as you don't have to make so many turns when placing the foil on the membrane.I didn't get round to putting the ferrites in position today. I planted some potatoes instead!Thank you for your kind words. I still have many neos left as I have turned the push pull designs into normal ones as I found out there was no difference in the sensitivity.
Big planar
Hi Henry,
I have been reading back through your many posts with great interest. I would really like to make a couple of fullrange planar speakers myself but don't have the time right now.
May I ask whether you got good bass from your 48 inchers? Enough to play dance music? What sort of SPl's are possible? 100DB ?
I realise that planars are normally considered to be suited to HIFI applications but I am wondering if more is possible.
If I could get up to Leicester could we do some tests with a meter if you haven't already?
Would you be interested in building some large ones? or maybe you know somone else in the UK?
Thx Eric
BIG PLANARS
Dear Eric, Have already built big planars up to 7' tall.Am in the process of rebuilding a 4' X 2' using ferrites which I built about 15 years ago. I have reduced the weight somewhat and used a thinner membrane and half the aluminium foil. This increases the sensitivity. I did build 4' ones using neos but have reduced the size to 60 x 40 cm.After using 23 um mylar A, and reducing the foil width. This gave the same results or even better than the 4' design, with the old membrane design. I have used a frequency meter to measure spot frequencies which I had on the HI- FI WORLD CD. Although I did find this very time consuming and boring. Not knowing how accurate the meter was didn't help! I prefer to listen than measure the ear is the best meter, although my upper frequency hearing stops at 10khz, being 72 years old.I am quite happy with the bass response of the 60 x 40 size and won't be building any more bigger ones with my remaining neo magnets, which I have plenty. Taking all my p/p designs apart as it wasn't worth the extra weight and work. I hope this helps with your decision. Bye the way, I play all types of music from classical to trance, dance, electronic, jazz, heavy metal garage, pop etc, etc. The bass is very tight and clean unlike the bass on the esl 57 & 63 which is plummy and resonant in comparison.
Dear Eric, Have already built big planars up to 7' tall.Am in the process of rebuilding a 4' X 2' using ferrites which I built about 15 years ago. I have reduced the weight somewhat and used a thinner membrane and half the aluminium foil. This increases the sensitivity. I did build 4' ones using neos but have reduced the size to 60 x 40 cm.After using 23 um mylar A, and reducing the foil width. This gave the same results or even better than the 4' design, with the old membrane design. I have used a frequency meter to measure spot frequencies which I had on the HI- FI WORLD CD. Although I did find this very time consuming and boring. Not knowing how accurate the meter was didn't help! I prefer to listen than measure the ear is the best meter, although my upper frequency hearing stops at 10khz, being 72 years old.I am quite happy with the bass response of the 60 x 40 size and won't be building any more bigger ones with my remaining neo magnets, which I have plenty. Taking all my p/p designs apart as it wasn't worth the extra weight and work. I hope this helps with your decision. Bye the way, I play all types of music from classical to trance, dance, electronic, jazz, heavy metal garage, pop etc, etc. The bass is very tight and clean unlike the bass on the esl 57 & 63 which is plummy and resonant in comparison.
Last edited:
- Status
- This old topic is closed. If you want to reopen this topic, contact a moderator using the "Report Post" button.
- Home
- Loudspeakers
- Planars & Exotics
- Full range planar speaker using neo magnets