I've been continuing to work on this alternative guitar cabinet that is meant to direct sound through a system of folded PVC pipe with several outlets, each at a different acoustic distance from the loudspeaker. With the outlets aimed in different directions, the idea is that the pipes work like delay lines, with arbitrary resonances within the pipes making for a very complex, room-filling sound that a conventional guitar cab can't reach.
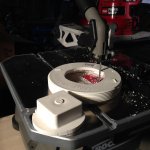
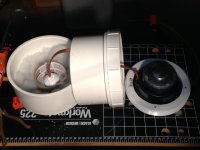
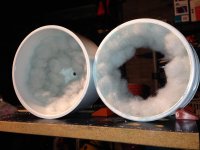
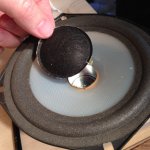
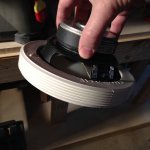
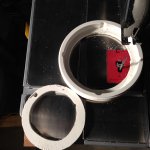
Work has focused on what I call the "head" - a 5" Carbonneau plastic-cone speaker screwed into an assembly of 6" PVC pipe parts to form a sealed enclosure. I plan to power the head initially from a 15W Fender Blues Junior. The FBJ is meant for 8 ohms whereas the Carbonneau is 4; as long as I don't have the amp just maxxed out it shouldn't be an issue and I figure I'll have some added resistance in the connectors to make up the difference anyway. I've got the inside of the enclosure lined with hunks of polyester fiberfill and the speaker jack has a 1-1/2" PVC cap silicone-caulked around it and the internal cable so that the jack is sealed off. Right now I'm just about ready to cement the two bottom PVC parts together and that will complete the head assembly.
I have tested the head with no polyfill and no sealed jack and it's got an appreciable low end and a pleasant tone, both with clean and distorted guitar. It's not very efficient; the master and volume settings I've run it at would send you out of the room if using the FBJ's own single 12" Eminence-sourced speaker.
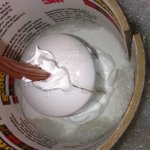
One problem I ran into was that the Carbonneau's dust cap was partially detached and was buzzing. After trying to fab my own dust cap using a hairspray-soaked used dryer softener sheet, a couple of aluminum drink can bottoms as forms, and a heat gun (it might have worked had I been able to remove the dryer sheet material from the bottom form), I decided to just run it without one. Is that going to create a situation where air is going to be shooting out from inside the voice coil out of phase from the cone, hurting my efficiency? Because the speaker isn't going to be out in the open by a long shot, I'm not really worried about dust.
I'm including some photos; I'd appreciate any comments.
Work has focused on what I call the "head" - a 5" Carbonneau plastic-cone speaker screwed into an assembly of 6" PVC pipe parts to form a sealed enclosure. I plan to power the head initially from a 15W Fender Blues Junior. The FBJ is meant for 8 ohms whereas the Carbonneau is 4; as long as I don't have the amp just maxxed out it shouldn't be an issue and I figure I'll have some added resistance in the connectors to make up the difference anyway. I've got the inside of the enclosure lined with hunks of polyester fiberfill and the speaker jack has a 1-1/2" PVC cap silicone-caulked around it and the internal cable so that the jack is sealed off. Right now I'm just about ready to cement the two bottom PVC parts together and that will complete the head assembly.
I have tested the head with no polyfill and no sealed jack and it's got an appreciable low end and a pleasant tone, both with clean and distorted guitar. It's not very efficient; the master and volume settings I've run it at would send you out of the room if using the FBJ's own single 12" Eminence-sourced speaker.
One problem I ran into was that the Carbonneau's dust cap was partially detached and was buzzing. After trying to fab my own dust cap using a hairspray-soaked used dryer softener sheet, a couple of aluminum drink can bottoms as forms, and a heat gun (it might have worked had I been able to remove the dryer sheet material from the bottom form), I decided to just run it without one. Is that going to create a situation where air is going to be shooting out from inside the voice coil out of phase from the cone, hurting my efficiency? Because the speaker isn't going to be out in the open by a long shot, I'm not really worried about dust.
I'm including some photos; I'd appreciate any comments.
Attachments
-
 IMG_1109.jpg610.9 KB · Views: 297
 -
 IMG_1132.jpg845.1 KB · Views: 80
 -
 IMG_1131.JPG699 KB · Views: 64
 -
 IMG_1130.jpg779.9 KB · Views: 65
 -
 IMG_1129.jpg256.9 KB · Views: 64
 -
 IMG_1128.JPG962.7 KB · Views: 253
 -
 IMG_1126.jpg923.5 KB · Views: 261
 -
 IMG_1112.jpg609.6 KB · Views: 266
 -
 IMG_1110.jpg624.4 KB · Views: 277
Looks good so far. May want to chamfer the back edge of the plug that the driver is mounted to. Giving it a bit more breathing room and help prevent reflections.
Microfiber towels work much better than polyester fiberfill. Easy to apply, cut to shape and a surface glued into place. The ones Target has are much thicker than what WallyWorld carries.
Minwax water based Polycrylic clear satin protectant works very well for sealing up mat fabrics like your fab'd dustcap. UV rated too")
Use a mold release compound or a good auto polish and apply many coats, buffing between coats to release.
Microfiber towels work much better than polyester fiberfill. Easy to apply, cut to shape and a surface glued into place. The ones Target has are much thicker than what WallyWorld carries.
Minwax water based Polycrylic clear satin protectant works very well for sealing up mat fabrics like your fab'd dustcap. UV rated too
Use a mold release compound or a good auto polish and apply many coats, buffing between coats to release.
Last edited:
I'm sure microfiber towels - from Target, not Wal-Mart - will have a certain effect in this enclosure but in what way do you believe that it is "better" than the polyfill?
My daughter also tsk-tsked me over the mold release compound; thanks for the suggestion as well as that of the Minwax protectant; if I try again I will look for both.
My daughter also tsk-tsked me over the mold release compound; thanks for the suggestion as well as that of the Minwax protectant; if I try again I will look for both.
Last edited:
Looks like any further new threads on this subject should go in Tubes / Valves; sorry.
My mistake; I meant Instruments and Amps.
I guess because this device is going to feature a crazy quilt of standing waves, I'm not all that worried about what standing waves may crop up in the head; I really only wanted to increase the apparent volume of the enclosure to extend its frequency range downward. If I had increased the physical volume by adding 6" PVC pipe, I'm sure I would have set up a pretty serious resonance in there.
I guess because this device is going to feature a crazy quilt of standing waves, I'm not all that worried about what standing waves may crop up in the head; I really only wanted to increase the apparent volume of the enclosure to extend its frequency range downward. If I had increased the physical volume by adding 6" PVC pipe, I'm sure I would have set up a pretty serious resonance in there.
Would only shift the resonances downward by increasing enclosure size. Dampening material within sealed enclosures serve two functions, breakup standing waves and to dampen resonances. Increased dampening will help by effectively increasing enclosure size, but there is a limit. Packed tightly won't do any good as the density would be to great thus reducing enclosure size and a loss of low end response would result.
BTW like your game plan, simple, cheap, durable, to the point and effective
BTW like your game plan, simple, cheap, durable, to the point and effective
Thanks! Right now the acoustic enclosure is a closer approximation to a sphere than a cylinder; there's no strong single directionality such that it can develop a strong "honk." I decided not to just stuff the whole volume with the polyfill because I felt like it would convert more energy into heat.
I'm rethinking running without a dust cap. There's an air-pumping action that would otherwise help cool the voice coil and I'm not happy with having an air path between the front of the cone and behind it. Will likely buy instead of build (I'm not seeing mold release agents being compatible with something you'd expect to glue to something else).
Other than that, the next milestone will be picking up a 6" cleanout receptacle to screw the head assembly into, adapt that down to 4" - and start laying out pipe for testing.
Two separate things. A flat panel can breakup a standing wave as can differing internal shape disperses them across a broad spectrum. Dampening can effectively increase the internal size of the enclosure while somewhat reducing the standing waves like in a acoustic suspension where they are normally dampened higher, but does apply to other types to a lesser degree.how is breaking up standing waves different from decreasing resonance?
1-7/8" dust cap on order from SpeakerWorks.com. They suggested I use "Crazy Glue" (cyanacrolate) but when I replaced dustcaps on a couple of aluminum-cone 10" Hartke speakers I got a good result with Gorilla Glue. I think a good result comes down to using as little of it as possible while making sure glue is present all the way around (will likely apply with a toothpick) and making sure that at least one of the mating surfaces is damp. Still keeping an eye out for my next two PVC parts to "complete the circuit" for some preliminary design testing.
Cyanoacrylates|BSI - Hobby Glues & Adhesives
IC2000 works a peach. Don't use accelerator on it to speed process.
IC2000 works a peach. Don't use accelerator on it to speed process.
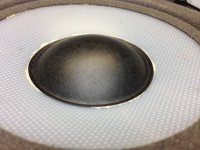
Have done the job using carefully applied Gorilla Glue; it expands a little but hopefully that will have helped it adhere all the way around. By the way, the plastic cone is covered with an array of tiny bumps so whatever glue is used has to gap-fill no matter what. Here's a photo of how it turned out.
Attachments
- Status
- This old topic is closed. If you want to reopen this topic, contact a moderator using the "Report Post" button.
- Home
- Loudspeakers
- Planars & Exotics
- Update to PVC Pipe Guitar Speaker Project