My ESL
I thought to share my journey of building my own electrostatic speakers to encourage and help others to start their own built.

Around two years ago I started to think about improving my stereo system. I was looking at different (commercial) options and the electrostats came into the spotlight. It did not take too much to find out that the magical electrostatic speaker can be built at home using tools and materials available for the average DIYer. As I have engineering and designing skills I thought I should give it a go.
I had Roger Sanders's esl cookbook to start with and later I have discovered a fellow DIYer Jazzmans's blog who carefully documented his own built.
While Mr Sanders's book is an excellent source for general information I also found it outdated. Nowdays we have more materials available and the building process has improved as well. Charlie's (Jazzman) blog contains all the details and background information that one needs to succeed with their own built.
Since I mostly followed Charlie's blog during my built I am not going to repeat it here, instead I am going to point out some key steps which I found necessary to be able to complete a working esl.
I found his process straightforward and simple. I tried to cut some corners here and there but soon realised that it always resulted in poorer quality and had to take a step back and start again. If one is just about to start their first built, it might be better to follow those advice first and than leave the tweaking for later.
Here are my additions to the process:
- when preparing the perforated metal sheet I think it is better to find a shop where they can roll the sheet flat instead of trying to do it by hand. It is essential to have a completely flat surface. The ideal stator spacing is around 1-2mm (fullrange panel >150-200Hz) and for better efficiency and higher spl it is essential to get close to the lower value. Therefore I would leave it to professionals. Because of the unevenness I ended up using 2mm spacing.
- I did not round the sharp edges, simple laziness! Instead I wrapped it around with electrician's insulating tape and it seems fine.
- I went for powder coating. The coating must be thick and cover the holes inside as well. It must be checked for defects and repaired or redone if needed to prevent arcing and for safety purposes! This cannot be emphasised enough!
- Best to use very high bound tape and a well known brand as spacer. These tapes have shelf life, so better check your source.
- I have seen many ways on how to attach cable to the coated panel. I simply cut a small 7X7mm square on the powder coating, scraped off inside the square and soldered the wire on. Simple! A powerful soldering iron is needed though.
- Stretching the mylar. Hahh, that was fun! See pictures.


It worked, but I had to hold my breath. I would build a proper jig next time. There is one rule here, one must be able to repeat the process (at least one more time for a stereo system) with the same result. We want both side sound the same.
- For coating I used the Lycron spray. After two years of daily use they still sound the same. One could measure its thickness, resistance.... etc. I did not do that.
That is it!
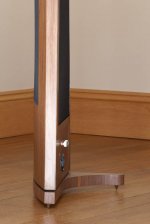
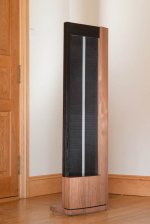
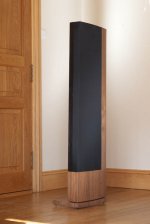
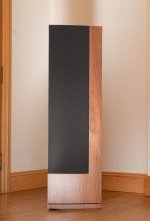
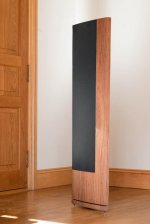
The final result is a beautifully playing panel, all it needs is a frame to be built in.
Here I took a different approach. Limited space and desire for good looking objects led me to the creation of my own design. All my projects start on the computer whether I am working on interior design, kitchen, furniture or other objects. After some sleepless night and many virtual prototypes I ended up with this curved shape. The panel is elevated to the listening position, the underneath space holds the electronics (power supply, and transformers), the curve creates and in the same time hides the necessary bulk. The physical barrier more than a necessary addition, it is part of the object, seamlessly integrated into the shape. I am very pleased with it.
Here I have to make a confession. Aesthetics are important to me. I am the kind of person who would sacrifice 10% sound quality for a more pleasing appearance. I think in this case I managed to find the right balance.
My panels are crossed over at 210Hz (still experimenting). For the low end I use Ripole subs on each side, based on the Peerless 830668 SLS-263 10" sub woofer driver.
Electronics and full system
Active crossover and equalisation is recommended. I started with a Behringer CX3400 active crossover and a Behringer DEQ2496 digital equaliser.
This is relatively cheap option and works well. However I soon discovered the limited capabilities of this setup and I moved to fully digital.
Now I have a dedicated pc (laptop) running a media player software and FIR filters for crossover and room correction. It sounds more pleasing this way. No signal conversion between units, no DA/AD conversion, everything is taken care of in the digital domain. No soldering needed to change parameters of the crossover, endless tweaking is possible.
A good quality (external) audio card is a must. FIR filters are generated in a software called Acourate developed by Dr. Ulrich Brüggemann.
Currently, I am in a process of building my own amp based on Hypex UCD400HG+HxR modules. Started to work on the design of the case, watch out!
I felt I owe the diyAudio community to report back on my successful built.
I am very thankful to all those on this site who have helped me.
Special thanks for Jazzman documenting and posting his own built and for Calvin providing endless expert advice.
Thomas
I thought to share my journey of building my own electrostatic speakers to encourage and help others to start their own built.
Around two years ago I started to think about improving my stereo system. I was looking at different (commercial) options and the electrostats came into the spotlight. It did not take too much to find out that the magical electrostatic speaker can be built at home using tools and materials available for the average DIYer. As I have engineering and designing skills I thought I should give it a go.
I had Roger Sanders's esl cookbook to start with and later I have discovered a fellow DIYer Jazzmans's blog who carefully documented his own built.
While Mr Sanders's book is an excellent source for general information I also found it outdated. Nowdays we have more materials available and the building process has improved as well. Charlie's (Jazzman) blog contains all the details and background information that one needs to succeed with their own built.
Since I mostly followed Charlie's blog during my built I am not going to repeat it here, instead I am going to point out some key steps which I found necessary to be able to complete a working esl.
I found his process straightforward and simple. I tried to cut some corners here and there but soon realised that it always resulted in poorer quality and had to take a step back and start again. If one is just about to start their first built, it might be better to follow those advice first and than leave the tweaking for later.
Here are my additions to the process:
- when preparing the perforated metal sheet I think it is better to find a shop where they can roll the sheet flat instead of trying to do it by hand. It is essential to have a completely flat surface. The ideal stator spacing is around 1-2mm (fullrange panel >150-200Hz) and for better efficiency and higher spl it is essential to get close to the lower value. Therefore I would leave it to professionals. Because of the unevenness I ended up using 2mm spacing.
- I did not round the sharp edges, simple laziness! Instead I wrapped it around with electrician's insulating tape and it seems fine.
- I went for powder coating. The coating must be thick and cover the holes inside as well. It must be checked for defects and repaired or redone if needed to prevent arcing and for safety purposes! This cannot be emphasised enough!
- Best to use very high bound tape and a well known brand as spacer. These tapes have shelf life, so better check your source.
- I have seen many ways on how to attach cable to the coated panel. I simply cut a small 7X7mm square on the powder coating, scraped off inside the square and soldered the wire on. Simple! A powerful soldering iron is needed though.
- Stretching the mylar. Hahh, that was fun! See pictures.
It worked, but I had to hold my breath. I would build a proper jig next time. There is one rule here, one must be able to repeat the process (at least one more time for a stereo system) with the same result. We want both side sound the same.
- For coating I used the Lycron spray. After two years of daily use they still sound the same. One could measure its thickness, resistance.... etc. I did not do that.
That is it!
The final result is a beautifully playing panel, all it needs is a frame to be built in.
Here I took a different approach. Limited space and desire for good looking objects led me to the creation of my own design. All my projects start on the computer whether I am working on interior design, kitchen, furniture or other objects. After some sleepless night and many virtual prototypes I ended up with this curved shape. The panel is elevated to the listening position, the underneath space holds the electronics (power supply, and transformers), the curve creates and in the same time hides the necessary bulk. The physical barrier more than a necessary addition, it is part of the object, seamlessly integrated into the shape. I am very pleased with it.
Here I have to make a confession. Aesthetics are important to me. I am the kind of person who would sacrifice 10% sound quality for a more pleasing appearance. I think in this case I managed to find the right balance.
My panels are crossed over at 210Hz (still experimenting). For the low end I use Ripole subs on each side, based on the Peerless 830668 SLS-263 10" sub woofer driver.
Electronics and full system
Active crossover and equalisation is recommended. I started with a Behringer CX3400 active crossover and a Behringer DEQ2496 digital equaliser.
This is relatively cheap option and works well. However I soon discovered the limited capabilities of this setup and I moved to fully digital.
Now I have a dedicated pc (laptop) running a media player software and FIR filters for crossover and room correction. It sounds more pleasing this way. No signal conversion between units, no DA/AD conversion, everything is taken care of in the digital domain. No soldering needed to change parameters of the crossover, endless tweaking is possible.
A good quality (external) audio card is a must. FIR filters are generated in a software called Acourate developed by Dr. Ulrich Brüggemann.
Currently, I am in a process of building my own amp based on Hypex UCD400HG+HxR modules. Started to work on the design of the case, watch out!
I felt I owe the diyAudio community to report back on my successful built.
I am very thankful to all those on this site who have helped me.
Special thanks for Jazzman documenting and posting his own built and for Calvin providing endless expert advice.
Thomas
Attachments
Last edited:

")
Thank you very much, I am glad you guys like it.
I used 6um Mylar. I put 5 Liters of water (5kg) on each hook, 26x5kg. I would not recommend it, not this way at least. Its dangerous!
On a proper jig this method would give consistent result and full control.
Health and safety first!
I used 6um Mylar. I put 5 Liters of water (5kg) on each hook, 26x5kg. I would not recommend it, not this way at least. Its dangerous!
On a proper jig this method would give consistent result and full control.
Health and safety first!

Beautiful woodwork! Man, all you guys with well-equipped wood shops are making me feel terrible. No wonder my wife can't stand my Lucas ESLs: they're ugly compared to these and those made by Jazzman and Fperra.
I'm in the process of building another set based on Jazzman's design and am now inspired to pay some attention to the woodwork!
I'm in the process of building another set based on Jazzman's design and am now inspired to pay some attention to the woodwork!
- Status
- This old topic is closed. If you want to reopen this topic, contact a moderator using the "Report Post" button.
- Home
- Loudspeakers
- Planars & Exotics
- My ESL