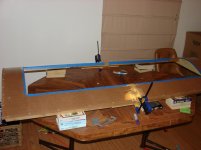
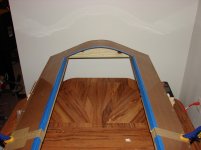
Moving on...
1. Build mounting jig. I used 2x10 boards for the ends. I stood one stator up on the board and traced the curve of the stator. Then I drew a straight line continuing the curve on each end and cut them on a band saw. Some sanding and smoothing was needed afterwards.
2. Masonite - Cut a 34"x72" rectangle. (Be sure to use fine-tooth blades for whatever you use to cut masonite) I measured out a 20"x60" rectangle to cut out of the center for the mounting area for the stator. This gave 6" of space on either end and 4" on the sides.
3. Bend Masonite over the arced boards, glue, screw, and clamp together. Make sure the smooth side of the masonite is facing up.
4. I used 1"x1" supports underneath the long sides of the masonite, since the masonite by itself is not strong enough to support it's own weight over that distance.
5. I had to cut the jig in half to fit in my car when I was leaving my parents' garage. The Irwin clamps in the photos are holding it together where I cut it.
6. I also covered the entire working surface of the masonite in clear packing tape. Tape by itself will strip the top layers of the masonite off, but will stick quite well and protect the masonite.
7. Don't laugh, I had to set this up on an old kitchen table in my apartment. the books under the sides help to stabilize it.
Attachments
Last edited:
Moving on...
7. Don't laugh, I had to set this up on an old kitchen table in my apartment. the books under the sides help to stabilize it.
Done in the true spirit of DIY!!!! GREAT GOING!!!!!!

- Status
- This old topic is closed. If you want to reopen this topic, contact a moderator using the "Report Post" button.