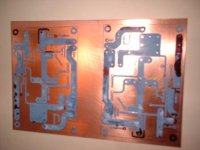
I made these boards with Staple brand Basic Inkjet Photo Paper.
I read about it on the net. http://www.fullnet.com/u/tomg/gooteepc.htm
The board trace is imprinter on the inkjet paper with a laser printer. A inkjet printer can't be used.
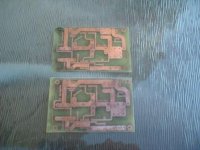
Pic od transer with paper removed:
I read about it on the net. http://www.fullnet.com/u/tomg/gooteepc.htm
The board trace is imprinter on the inkjet paper with a laser printer. A inkjet printer can't be used.
Pic od transer with paper removed:
Attachments


Even magnified your pics, the traces look really good, seems like a good trick.
I don't have a good camera for close ups.

It's better than the Tech2000 transfer film. I used the Tech2000.
This cost 1/2 of the cost of the Tec2000 and looks better. 30 sheets of the Staple Basic Photo paper cost me $9. It was on sale from $15.
One thing I should have done was keep the iron on longer.
When the paper starts to brown and the edges stick the copper, you're almost there.
It's tough to get the paper off once it's on, but the transfer is strong. It won't come off from scrubbing.
I also used this procedure.
I used matt paper, 90g (very light), 8,30 Euro for 100 sheets...
I've made several experiments and the procedure is - almost - near to the perfection.
Tricks:
pre-heating: a thick paper between the iron and the copper seems to prevent non-homogeneus heating.
heating: pressure is as important as iron temperature is.
pealing-off: use some tensio-active (i.e. standard detergent, I use one for floor washing): you will see the paper to become transparent, and very easy to remove. Your thumbs and a toothbrush will do the rest of the work.
With a permanent marker, correct the eventual holes (take care: the ink seems to dislike the edges, two pass is better than one).
Etching: try with Muriatic Acid and Hydrogen Peroxide, it's very fast (but use a mask and glasses, and protective gloves).
Try this procedure, it's really easier and useful than you can imagine (but don't mind Veteran, your boards are of another planet...)
Try this procedure, it's really easier and useful than you can imagine (but don't mind Veteran, your boards are of another planet...)
Yes, they are nice boards. I used the ZV9 board as my test because it had a nice reverse image of the trace. It's also the only board I don't have!

Vince
Vince,
Looks really good. Now you need to find a source for super tiny drill bits. That was the tricky part for me. I've made quite a few boards using the "Press-n-peel" blue stuff.
The only thing I would comment is that it looks like you etched away quite a bit of material which "consumes" your etching solution. Next time you may consider keeping that material there, attaching it to your ground plane and only etching away a small (maybe 1/16" - 1/8") seperation around the individual traces. This way you use a lot less of your etching solution. The etching solution becomes less effective with use as the acid molecules are consumed eating away the copper.
--
Danny
Another helpful tip
Another tip I picked up from the Pulsar TTS paper site: to get a nice high pressure from your iron onto the PCB by:
1. tacking the image to the PCB with your iron so they don't move with respect to each other, and then:
2. put a dowel (wooden broomstick) between the PCB and the ironing board, and iron the PCB/paper combination ON the dowel, rolling it slowly from end to end. (I found that the edges of the board need to be touched up with the tip of the iron in the usual manner, though.)This increases the pressure a lot, your arm and the ironing board don't feel as if they are going to break.
I have tried this modification once and it was quite nice. (I bought one of those laminators which the TTS bloke advertizes and it didn't even melt the toner onto the board. And I don't need a laminator for anyting else )
Regards,
George.
Another tip I picked up from the Pulsar TTS paper site: to get a nice high pressure from your iron onto the PCB by:
1. tacking the image to the PCB with your iron so they don't move with respect to each other, and then:
2. put a dowel (wooden broomstick) between the PCB and the ironing board, and iron the PCB/paper combination ON the dowel, rolling it slowly from end to end. (I found that the edges of the board need to be touched up with the tip of the iron in the usual manner, though.)This increases the pressure a lot, your arm and the ironing board don't feel as if they are going to break.
I have tried this modification once and it was quite nice. (I bought one of those laminators which the TTS bloke advertizes and it didn't even melt the toner onto the board. And I don't need a laminator for anyting else
)Regards,
George.
- Status
- This old topic is closed. If you want to reopen this topic, contact a moderator using the "Report Post" button.
- Home
- Amplifiers
- Pass Labs
- DIY ZV9 boards with Inkjet Photo Paper