Well after 1.5 years its finally done.
Its bold and bright to say the least; works great.
I'm so tired of working on this...I don't even have the energy to finish the web site yet. Suffice it to say I had absolutely no tools and no clue when I started this 1.5 years ago. Now I've designed PCBs, used relays, done a ton of stuff I don't even recall, hundreds of hours and I don't even want to think how much (one thousand $ or so...) I spent on this..... boy am I tired. Everything you see I made or designed (like PCBs or panels, these were designed by me and made by outside vendors). This was supposed to be a unique design made for the fun of learning, not to save money.
This is truely my 1st project in over a decade; but I built a Gainclone during the middle of this project, so that's my first complete project. See Here for the GainClone thread.
Front1 (very large picture)
Front2 (very large picture)
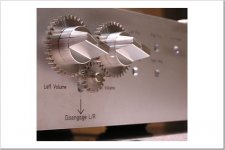
Gears--super zoom
Inside This was taken when there was only the DRV134PA board to install on input #3 left to go. All other inputs are done and connect directly to the BOSOZ circuitry (#3 is a SE input with DRV134's to balance them to the BOSOZ circ.) This is why I have another power supply that ends with the unterminated cable you see in the picture.
With Not Your Mommy's Gainclone (Gainclone thread is located Here) I tried to make these match even though the chassis' are different.
With Pass Aleph 3 (not a diy Aleph) operating with all LEDs turned off (except backlight). The switches on the right side deactivate all non-preamplifier circuitry, all of it...except the 2 LEDs used for backlighting the gears. I found that you absolutely need an indicator to show you when the power is turned on. So this preamp operates as shown with only the 2 LEDs active. No accusing this of having extra noise due to the 20+ LEDs.
Panel construction with microscope slide. If anyone wants some of these I've got a box to send you.
Back Panel Yes, I still have to drill holes in the cover, right now I use this with the cover off. It of course gets very hot.
A more complete description on my new (but not even close to being finished) web site.
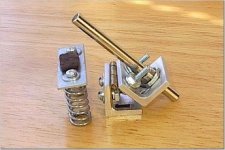
Attached you see an image of the spring loaded balance structure that is located behind the front panel.
Please post or email comments.
Its bold and bright to say the least; works great.
I'm so tired of working on this...I don't even have the energy to finish the web site yet. Suffice it to say I had absolutely no tools and no clue when I started this 1.5 years ago. Now I've designed PCBs, used relays, done a ton of stuff I don't even recall, hundreds of hours and I don't even want to think how much (one thousand $ or so...) I spent on this..... boy am I tired. Everything you see I made or designed (like PCBs or panels, these were designed by me and made by outside vendors). This was supposed to be a unique design made for the fun of learning, not to save money.
This is truely my 1st project in over a decade; but I built a Gainclone during the middle of this project, so that's my first complete project. See Here for the GainClone thread.
Front1 (very large picture)
Front2 (very large picture)
Gears--super zoom
Inside This was taken when there was only the DRV134PA board to install on input #3 left to go. All other inputs are done and connect directly to the BOSOZ circuitry (#3 is a SE input with DRV134's to balance them to the BOSOZ circ.) This is why I have another power supply that ends with the unterminated cable you see in the picture.
With Not Your Mommy's Gainclone (Gainclone thread is located Here) I tried to make these match even though the chassis' are different.
With Pass Aleph 3 (not a diy Aleph) operating with all LEDs turned off (except backlight). The switches on the right side deactivate all non-preamplifier circuitry, all of it...except the 2 LEDs used for backlighting the gears. I found that you absolutely need an indicator to show you when the power is turned on. So this preamp operates as shown with only the 2 LEDs active. No accusing this of having extra noise due to the 20+ LEDs.
Panel construction with microscope slide. If anyone wants some of these I've got a box to send you.
Back Panel Yes, I still have to drill holes in the cover, right now I use this with the cover off. It of course gets very hot.
A more complete description on my new (but not even close to being finished) web site.
Attached you see an image of the spring loaded balance structure that is located behind the front panel.
Please post or email comments.
Attachments
right....
Originally the gears were going to on the inside, hidden. But I had no room, and they looked really nice so I put them on the outside.
Despite all the wires, there is no hum, its really quiet. I have a signal star ground on one side and a power star ground near the xformers. Maybe this helped, not sure.
Blue lights? I don't really like blue that much, but green and red would not have gone with the amber. OK, blue is not bad.
Attachments
Blue lights? I don't really like blue that much, but green and red would not have gone with the amber. OK, blue is not bad.
Looks like you've got a REAL 'blue light special' there.

Very nice. Good work.
PS: don't forget to try to find a way to get some holes in the bottom too. Hot air won't come out if it can't get in!
Very impressive, it give me hope for how my preamp might turn out and that it might someday be finished.
What method did you use for putting all the very tidy and professional looking lettering on your faceplace and backplate. I've been doing some serious headscratching trying to figure out how I am going to handle that, and my chassis should be arriving next week. Did you get your chassis from Lansing? It look s familiar.
Terry

That's really a wonderfull work!
Can you tell me more about the side pannels you used? We call this "profilé" in french, don't know the english word. I've been looking for this kind of stuff for some time. That seems to be a nice way to build a chassis without too much trouble. Where can I get some?
Can you tell me more about the side pannels you used? We call this "profilé" in french, don't know the english word. I've been looking for this kind of stuff for some time. That seems to be a nice way to build a chassis without too much trouble. Where can I get some?
answers pt. 1
Thanks for the mostly positive responses! I thought many of you would think this to be the most gaudy, tacky and obnoxious preamp out there. But I wouldn't change a thing, I wanted it to be just like this, which is the good thing about DIY, you can make whatever you want.
I'll try to answer a few of your questions, and will answer the rest later.
If you look at the under construction photos, you will see that I drilled the heck out of the bottom to allow for convection. Here is a picture of the bottom plate:
I drilled holes specifically under the heatsink/transistor combos that actually get hot. So the holes are strategically located. Also, this pictures shows that I used Vibrapods for feet. I guess that I forgot to mention that before.
The gears work great! In the clockwise, increase volume direction, they are flawless, but they sometimes lose lock when you turn the volume down even though I doubled up the springs. You see that I used Alps stepped attenuators for the vol control (sometimes called blue velvet), and had I used a conductive plastic pots the gears would work a lot better in that they would mesh easier upon the spring release of the interlock. The Alps had 1% matching between decks (so I'm told) and were closer in value to the original circuit requirements, so I took them. So its still performance over ease of use. Also, round knobs would be tough to use so I selected aluminum knobs with a flat projection. They are Keystone (I think) from Mouser (definatley from Mouser).
The faceplate is from Front Panel Express. You download their CAD software and email them the design (or in my case I shipped the panel to them as well), they make the panel from stock or from your shipped panel. The CAD system is good to use even if you make your own panels because you can print it out at 100% and overlay the paper on your metal panel to assist with cutouts etc...
FYI, they told me that they will start to sell full cases in Jan., so you should be able to get a whole custom case from them, which will be pretty nice. My front prob. cost $60, and back about $40. I had them do the front panel twice (I had 2 blanks) due to excessive scratches on the 1st try. 2nd try was free, good customer service. You see some imperfections in the super-zoom photo, can't really tell at a norma viewing distance. The lettering is actually etched in the metal and the etching are filled in with colored ink.
The case is a Scroff multipac. Click here and type "multipac" into the oneclick box at the top. The Case is ok, but not very sturdy for my application which exerts a lot of spring loaded force on the bottom plate.
I'll get to the rest of the questions in the next day or so.
Thanks for the mostly positive responses! I thought many of you would think this to be the most gaudy, tacky and obnoxious preamp out there. But I wouldn't change a thing, I wanted it to be just like this, which is the good thing about DIY, you can make whatever you want.
I'll try to answer a few of your questions, and will answer the rest later.
PS: don't forget to try to find a way to get some holes in the bottom too. Hot air won't come out if it can't get in!
If you look at the under construction photos, you will see that I drilled the heck out of the bottom to allow for convection. Here is a picture of the bottom plate:
An externally hosted image should be here but it was not working when we last tested it.
I drilled holes specifically under the heatsink/transistor combos that actually get hot. So the holes are strategically located. Also, this pictures shows that I used Vibrapods for feet. I guess that I forgot to mention that before.
How good are the gears in tracking the volume level with two different pots?
The gears work great! In the clockwise, increase volume direction, they are flawless, but they sometimes lose lock when you turn the volume down even though I doubled up the springs. You see that I used Alps stepped attenuators for the vol control (sometimes called blue velvet), and had I used a conductive plastic pots the gears would work a lot better in that they would mesh easier upon the spring release of the interlock. The Alps had 1% matching between decks (so I'm told) and were closer in value to the original circuit requirements, so I took them. So its still performance over ease of use. Also, round knobs would be tough to use so I selected aluminum knobs with a flat projection. They are Keystone (I think) from Mouser (definatley from Mouser).
What method did you use for putting all the very tidy and professional looking lettering on your faceplace and backplate. I've been doing some serious headscratching trying to figure out how I am going to handle that, and my chassis should be arriving next week. Did you get your chassis from Lansing? It look s familiar.
The faceplate is from Front Panel Express. You download their CAD software and email them the design (or in my case I shipped the panel to them as well), they make the panel from stock or from your shipped panel. The CAD system is good to use even if you make your own panels because you can print it out at 100% and overlay the paper on your metal panel to assist with cutouts etc...
FYI, they told me that they will start to sell full cases in Jan., so you should be able to get a whole custom case from them, which will be pretty nice. My front prob. cost $60, and back about $40. I had them do the front panel twice (I had 2 blanks) due to excessive scratches on the 1st try. 2nd try was free, good customer service. You see some imperfections in the super-zoom photo, can't really tell at a norma viewing distance. The lettering is actually etched in the metal and the etching are filled in with colored ink.
The case is a Scroff multipac. Click here and type "multipac" into the oneclick box at the top. The Case is ok, but not very sturdy for my application which exerts a lot of spring loaded force on the bottom plate.
I'll get to the rest of the questions in the next day or so.
How good are the gears?
Actually to correct the above quote:
I have discovered, though actually using this, that if you turn the volume up with the righthand vol knob, and turn the volume down with the lefthand vol knob, the gears work reliably in both directions. Turns out that the rotational forces cause the coupling gear, when operated in this manner, to want to go up (rather than down), and thus increases traction on the two gears above it. Its only when operated opposite to that described above that you can get the coupling gear to pop out, as it appears that the rotational forces sometimes overcome the upward spring force if used that way.
So this is actually a very workable system. As I am not a mech. engr. I didn't see this, but that's how it actually works.
Actually to correct the above quote:
In the clockwise, increase volume direction, they are flawless, but they sometimes lose lock when you turn the volume down even though I doubled up the springs
I have discovered, though actually using this, that if you turn the volume up with the righthand vol knob, and turn the volume down with the lefthand vol knob, the gears work reliably in both directions. Turns out that the rotational forces cause the coupling gear, when operated in this manner, to want to go up (rather than down), and thus increases traction on the two gears above it. Its only when operated opposite to that described above that you can get the coupling gear to pop out, as it appears that the rotational forces sometimes overcome the upward spring force if used that way.
So this is actually a very workable system. As I am not a mech. engr. I didn't see this, but that's how it actually works.
Answers, pt. 2
In addition to allowing for disengagement, the disengage feature allows for a wide tolerance of the left and right gear through holes; if the holes don't match as precisely as you want, you don't worry because you have a gear that is being forced upward until it mashes with the other 2 gears. So this gave me some comfort that the whole thing would work.
I have not really listened for this yet and also have not tweaked the gains on my input pots for the bosoz circ. So I won't have a chance to fully answer this for maybe 2 weeks. I'll post something when I am able to, check back.
They are the standard side panels from the Schroff multipac referenced in my earlier post. Do you want a pair? I've got the following extra pieces-- unused in original packaging: 2 side panels and a back panel. I've also got a faceplate very similar to the one in the pictures, predrilled and labeled essentially as shown. It had too many scratches for me so I didn't use it. I'm willing to sell for a reasonable fee plus shipping. You just need to add top and bottom panels which I cannot supply. Email me if you want these; I'll probably put them in the for sale section in a few weeks if there is no immediate interest.
Yes, but I was in uncharted waters and just stuck to the basics? If I did it again I'd probably try it that way, though I would have to come up with a different way to disengage. Wonder if it would have a problem with binding?
Wow, thanks for the compliment! I'm thinking that its not quite like a Swiss watch, it only has 3 gears; its not understated, rather its overstated; its not small, its big.
Hopefully this gave some of you ideas, this was probably too complicated for my 1st project but at least I got through it, at times I thought I wouldn't. I like this design because it offers the following features in addition to the standard ones you get with the BOSOZ circuit: (a) provides a maximum amount of visible information about the operating status through LEDs, (b) is very flexible as to which circ. parts you can have operating at any one time, (c) has good SE and Differential input options (bal xlr, drv, std rca), (d) has 8 outputs (2 sets of SE, 2 sets of Bal), and because it remembers the last input selected. Its really loaded with flexibility, and while the volume gears get a lot of attention the rest of it is quite useful though not as unique.
I especially like the disengage feature that allows you to balance between the channels.
In addition to allowing for disengagement, the disengage feature allows for a wide tolerance of the left and right gear through holes; if the holes don't match as precisely as you want, you don't worry because you have a gear that is being forced upward until it mashes with the other 2 gears. So this gave me some comfort that the whole thing would work.
How do the drv inputs compare to the preamp doing the balancing? Is it a noticeable difference for the better, or worse?
I have not really listened for this yet and also have not tweaked the gains on my input pots for the bosoz circ. So I won't have a chance to fully answer this for maybe 2 weeks. I'll post something when I am able to, check back.
Can you tell me more about the side pannels you used? We call this "profilé" in french, don't know the english word.
They are the standard side panels from the Schroff multipac referenced in my earlier post. Do you want a pair? I've got the following extra pieces-- unused in original packaging: 2 side panels and a back panel. I've also got a faceplate very similar to the one in the pictures, predrilled and labeled essentially as shown. It had too many scratches for me so I didn't use it. I'm willing to sell for a reasonable fee plus shipping. You just need to add top and bottom panels which I cannot supply. Email me if you want these; I'll probably put them in the for sale section in a few weeks if there is no immediate interest.
maybe you should have used an upper and a lower gear... that way it's loaded in either direction.
Yes, but I was in uncharted waters and just stuck to the basics? If I did it again I'd probably try it that way, though I would have to come up with a different way to disengage. Wonder if it would have a problem with binding?
You are sure you are not Swiss ?
Wow, thanks for the compliment! I'm thinking that its not quite like a Swiss watch, it only has 3 gears; its not understated, rather its overstated; its not small, its big.
Hopefully this gave some of you ideas, this was probably too complicated for my 1st project but at least I got through it, at times I thought I wouldn't. I like this design because it offers the following features in addition to the standard ones you get with the BOSOZ circuit: (a) provides a maximum amount of visible information about the operating status through LEDs, (b) is very flexible as to which circ. parts you can have operating at any one time, (c) has good SE and Differential input options (bal xlr, drv, std rca), (d) has 8 outputs (2 sets of SE, 2 sets of Bal), and because it remembers the last input selected. Its really loaded with flexibility, and while the volume gears get a lot of attention the rest of it is quite useful though not as unique.
Coming in a little late on this one...
Having used a very similiar gear set-up before (non audio related though) I have a couple of suggestions (for your next one ). If you used gears with finer teeth it would allow for finer adjustment, unless you are using a stepped attenuator in which case the sweep of the steps would dictate pitch. Also, instead of using the rocker mechanism to engage/disingage, a push/pull would be simpler, more reliable and would fix your deflection problem.
I wish I had implemented this into an audio project myself, but now I can't allow myself to do so, my artsy side won't allow me to be a copycat. If you find the time, and I'm sure you will, make some more stuff utilising the gears, it's a nice trademark.
Having used a very similiar gear set-up before (non audio related though) I have a couple of suggestions (for your next one
). If you used gears with finer teeth it would allow for finer adjustment, unless you are using a stepped attenuator in which case the sweep of the steps would dictate pitch. Also, instead of using the rocker mechanism to engage/disingage, a push/pull would be simpler, more reliable and would fix your deflection problem. I wish I had implemented this into an audio project myself, but now I can't allow myself to do so, my artsy side won't allow me to be a copycat. If you find the time, and I'm sure you will, make some more stuff utilising the gears, it's a nice trademark.
- Status
- This old topic is closed. If you want to reopen this topic, contact a moderator using the "Report Post" button.
- Home
- Amplifiers
- Pass Labs
- Not Your Mommy's BOSOZ - Finished