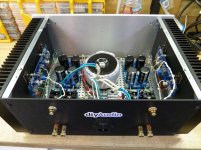
F5 built from latest boards. Used 4U case, parts from Mouser.
Case is beautifully done, but not easy to assemble. I would contribute comments and suggestions if anyone wants to do a Chassis build guide.
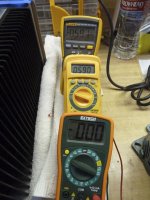
Biased up without a problem. I set bias to about .5 volts and put the top on for an hour of listening. Touched up the bias to .59v with .00 offset on the speaker terminals.
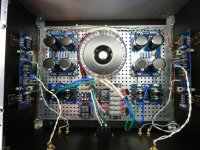
All stock assembly, except I put in eBay speaker protection board (seen next to terminal strip. To be completed is cleaning up power wiring and connecting speaker protection.
Thanks to all that guided me through this, especially 6L6.
Randy
Case is beautifully done, but not easy to assemble. I would contribute comments and suggestions if anyone wants to do a Chassis build guide.
Biased up without a problem. I set bias to about .5 volts and put the top on for an hour of listening. Touched up the bias to .59v with .00 offset on the speaker terminals.
All stock assembly, except I put in eBay speaker protection board (seen next to terminal strip. To be completed is cleaning up power wiring and connecting speaker protection.
Thanks to all that guided me through this, especially 6L6.
Randy
Attachments
Thanks. The build went fairly smooth. I am an experienced builder, both kits and from scratch. Would be tough for an someone starting out, I think.
There is some improvising needed. 6L6's build guide helped a lot. Extreme care needed in mounting Fets and thermistors on the heat sinks. Stuffing boards was straight forward, sourced parts fairly easily (Jameco, Mouser, local surplus store). JFets were purchased from Spencer in Singapore.
If you are starting an F5, some thoughts...
Get at least one quality DVM. Flukes are expensive but worth it. I also used two cheap DVMs for monitoring, but always used the readings from the Fluke for making final settings.
Check the values of ALL resistors. No need to buy expensive ones, as you can get a bunch of 5% or 2% and match ones needed within 1% without much trouble. Gets you to a balanced bias voltage.
I found some nice #18 and #16 teflon coated wire at a surplus house. Not very expensive and is easier to use then the cheap vinyl stuff.
Double, triple check solder joints.
Double check that the FETs are not shorted to the heatsinks.
I used a covered barrier strip for the AC wiring. I avoid any exposed AC line (mains) voltage in the amp.
The 4U case is tricky to put together. When assembling the case, tape cardboard on the front panel, and the edges. It is soft metal and will ding easily. Leave the protective plastic on the other metal pieces until just before final assembly. Attach PCBs (with wires attached) to heatsinks, attach front panel to heatsinks loosely, slide in bottom mounting grid (with PSU PCBs attached) and bolt down loosely, attach back, then tighten all screws. Add power transformer and wire everything up. Then attach bottom and feet. Hook up DVMs, then lay top on. After about a hour, check and touch up bias. Then attach top panel and enjoy!
Very nice build. You look to be very careful and somewhat exacting in your construction (there is nothing sloppy about the care you took on placement of your components soldered).
How long do you think it took you from start to finish averaging the hours spent per week? And is this your first Class A amplifier (like did your build experience lie somewhere else like tubes or AB amplifiers or chipamps?)?
You said it was challenging, would you attempt an F5Turbo knowing what you know from this build?
And what is next?
Would you be prepared to twist your AC wiring? Both mans and LV.
That is certainly the right way to deal with those wires.
Thanks for the encouraging words.
Regarding mains/AC wiring. Comments are correct. I didn't want to cut anything too short in case I needed to remove or reposition PCBs during testing. The mains wires to the barrier strip will be replaced and a AC noise capacitor added. The transformer is actually a 16v 400va unit, as 18v ones were out of stock. I wanted to see how the amp works with the slightly lower voltage before trimming leads down too far. Also, the DC wiring needs to be cleaned up a bit.
Regarding time needed. This has been a part time project in between work/family. I probably put 30 hours total, half looking for parts and reading up on these boards about what to do. I work best when I break things up into 1-2 hour chunks. Otherwise, I tend to make dumb mistakes as I get into a hurry.
Experience? Over the years I have fixed/restored classic tube amps. Recently, I build a small chip amp and a class D amp for my sons with eBay parts/kits. Last project was a EL84 Dynaco clone from Sheldon's PCB (diytube). It is a REALLY nice sounding amp. EL84 tubes are cheap, and the transformer from Triode Electronics are high quality. Recommend it if you want a tube amp.
Next? Replace my Ariel diy speakers with a MarkAudio Pensil10p full range. A friend will help my make the cabinet. Not sure when that will happen, probably in a few months.
I use these
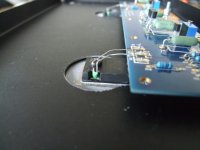
Big hole for mosfet screw, the ear to hold the thermistor tight against the mosfet case. They come in many sizes solder lug
An externally hosted image should be here but it was not working when we last tested it.
Big hole for mosfet screw, the ear to hold the thermistor tight against the mosfet case. They come in many sizes solder lug
Do you have a pic? I can't visualize the connection.I use theseAn externally hosted image should be here but it was not working when we last tested it.
Big hole for mosfet screw, the ear to hold the thermistor tight against the mosfet case. They come in many sizes solder lug
I use theseAn externally hosted image should be here but it was not working when we last tested it.
Big hole for mosfet screw, the ear to hold the thermistor tight against the mosfet case. They come in many sizes solder lug
Just PLEASE do not short either of the thermistor leads to the heatsink, tab, screw or solder lug.....(!)
you're right, I use teflon tubing [Apex Jr.] on the thermistor leads and a small piece of teflon plumbing tape between the 'tang' and the thermistorJust PLEASE do not short either of the thermistor leads to the heatsink, tab, screw or solder lug.....(!)
- Status
- This old topic is closed. If you want to reopen this topic, contact a moderator using the "Report Post" button.
- Home
- Amplifiers
- Pass Labs
- Another F5 born!