F4
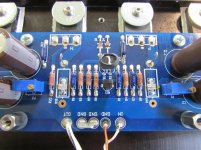
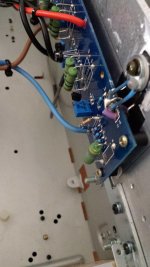
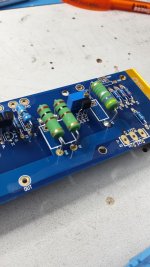
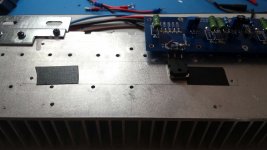
Way late to the F4 party... Showing progress of one of my monoblocks. Boards have Dale PTF and CMF resistors, Susumu .47 1W SMD in a quad (http://www.diyaudio.com/forums/part...-traditional-power-resistors.html#post5385455), matched triplets from Teabag with the Harris P-channel's to avoid the "IR problem", Elna Silmic 2's, 6.8mA idss jfets (about 5.4mA in circuit with 10 ohm source resistors), R9 at 5k and it biases up perfectly. Heatsink at 42C at thermal equilibrium, total 1.75A through the outputs. Fabricated a piece of veroboard to maybe try Ihquam's "Curly" gain stage. Already have jfets and some of the parts for that. But I would really like to try a nice high gain/swing tube preamp in front of this thing. I have shown this chassis before, it's had F5, BA-1, F6, and Aleph J in there. This began life as some sort of high current controller for a train braking application (I work in the rail industry). Two were being scrapped out so I managed to save them to make some unusual Class A monoblocks. Kinda hard to work in, like building a ship in a bottle. But they have worked out well for being free.
Way late to the F4 party... Showing progress of one of my monoblocks. Boards have Dale PTF and CMF resistors, Susumu .47 1W SMD in a quad (http://www.diyaudio.com/forums/part...-traditional-power-resistors.html#post5385455), matched triplets from Teabag with the Harris P-channel's to avoid the "IR problem", Elna Silmic 2's, 6.8mA idss jfets (about 5.4mA in circuit with 10 ohm source resistors), R9 at 5k and it biases up perfectly. Heatsink at 42C at thermal equilibrium, total 1.75A through the outputs. Fabricated a piece of veroboard to maybe try Ihquam's "Curly" gain stage. Already have jfets and some of the parts for that. But I would really like to try a nice high gain/swing tube preamp in front of this thing. I have shown this chassis before, it's had F5, BA-1, F6, and Aleph J in there. This began life as some sort of high current controller for a train braking application (I work in the rail industry). Two were being scrapped out so I managed to save them to make some unusual Class A monoblocks. Kinda hard to work in, like building a ship in a bottle. But they have worked out well for being free.
Attachments

F5 Prototyp --the fugly one ") )
)
Hello community,
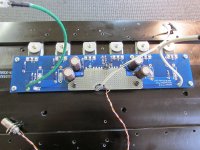
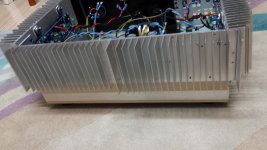
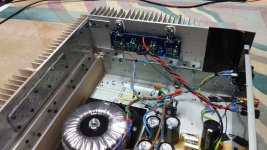
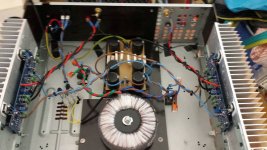
here is my Prototype of a F5 Pass Amp buit with used parts from an Onkyo and Denon reciever. A lot of mechanical effort was made to do this parts together.
.........fugly ....what else....
I have no hum or something else and I´m very happy with the sound.
I use 2SK 1058 and 2SJ 162 FET -but ATTENTION you have to CROSS OVER the pins for Drain and Source.
thanks Mr Nelson Pass and all others in the community to help with their technical recommendations and tips.
Some questions appear for me:
1) What sound improvement could I expect if I use selected parts?
2) What is the maximum VinRMS or Vpp Voltage as input signal?
greetings
HARRY
)Hello community,
here is my Prototype of a F5 Pass Amp buit with used parts from an Onkyo and Denon reciever. A lot of mechanical effort was made to do this parts together.
.........fugly ....what else....
I have no hum or something else and I´m very happy with the sound.
I use 2SK 1058 and 2SJ 162 FET -but ATTENTION you have to CROSS OVER the pins for Drain and Source.
thanks Mr Nelson Pass and all others in the community to help with their technical recommendations and tips.
Some questions appear for me:
1) What sound improvement could I expect if I use selected parts?
2) What is the maximum VinRMS or Vpp Voltage as input signal?
greetings
HARRY
Attachments
-
 HIFI.jpg295.8 KB · Views: 536
 -
 front.jpg243.5 KB · Views: 542
 -
 Inside_front.jpg327.5 KB · Views: 593
 -
 inside_all.jpg334.2 KB · Views: 633
 -
 PSU_PCB.jpg284.3 KB · Views: 488
 -
 pcb_mounted.jpg335.7 KB · Views: 415
 -
 PCB_detailed.jpg382.4 KB · Views: 417
 -
 FET_iso.jpg246.2 KB · Views: 423
 -
 FET.jpg250.9 KB · Views: 1,448
Last edited:


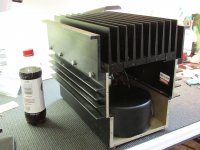
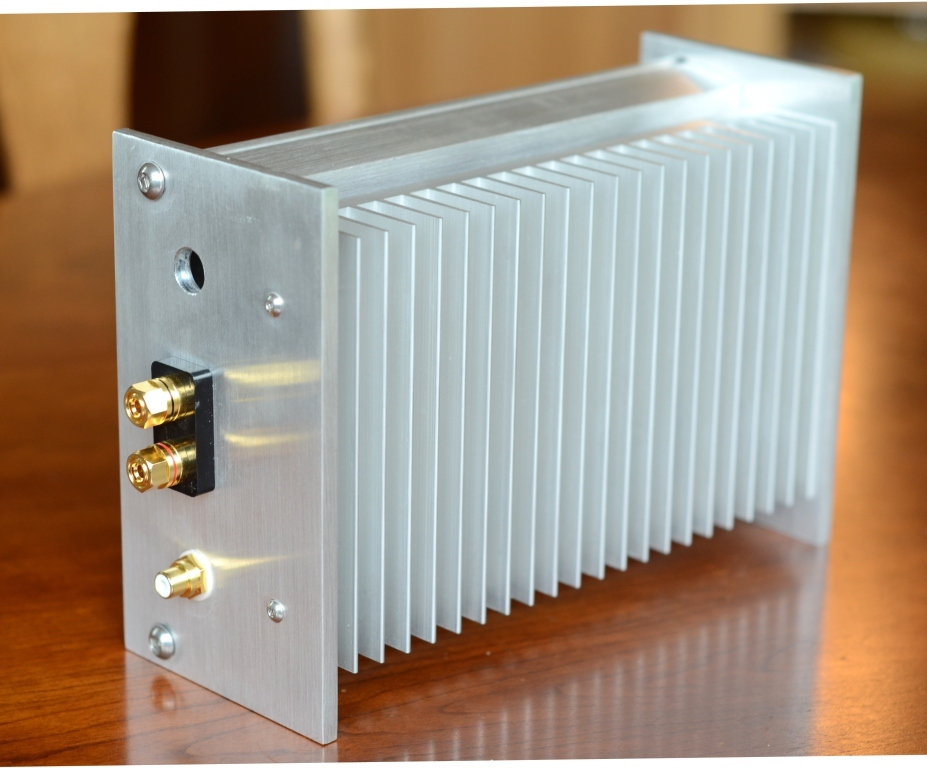
ACA. Waited for months for the kits and ended up just ordering the boards/sinks from diy store. I wanted mono blocks anyway so that worked out. Also didn't want a factory looking part. I almost made the heat sinks but I didn't feel like it, since welding aluminum is my day job too.
Made the sub frame parts out of 1" square tubing ripped lengthways on it's corners in a V-block rigged up in my band saw. Then ripped them again at .750", sanded the cut edges and welded them up. I used this because I would have had to order a 20' stick in the wall thickness/size I wanted. This instead took a 6' piece of scrap square tube we already had.


Ended up making the covers out of some other 11 gage mill ends we had laying around. Set up a fence on my band saw, ripped to size and put the cut corners together open and welded those up too. I was going to grind/sand the weld but it came out so neat I decided to keep it. Yet another detail further away from a factory looking part. The hand work on the metal bits is apparent, but neatly done. This is a style I like for my personal things. I deal with a lot of CNC machined parts and it has become too obvious a choice. Is why I like to make things with basic hand skills instead.

Mirrored pair. Fronts are .250 x 4" anodized flat bar. rears are .250 x 4" mill finish aluminum.

Still need to make accommodations for the power wires but I was not comfortable putting these fittings through .250". Ended up carving a hollow and mounting them instead on a cover made of 11 gauge. I used the band saw to make the hole, and then just welded up the entry cut and sanded it away after.

Everything works and I am pleased with how they turned out.

Made the sub frame parts out of 1" square tubing ripped lengthways on it's corners in a V-block rigged up in my band saw. Then ripped them again at .750", sanded the cut edges and welded them up. I used this because I would have had to order a 20' stick in the wall thickness/size I wanted. This instead took a 6' piece of scrap square tube we already had.
Ended up making the covers out of some other 11 gage mill ends we had laying around. Set up a fence on my band saw, ripped to size and put the cut corners together open and welded those up too. I was going to grind/sand the weld but it came out so neat I decided to keep it. Yet another detail further away from a factory looking part. The hand work on the metal bits is apparent, but neatly done. This is a style I like for my personal things. I deal with a lot of CNC machined parts and it has become too obvious a choice. Is why I like to make things with basic hand skills instead.
Mirrored pair. Fronts are .250 x 4" anodized flat bar. rears are .250 x 4" mill finish aluminum.
Still need to make accommodations for the power wires but I was not comfortable putting these fittings through .250". Ended up carving a hollow and mounting them instead on a cover made of 11 gauge. I used the band saw to make the hole, and then just welded up the entry cut and sanded it away after.
Everything works and I am pleased with how they turned out.

Fugly!
are these made with Boat-wire ?
Yes. They were all out of Zen wire.
Great job! Superb welding.
nash
Thank you. That was done here at my home on an ancient transformer machine that is over 800#! In this day of inverter technology and it's myriad of settings, it occurs to me how this old iron still manages blueprint quality welds without all that, or even a variable control, for that matter.
Nice, love the welds.
Thank you. I even like the raw, sanded aluminum. I was going to paint them but now I don't know.
ACA. Waited for months for the kits and ended up just ordering the boards/sinks from diy store. I wanted mono blocks anyway so that worked out. Also didn't want a factory looking part. I almost made the heat sinks but I didn't feel like it, since welding aluminum is my day job too.
Made the sub frame parts out of 1" square tubing ripped lengthways on it's corners in a V-block rigged up in my band saw. Then ripped them again at .750", sanded the cut edges and welded them up. I used this because I would have had to order a 20' stick in the wall thickness/size I wanted. This instead took a 6' piece of scrap square tube we already had.
Ended up making the covers out of some other 11 gage mill ends we had laying around. Set up a fence on my band saw, ripped to size and put the cut corners together open and welded those up too. I was going to grind/sand the weld but it came out so neat I decided to keep it. Yet another detail further away from a factory looking part. The hand work on the metal bits is apparent, but neatly done. This is a style I like for my personal things. I deal with a lot of CNC machined parts and it has become too obvious a choice. Is why I like to make things with basic hand skills instead.
Mirrored pair. Fronts are .250 x 4" anodized flat bar. rears are .250 x 4" mill finish aluminum.
Still need to make accommodations for the power wires but I was not comfortable putting these fittings through .250". Ended up carving a hollow and mounting them instead on a cover made of 11 gauge. I used the band saw to make the hole, and then just welded up the entry cut and sanded it away after.
Everything works and I am pleased with how they turned out.
Wow!
I should add it was the rather raw, prototype chassis pictured in Nelson Pass's original article that made me think it ok to make it this way. I thought that was just so simple and neatly done looking. If I had been more sure about the heat sink with the 24v upgrade, I likely would have emulated these instead.
This is so beautiful, I wish I have the ability to do the same.I should add it was the rather raw, prototype chassis pictured in Nelson Pass's original article that made me think it ok to make it this way. I thought that was just so simple and neatly done looking. If I had been more sure about the heat sink with the 24v upgrade, I likely would have emulated these instead.
B1
A nice exercise to get solder station out of long term hibernation. I have both mezmerize and hypnotize boards from the original GB but was not following the thread back then and before building them (but after ordering and receiving the parts, including 12V relays), I didn't like the idea of passing DC through if something failed due to direct coupling so I ordered some boards from PassDIY instead.
Yes, I know p2p or protoboard would have sufficed but if I was lazy and stupid before, I am only 10x more so now ... anyway, enough about me, you're here to see gifts from Papa.
Power comes from 24V 2A switcher through LM317 to baby CRC. I have a 1A switcher but it oscillates and makes the led glow in and out like Christmas lights. I have it choked down to 18V, haven't experimented with higher voltages and from what I remember/read don't see that higher voltage alone provides any improvement. Dug through my useless junk that I keep for no good reasons and found a very nice cardboard box that my old HTC phone came in. Cardboard is so much easier to work with than metal. Glue gun is your best tool and you feel like Martha Stewart (nothing to do with insider trading or going to jail though).
Finally, of course it sounds wonderful! Thank you Papa Pass!
(now I keep thinking of Netflix - Stranger Things when I say/see Papa)


The other board almost there but I have to wait until I buy another phone to have a case for it

A nice exercise to get solder station out of long term hibernation. I have both mezmerize and hypnotize boards from the original GB but was not following the thread back then and before building them (but after ordering and receiving the parts, including 12V relays), I didn't like the idea of passing DC through if something failed due to direct coupling so I ordered some boards from PassDIY instead.
Yes, I know p2p or protoboard would have sufficed but if I was lazy and stupid before, I am only 10x more so now
... anyway, enough about me, you're here to see gifts from Papa.Power comes from 24V 2A switcher through LM317 to baby CRC. I have a 1A switcher but it oscillates and makes the led glow in and out like Christmas lights. I have it choked down to 18V, haven't experimented with higher voltages and from what I remember/read don't see that higher voltage alone provides any improvement. Dug through my useless junk that I keep for no good reasons and found a very nice cardboard box that my old HTC phone came in. Cardboard is so much easier to work with than metal. Glue gun is your best tool and you feel like Martha Stewart (nothing to do with insider trading or going to jail though).
Finally, of course it sounds wonderful! Thank you Papa Pass!
(now I keep thinking of Netflix - Stranger Things when I say/see Papa)
The other board almost there but I have to wait until I buy another phone to have a case for it
- Home
- Amplifiers
- Pass Labs
- Pictures of your diy Pass amplifier