B1 Bench Test
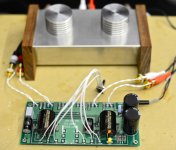
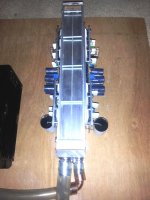
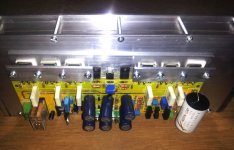
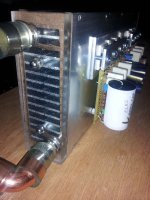
I uncovered this Nelson Pass B1 board in my toy box last week.
I decided after finding it along with the matched JFETs it was time to give it a go.
An absolutely perfect match for a gainclone.
I declare it more than worthy of a proper enclosure and a permanent place in my DIY bedroom audio system.
I uncovered this Nelson Pass B1 board in my toy box last week.
I decided after finding it along with the matched JFETs it was time to give it a go.
An absolutely perfect match for a gainclone.
I declare it more than worthy of a proper enclosure and a permanent place in my DIY bedroom audio system.
Attachments
Familiar pictures for those reading the Pearl II thread, but for the rest of you here's my version of the Pearl II. It sounds really great!
An externally hosted image should be here but it was not working when we last tested it.
An externally hosted image should be here but it was not working when we last tested it.
An externally hosted image should be here but it was not working when we last tested it.
I uncovered this Nelson Pass B1 board in my toy box last week.
I decided after finding it along with the matched JFETs it was time to give it a go.
An absolutely perfect match for a gainclone.
I declare it more than worthy of a proper enclosure and a permanent place in my DIY bedroom audio system.
Nice looking B1. Are you going to make a case to match the amp in the background?
btw... What are you powering it with?
Nice - how did you make the logo and text?
I had it made in a shop that specializes in self adhesive lettering. Just upload the text, choose a font and presto. For the logo, just view a pdf manual at 400% and take a screenshot
")
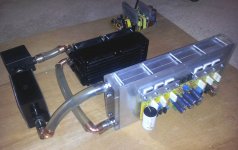
Recently I sent pictures of my water cooled SofZ V7T to Nelson. He wrote back with a suggestion that I post the pictures here also. So, here are some pictures for you guys:
The load toroids are 2000VA each. Capacitors for the input.

The power supplies are put together with stuff from the junk box, choke filtered. One supply/channel.

Amd one picture of the heat sink, this is integrated with the heating system in the house.

Two more pics:


Schematic: http://www.passdiy.com/pdf/zen-v7.pdf (Figure 8)
The load toroids are 2000VA each. Capacitors for the input.
The power supplies are put together with stuff from the junk box, choke filtered. One supply/channel.
Amd one picture of the heat sink, this is integrated with the heating system in the house.
Two more pics:
Schematic: http://www.passdiy.com/pdf/zen-v7.pdf (Figure 8)
Bernt, that is a pretty nice looking and creative build, however it does lack that one little something... what it really need is a blue LED and the PassDIY sticker somewhere and I will say your build is complete.
Without the LED and sticker, what is the sound like and how many watts are you producing?
Otherwise, all joking aside, that is a very green, an excellent use of cooling (if that water is cold enough), creative, and if I had a junk box like yours I think I would be very happy (but what is the sound like)?
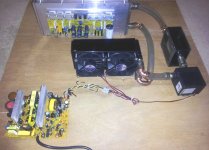
Oh, the sound! Sorry, forgot to describe it. It is extremely relaxed and easy, natural and very, very dynamic.Excellent midbass! The only difficulty is that the output impedance is a little on the high side so the bass is a little bit swollen on my speakers. (TQWP with 15 inch coax, Beyma 15xa38nd) I solved this by putting a 20 ohm resistor between the speaker terminals to even out the impedance a little. I get about 2x30W to the speakers and 300W heat to the water.
I have built several tube amps including OTLs but this one beats them all.
Compared today with a F5 and it is a matter of taste what you prefer, I see no reason to swap. If one is listening for hours on end I think the SoZ wins really.
The cables are long, about 6 meters each way to the speakers plus the leads between the power supply and the cooler. No problem with that though.
Last edited:
any ill effects
Not an issue an a horse and carriage amp.
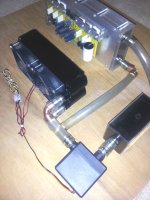
Since we are on the subject, the next version of the BLAT is nearing completion. Instead of folding the earlier design I decided to eliminate the small U channel and screws, and move to a piece of standard heat sink. Blind holes were used wherever possible to reduce possible leaks around screws.
I'll post a breakout of the components in a day or so (most likely over on the BLAT thread) but it's basically HS, paper automotive head gasket material, aluminum plate, plexiglass plate (used only temporarily to check flow pattern) and some threaded 6-32 rod. Essentially, the liquid flows through the bottom two slots all the way to the back. In addition to passage holes in the back interior, there is a small gap between the HS halves that facilitates the flow. The top two channels (sealed from all others) collect the liquid - again at the back - and present it to the top fitting.
The pump will most likely stay the same (smaller than the previous one but just as powerful) but I still want to reduce the size of the radiator/fan combo. The final configuration - be it horizontal or vertical - will have the operating components of the cooling system below the amps for safety.
There is a BLAT 3 which is smaller and thinner, more suited to the F5 clone boards at the diyAudio store, that won't be finished till the weekend.
Edit: This version is 11.5" X 1.5" X 4.8"
Attachments
Last edited:
Here's short clip of the action. To see the actual flow rate watch the short tube in the upper left corner as soon as the color is added. There is a lot of mixing inside both the radiator and the cooler itself, but the rate is steady. Will need to adjust flow rate and fan speed to get the best heat transfer.
BLAT 2 Flow Clip (click play on video)
BLAT 2 Flow Clip (click play on video)
The new breed of pumps are silent with almost any type of foam padding underneath. What can be heard is a light vibration if there is any direct physical contact with wood or metal that can amplify it. Again, a small foam pad eliminates that.
The fans are a bigger problem but that is just the sound of the air flow. I believe a final build with the fans pointing away from the listening position will solve that. You have to be within 2 - 3 feet to know it's running. There is a great brand "Loon" that has a 120 mm unit that is really silent. I have two of them in the PC at my feet and they can not be heard. They are low speed and will require a single 120 radiator instead of the dual 80s. I'm working on it.
Thanks a.wayne
Last edited:
Sorry, I was trying to remove the ranting in the background and broke the link to the video.
Here it is again.
BLAT 2 Flow Cliphttps://www.box.com/s/9jxs7c91w2q63ptqbynp
Here it is again.
BLAT 2 Flow Cliphttps://www.box.com/s/9jxs7c91w2q63ptqbynp
Bernt,
Awesome idea! How do you manage to use the amplifier while the heating system is turned off in summer?
As a silent PC fan, I can recommend you this website where they compare, among other computer part, silent fans. I have used (and actually use) Noctua and Nexus fans. I think Yate Loon makes those Nexus. They have measured the noise on each one:
Recommended Fans | silentpcreview.com
- Home
- Amplifiers
- Pass Labs
- Pictures of your diy Pass amplifier