
sorry not finished, but see ........
An externally hosted image should be here but it was not working when we last tested it.
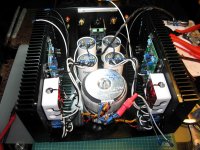
Actual playing: Mac mini - WaveIO- Pass D1 Clone - P1.7 Clone - Aleph mini - Spendor BC1 on my working space.
Out of Photo:
- On the left side the Pass Ono Clone (Dragan), glue to dry
- On the right side the AJ like in this case
An externally hosted image should be here but it was not working when we last tested it.
Other comes .........
My F5T Build
Hi
A few months ago, I began looking for an upgrade to my tube power amp. Although it sounded very smooth, it didn’t have the bass punch and control of my previous SS Aragon 4004.
A fellow enthusiast sent me Nelson Pass’s F5T article. I was intrigued by the minimalist and simple design and most of the opinions of diyers who have built the F4 and F5/T were positive. Also, there is a community of very experienced builders on the forum who will be able to help me trouble shoot any problems.
I know there are very good PCBs on diyaudio which many diyer’s have used with very good results. However being a novice, I was looking for a ‘turnkey’ solution. I ended up getting the F5T kit from FetAudio. As usual, Spencer was very helpful.
Frankly, soldering the PCBs together was the easiest bit.
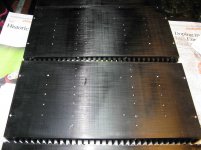
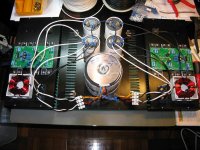
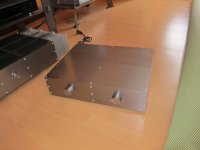
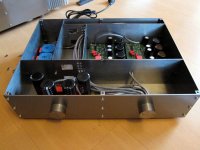
Interestingly, the case proved to be the most challenging (and expensive, to my surprise!!). This almost stopped the build on its tracks! Anyway, after a few false starts, I finally managed to find a Chinese seller who was prepared to drill and tap all the holes to mount the PCB (plus Mosfets and MUR diodes) and also all holes on the back and front plate. The process was complicated as the seller made some mistakes and I made some changes after placing the order. It was a mess. This ‘ding dong’ went on for 2 whole weeks with over 100 emails. At that time, I couldn’t abandon the build as I had paid for the cases and bought all the other stuff!
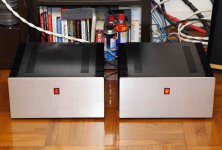
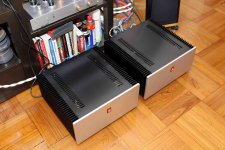
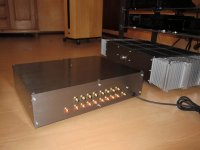
Anyway, I think the cases came out alright and do look nice, don’t they? If I had to do it all over again, I would get the cases sorted before anything else!
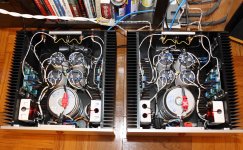
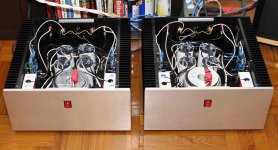
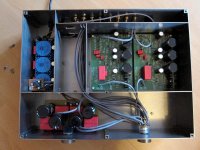
As for filtering, I used Rifas PEH series (now Kemet) 63V caps. These are superb as they are low ESR and inductance. TX are two 2*25V 500VA toroidals. I couldn’t get 24V ones at the VA I wanted easily. Bridge diodes are Vishay, as suggested by Nelson. I use two for each rail as the TX secondaries are just too thick/stiff. As for smoothing, I went for CLC instead of CRC.
The rectified DC output at the caps are about 32.2V (loaded), and are within 0.1VDC across all four rails. I had to include an AC power delay board to prevent the house circuit breaker from tripping!
Biasing the amps was most interesting. Although I had familiarized myself with the biasing procedure earlier using my PS, I still had two close calls, both with electrifying results! The first was when the MM probes accidently touched a nearby cap and the second was when I was removing a grabber clip. In both instances, there was a huge spark. The tip of the grabber clip was vaporized and the MM probe was left with a huge burnt mark!!! These amps can sure deliver a huge amount of power. I was fortunate as the amps appear unaffected. The lesson here …. ‘turn-off amps, remove AC power connector, discharge caps then attach/remove probes’. I have now put in some bleeder resistors, just to be safer .
.
The amps are biased to 1.4A per channel. The heat sinks are warm to the touch after an hour so I guess it passes the ‘Pass’ heat test. Maybe I should be a Pass FAB – Fearless Amplifier Builder. Increase bias to 2A!!!!
I did plan to have speaker protection using the NEC upc1237 chip initially but after reading up, I think the conclusion was that this offers limited protection as relays don’t react fast enough to cut power off. I hope this is right. So I started listening using my daughter’s home stereo speakers, just in case. Hey, these are Sony’s ….. Ha ha…
All this build work was fun but what about the sound? In one word … ‘awesome’. I have the bass punch and control I wanted/missed. Furthermore, the bass is extended and goes really low. Mids and highs are very natural and transparent. Overall, the sound is really smooth and relaxed. Perhaps I finally now have an amp that has enough power to drive my 4 ohm Thiel CS2.4s.
The mids and highs are where the most significant improvement over my previous amp are. The clarity and smoothness is just amazing. The tube push-pull power amp now sounds lethargic, by comparison.
I hope this was the sound Nelson heard with his F5T.
I am not sure what to do with P3 though. Just left it untouched, for now. Ideas?
At the start, the amps sounded terrible. Mids and highs were harsh. However, after a day of burn-in, they began to perform, delivering sweet sweet music. I guess this is normal? Everything is new and the caps probably need time to form before doing their thing.
Of course, I tried bridging the two amps, initially using my daughter’s stereo speakers again. As it turns out, I am not a FAB after all. Ha ha…
With the Thiels, the musicality and bass punch/extension improves further. Unfortunately, I can’t really say for sure as there is a problem with my pre amp. The darn thing hums!!! In bridge mode, the F5T is so powerful that the hum is clearly audible. Really annoying! Hence, I am now looking for a new pre amp… what a bummer! Er…. on the other hand ….. do I see a new build on the horizon? You bet!!! Yippie !!!!
Anyway, I would like to thank Nelson Pass for releasing this wonderful design to the diy community. I guess I was fortunate to be able to jump in at this stage, benefitting from the tremendous amount of improvements from preceding versions. I must admit I am fast becoming a Pass’ian!!!
Thanks Mr. Nelson Pass. You’re the Man!
TC
Hi
A few months ago, I began looking for an upgrade to my tube power amp. Although it sounded very smooth, it didn’t have the bass punch and control of my previous SS Aragon 4004.
A fellow enthusiast sent me Nelson Pass’s F5T article. I was intrigued by the minimalist and simple design and most of the opinions of diyers who have built the F4 and F5/T were positive. Also, there is a community of very experienced builders on the forum who will be able to help me trouble shoot any problems.
I know there are very good PCBs on diyaudio which many diyer’s have used with very good results. However being a novice, I was looking for a ‘turnkey’ solution. I ended up getting the F5T kit from FetAudio. As usual, Spencer was very helpful.
Frankly, soldering the PCBs together was the easiest bit.
Interestingly, the case proved to be the most challenging (and expensive, to my surprise!!). This almost stopped the build on its tracks! Anyway, after a few false starts, I finally managed to find a Chinese seller who was prepared to drill and tap all the holes to mount the PCB (plus Mosfets and MUR diodes) and also all holes on the back and front plate. The process was complicated as the seller made some mistakes and I made some changes after placing the order. It was a mess. This ‘ding dong’ went on for 2 whole weeks with over 100 emails. At that time, I couldn’t abandon the build as I had paid for the cases and bought all the other stuff!
Anyway, I think the cases came out alright and do look nice, don’t they? If I had to do it all over again, I would get the cases sorted before anything else!
As for filtering, I used Rifas PEH series (now Kemet) 63V caps. These are superb as they are low ESR and inductance. TX are two 2*25V 500VA toroidals. I couldn’t get 24V ones at the VA I wanted easily. Bridge diodes are Vishay, as suggested by Nelson. I use two for each rail as the TX secondaries are just too thick/stiff. As for smoothing, I went for CLC instead of CRC.
The rectified DC output at the caps are about 32.2V (loaded), and are within 0.1VDC across all four rails. I had to include an AC power delay board to prevent the house circuit breaker from tripping!
Biasing the amps was most interesting. Although I had familiarized myself with the biasing procedure earlier using my PS, I still had two close calls, both with electrifying results! The first was when the MM probes accidently touched a nearby cap and the second was when I was removing a grabber clip. In both instances, there was a huge spark. The tip of the grabber clip was vaporized and the MM probe was left with a huge burnt mark!!! These amps can sure deliver a huge amount of power. I was fortunate as the amps appear unaffected. The lesson here …. ‘turn-off amps, remove AC power connector, discharge caps then attach/remove probes’. I have now put in some bleeder resistors, just to be safer
.The amps are biased to 1.4A per channel. The heat sinks are warm to the touch after an hour so I guess it passes the ‘Pass’ heat test. Maybe I should be a Pass FAB – Fearless Amplifier Builder. Increase bias to 2A!!!!
I did plan to have speaker protection using the NEC upc1237 chip initially but after reading up, I think the conclusion was that this offers limited protection as relays don’t react fast enough to cut power off. I hope this is right. So I started listening using my daughter’s home stereo speakers, just in case. Hey, these are Sony’s ….. Ha ha…
All this build work was fun but what about the sound? In one word … ‘awesome’. I have the bass punch and control I wanted/missed. Furthermore, the bass is extended and goes really low. Mids and highs are very natural and transparent. Overall, the sound is really smooth and relaxed. Perhaps I finally now have an amp that has enough power to drive my 4 ohm Thiel CS2.4s.
The mids and highs are where the most significant improvement over my previous amp are. The clarity and smoothness is just amazing. The tube push-pull power amp now sounds lethargic, by comparison.
I hope this was the sound Nelson heard with his F5T.
I am not sure what to do with P3 though. Just left it untouched, for now. Ideas?
At the start, the amps sounded terrible. Mids and highs were harsh. However, after a day of burn-in, they began to perform, delivering sweet sweet music. I guess this is normal? Everything is new and the caps probably need time to form before doing their thing.
Of course, I tried bridging the two amps, initially using my daughter’s stereo speakers again. As it turns out, I am not a FAB after all. Ha ha…
With the Thiels, the musicality and bass punch/extension improves further. Unfortunately, I can’t really say for sure as there is a problem with my pre amp. The darn thing hums!!! In bridge mode, the F5T is so powerful that the hum is clearly audible. Really annoying! Hence, I am now looking for a new pre amp… what a bummer! Er…. on the other hand ….. do I see a new build on the horizon? You bet!!! Yippie !!!!
Anyway, I would like to thank Nelson Pass for releasing this wonderful design to the diy community. I guess I was fortunate to be able to jump in at this stage, benefitting from the tremendous amount of improvements from preceding versions. I must admit I am fast becoming a Pass’ian!!!
Thanks Mr. Nelson Pass. You’re the Man!
TC
Attachments
-
 IMG_1159.jpg990.6 KB · Views: 1,821
 -
 AH2D9961.jpg278.5 KB · Views: 898
 -
 AH2D9978.jpg1 MB · Views: 858
 -
 IMG_1240.jpg913.3 KB · Views: 758
 -
 IMG_1233.jpg963.1 KB · Views: 1,712
 -
 IMG_1195.jpg539.9 KB · Views: 1,739
 -
 IMG_1238.jpg972.3 KB · Views: 893
 -
 AH2D9985.jpg987.9 KB · Views: 757
 -
 AH2D9981.jpg336.3 KB · Views: 842
 -
 IMG_1229.jpg1,002.9 KB · Views: 956
Hi
Interestingly, the case proved to be the most challenging (and expensive, to my surprise!!).
TC
Nice cases! Do you mind sharing where you got them?
Cases
MASantos/ijscobar
Thanks. I bought the cases off a seller in China but he appears to be on vacation. However, I have written to him. If there is enough interest, maybe I can get him to reduce his prices and I can get another two!!! ha ha... Don't ask me why I need another two case as in Hifi land, logic doesn't always prevail!!!
So, can you PM me?
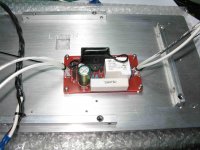
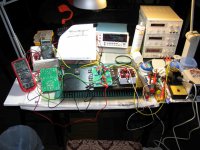
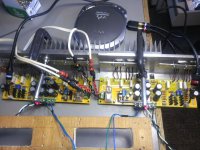
Oh, here is the setup for my biasing practice run.
TC
MASantos/ijscobar
Thanks. I bought the cases off a seller in China but he appears to be on vacation. However, I have written to him. If there is enough interest, maybe I can get him to reduce his prices and I can get another two!!! ha ha... Don't ask me why I need another two case as in Hifi land, logic doesn't always prevail!!!
So, can you PM me?
Oh, here is the setup for my biasing practice run.
TC
Attachments
Last edited:
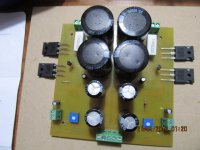
The Ugly Duckling
I finally got through the "discrete" door. I've been building chip based amps for about three years and always had that "Pass" whisper floating around the room. Completed a pair of Nelson's Amp Camp design a month or so ago, but still wanted to try something bigger.
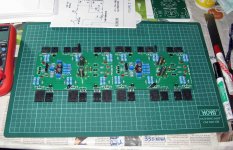
This is a kit ........ link removed by moderation .....---that probably can't be called a pure Pass amp but is a similar approach. It has speaker protection on-board that was an adventure to get to work but is functioning as designed now. There are two pair of power transistors missing from each board as I learned the hard way about the need for double checking the tightness of the heat sink attachment bolts.
The amps sound great and I understand all those comments about the smoothness of this approach. Just bench speakers so far but I'm sure I'll be thrilled with the sound when I move them to the Sunflowers. I have read a lot about discrete amps not being well suited to low efficiency speakers, but from what I'm hearing (even without all the power transistors) I'll never need anything stronger - big surprise. Although, there might be a diyAudio Store F5 build in the not to distant future.
Hopefully the "ugly duckling" will soon become a lovely swan with some reconfiguration and a nice chassis. I couldn't be happier with the active support I received from the vendor of this kit. There are many differences between this and the MyRefs I'm used to, and all my questions and mistakes were resolved promptly.
I finally got through the "discrete" door. I've been building chip based amps for about three years and always had that "Pass" whisper floating around the room. Completed a pair of Nelson's Amp Camp design a month or so ago, but still wanted to try something bigger.
This is a kit ........
link removed by moderation .....---that probably can't be called a pure Pass amp but is a similar approach. It has speaker protection on-board that was an adventure to get to work but is functioning as designed now. There are two pair of power transistors missing from each board as I learned the hard way about the need for double checking the tightness of the heat sink attachment bolts. The amps sound great and I understand all those comments about the smoothness of this approach. Just bench speakers so far but I'm sure I'll be thrilled with the sound when I move them to the Sunflowers. I have read a lot about discrete amps not being well suited to low efficiency speakers, but from what I'm hearing (even without all the power transistors) I'll never need anything stronger - big surprise. Although, there might be a diyAudio Store F5 build in the not to distant future.
Hopefully the "ugly duckling" will soon become a lovely swan with some reconfiguration and a nice chassis. I couldn't be happier with the active support I received from the vendor of this kit. There are many differences between this and the MyRefs I'm used to, and all my questions and mistakes were resolved promptly.
Attachments
Preamp project
Dear TC Goh, maybe something like this:
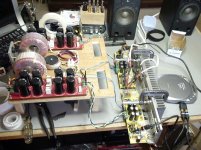
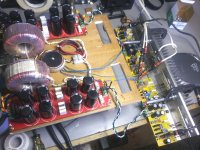
An integrated B1 / PearlPhono Preamp. Add a switch, some power supplies, turn-on delay and you get a perfect preamp in no time .... or thereabouts.
The Pearl Phono are original PCBs, the B1 and power supply PCBs are self-designed to be able to use existing parts, most of all capacitors.
I added a „quick charge“ circuit (R7, R18, D2) to the B1 bias voltage supply, which charges C2 to within 1,5 volts of its final voltage within 18s and output muting relays, which enable audio signals after 20s, so you don´t have to wait that long after a cold start of the Preamp.
Inputs are switched by an ELMA Type 04 2x6 gold plated rotary switch.
The power supply PCB has 3 small toroids for catering the B1 and the Pearls individually. The small perfboard on top is the turn-on delay circuit.
The case is made from 2mm laser cut steel plates and milled steel bars with M4 threads to bolt it all together, knobs lathed from 50mm round steel bar. All steel parts are brushed and finished with a transparent glossy varnish.
The steel case provides excellent shielding, there is no noise pick-up by the Pearls or the B1 from the transformers or other electromagnetic interference. Of course the metal case is well grounded.
Soundwise the B1 is like a short piece of wire with high Z at one end and low Z at the other.
The Pearls to me - having always preferred CDs - were kind of a revelation, they made me get a serious turntable instantly.
Thanks very much, Mr. Pass and Mr. Colburn.
Norb
..... and yes, the case was the hardest part.
Dear TC Goh, maybe something like this:
An integrated B1 / PearlPhono Preamp. Add a switch, some power supplies, turn-on delay and you get a perfect preamp in no time .... or thereabouts.
The Pearl Phono are original PCBs, the B1 and power supply PCBs are self-designed to be able to use existing parts, most of all capacitors.
I added a „quick charge“ circuit (R7, R18, D2) to the B1 bias voltage supply, which charges C2 to within 1,5 volts of its final voltage within 18s and output muting relays, which enable audio signals after 20s, so you don´t have to wait that long after a cold start of the Preamp.
Inputs are switched by an ELMA Type 04 2x6 gold plated rotary switch.
The power supply PCB has 3 small toroids for catering the B1 and the Pearls individually. The small perfboard on top is the turn-on delay circuit.
The case is made from 2mm laser cut steel plates and milled steel bars with M4 threads to bolt it all together, knobs lathed from 50mm round steel bar. All steel parts are brushed and finished with a transparent glossy varnish.
The steel case provides excellent shielding, there is no noise pick-up by the Pearls or the B1 from the transformers or other electromagnetic interference. Of course the metal case is well grounded.
Soundwise the B1 is like a short piece of wire with high Z at one end and low Z at the other.
The Pearls to me - having always preferred CDs - were kind of a revelation, they made me get a serious turntable instantly.
Thanks very much, Mr. Pass and Mr. Colburn.
Norb
..... and yes, the case was the hardest part.
Attachments
Hi
A few months ago, I began looking for an upgrade to my tube power amp. Although it sounded very smooth, it didn’t have the bass punch and control of my previous SS Aragon 4004.
....................
It is nice to see the power switch located on the front panel for a change!

Hi
I am not sure what to do with P3 though. Just left it untouched, for now. Ideas?
TC
A quote from The F5T article:
One thing that many will appreciate is the addition of P3, which due to inattention on my part was not public until recently. It allows the adjustment of the distortion character between complete nulling of the second harmonic distortion to an arbitrary ratio of second to third harmonic. It definitely alters the sound, and reaffirms that things going on below 0.1% are audible. In any case, you can adjust it to taste.
Did you try that?
Pre Amp?
Norb
What a build. The case looks very solid.
I noticed after a few days of listening that the F5T sounds a little bright with my Thiels. Despite the hum from the pre amp, it does sound very good. As I have replaced all the coupling caps with Jensens, it has that characteristic mellow sound, which I like.
I read that the B1 is very neutral so I am not sure whether it would fit my gear and listening taste.
Thanks for the suggestion and sharing. Really great work in routing all the wires.
TC
Dear TC Goh, maybe something like this:
An integrated B1 / PearlPhono Preamp. Add a switch, some power supplies, turn-on delay and you get a perfect preamp in no time .... or thereabouts.
Thanks very much, Mr. Pass and Mr. Colburn.
Norb
..... and yes, the case was the hardest part.
P3
I read this in the Pass manual too. However, I haven't tried adjusting yet. From my recollection, even harmonics are 'good' and should improve the listening pleasure. However, I am not sure if my ears are as sensitive as Nelson's.
Anyway, the amps sounds so good currently .... why mess around with something that is already perfect, right !!!
Bridge mode is the way to go. The sound really opens up and bass extension is ... well .... out of this world.
Hey, is speaker protection using the upc1237 realiable? Any one using these successfully? How do the relays affect the sound?
Oh ... I need to rush as I am F5T'ing.... ha ha... even harmonics and all ....
TC
Pass'ian
I read this in the Pass manual too
. However, I haven't tried adjusting yet. From my recollection, even harmonics are 'good' and should improve the listening pleasure. However, I am not sure if my ears are as sensitive as Nelson's. Anyway, the amps sounds so good currently .... why mess around with something that is already perfect, right !!!
Bridge mode is the way to go. The sound really opens up and bass extension is ... well .... out of this world.
Hey, is speaker protection using the upc1237 realiable? Any one using these successfully? How do the relays affect the sound?
Oh ... I need to rush as I am F5T'ing.... ha ha... even harmonics and all ....
TC
Pass'ian
A quote from The F5T article:
One thing that many will appreciate is the addition of P3, which due to inattention on my part was not public until recently. It allows the adjustment of the distortion character between complete nulling of the second harmonic distortion to an arbitrary ratio of second to third harmonic. It definitely alters the sound, and reaffirms that things going on below 0.1% are audible. In any case, you can adjust it to taste.
Did you try that?
Power Switch ..
Thanks.... I think....
TC
Thanks.... I think....
TC
It is nice to see the power switch located on the front panel for a change!
HI ,Les escribo desde chile , les muestro mi primer ampli zen del sr Nelson.pass
esta en una etapa primaria
SORRY
HI, I'm writing from Chile, I show you my first Zen amp sr Nelson.pass
is at an early stage
Mellow Sound
Dear TC,
maybe the A75 would be an option for you, as you can alter the sonic characteristic of this amp in a large range.
I tried different values for some components as suggested in the A75 article (feed-back amount and folded cascode operation) and the amp could be made very mellow and softly sounding (Speakers are Isophon Europa).
Since i´m more the rocking kind, i set up the amp in the opposite soundwise, but the difference in sound characteristic was amazing, espacially voices and classical music could be made like honey: sweet, soft and golden.
Norb
May I ask why?too thick
for signal inside the chassis use 0.1mm dia
- Home
- Amplifiers
- Pass Labs
- Pictures of your diy Pass amplifier