


Babowana said:100% done?
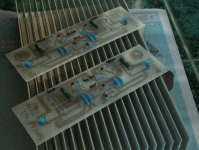
No, power Mosfets, thermistors and Jfets are not soldered yet.
>><<
Simply marvellous and terrific work. Cant wait to hear what you think of the sound
This is true DIY 
leapcat said:Hi
I really like you hand drawn layouts and boards! What type of marker do you use and how do you clean them after etching?
Thanks
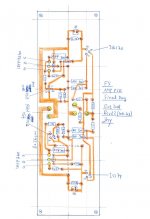
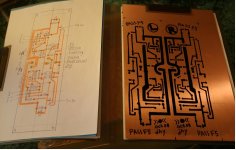
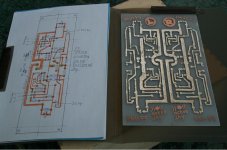
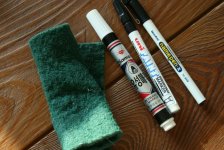
For drawing I use the oil-based marker (permanent marker) which we can easily buy in the stationary shop. For cleaning after etching I use the rough sponge in the kitchen. I rub the finished with the sponge in water.
>>
<<Attachments
Babowana said:
For drawing I use the oil-based marker (permanent marker) which we can easily buy in the stationary shop. For cleaning after etching I use the rough sponge in the kitchen. I rub the finished with the sponge in water.
>>
Now I believe you when you say "kitchen". NPaPass fessed up some time ago that FW amps are really not from his kitchen.
Blues said:
Now I believe you when you say "kitchen". NPaPass fessed up some time ago that FW amps are really not from his kitchen.
Hey, Blues... dont spoil the party
Re: Sweet
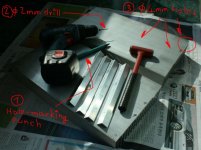
When I was buying the heatsinks and 2mm-aluminium plates, I asked for the holes too. But, the shop said that they don't have man-power to make any hole. Pity . . .
I decided to make the holes myself.
My normal procedure is:
enzedone said:
You didn't have any problems with the drilling of holes?
When I was buying the heatsinks and 2mm-aluminium plates, I asked for the holes too. But, the shop said that they don't have man-power to make any hole. Pity . . .
I decided to make the holes myself.
My normal procedure is:
- First, I make hole puch marks to the right hole locations. The aluminium plate or surface is very slippery for the drill ends. So, I put the punch mark for the 2mm-drill end not to slip.
- Second, I use 2mm-drill on the punch mark to make the mark bigger.
- Third, I use 4mm-drill to make holes for 3mm bolts.
[/list=1]
The photo shows marks after finishing 2mm-drilling.
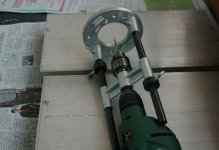
In order to make the 4mm hols straight, I also use a special tool. I will show it to you later.
>><<
Attachments
Babowana said:Now making holes . . .
I changed mine. I'm drilling 3.2mm-holes, not 4mm.
Do you see the drill stand (or drill guide or whatever)? It is a very convinient tool for my diy work.
>>
Dang, no wonder my holes are all crooked.
- Status
- This old topic is closed. If you want to reopen this topic, contact a moderator using the "Report Post" button.
- Home
- Amplifiers
- Pass Labs
- New-building of my F5