I transfered one side. Drilled some alignment holes, and used it to align the other side. The registration wasn't perfect. But all I had was a wobbly 1/16" bit. I was waiting to order carbide bits until I saw how well it went.
The registration:
The registration:
Attachments
I do both sides at the same time. Print them both out on the same piece of paper, about 2cm apart,then you can use a lightbox or window to align them perfectly before creasing the fold in the paper. Allow another couple of centimetres overlap of blank paper at the top and bottom, and you can stick them to the PCB with masking tape, then iron both sides. Works every time!
Here's what I did...
Inspired by this thread from dfdye:
http://www.diyaudio.com/forums/showthread.php?threadid=80165
I bought the laminator he mentions, the XRX-LM1910 from Staples. It's manufactured by Xerox, so you may be able to find it other places, as well. The manual packaged with the unit doesn't specify a max. thickness, but I found a manual from Xerox:
http://www.xerox-oa.com/lm1910-xrx.pdf
(Unfortunately, the link seems to be dead, now)
It listed the max. thickness of as 1/12"...perfect for 1/16" thickness boards. The laminator has different temperature settings for various pouch thicknesses, plus a "Foil" setting. In my experiments, the foil setting was the one that worked the best. The feed roller is pretty far into the housing, so the minimum dimension is about 2.5" to 3" You need to press pretty hard to get it to start feeding & not stall, but once it started, I never had a problem with slippage or stalling.
I tried a whole bunch of different media. Inkjet transparency, laser transparency, baking parchment (not wax paper!), synthetic parchment from a stationery store, and last, Pulsar Toner Transfer paper I got from a friend. The only thing I didn't try was inkjet photo glossy paper, because neither of us had any.
Everything was printed in a 10-year old HP LaserJet 4MV with genuine HP toner. The winner was the Pulsar paper, and second place was inkjet transparency. It was 3M type CG3460. There were no problems with it melting or shrinking & getting brittle in the printer or the laminator. But it did have problems with large copper pours near the edge of the board...more of the toner tended to pull off in these areas, but I'm not quite sure what exactly caused it. All of the other media gave very poor results.
I think you could use a humidifier or steamer to with the inkjet media. I think that the little bit of moisture will cause the gelatin to swell, and release from the backing a little bit. Then it could be rinsed off while the toner stays. Just an I idea, but I have neither a steamer nor a humidifier. Just don't get them fully wet!!! I tried that, and it made a huge mess.
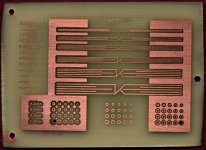
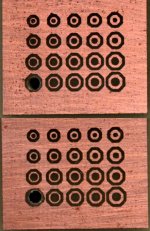
I used 2-3 passes to do the toner transfer, but I only needed 1 pass for the Pulsar Green TRF foil to seal the toner. I didn't have a second board to compare TRF to no-TRF. But if you look at the "registration" picture above, I still got a tiny bit of pitting. I think a scrubbing with scotch-brite and tin-plating should alleviate any concerns about that.
I etched with a HCl - hydrogen peroxide mixture. 3% peroxide and 31.5% HCl mixed in a 2:1 ratio, acid added to peroxide and etched with gentle back-and-forth rocking.
This page has some info on the ideal ratio of HCl to peroxide:
http://www.dr-lex.34sp.com/info-stuff/tonertransfer.html
I don't know if it's correct or not, but according to his calculations, I should be using a ratio of 8:3:1 peroxide:HCl:water. I thought 2:1 was close enough, and it worked in about 5 minutes, even on my cold garage floor.
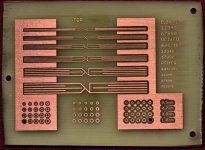
About the board...the holes are 0.5mm, 0.7, 0.9 and 1.0, with 8,12,16,20,24 mil annular ring. The tracks are 4 mil line/4mil space at the top, and the 6/6, 8/8, 10/10, 15/15 and 20/20. The 8 mil are very good, and the 6 look OK, but the scan didn't capture it.
Anyway...I apologize for writing a book, but I just wanted to share my experiences. Thanks to the forum for helping me put all the pieces together.
--Greg
Inspired by this thread from dfdye:
http://www.diyaudio.com/forums/showthread.php?threadid=80165
I bought the laminator he mentions, the XRX-LM1910 from Staples. It's manufactured by Xerox, so you may be able to find it other places, as well. The manual packaged with the unit doesn't specify a max. thickness, but I found a manual from Xerox:
http://www.xerox-oa.com/lm1910-xrx.pdf
(Unfortunately, the link seems to be dead, now)
It listed the max. thickness of as 1/12"...perfect for 1/16" thickness boards. The laminator has different temperature settings for various pouch thicknesses, plus a "Foil" setting. In my experiments, the foil setting was the one that worked the best. The feed roller is pretty far into the housing, so the minimum dimension is about 2.5" to 3" You need to press pretty hard to get it to start feeding & not stall, but once it started, I never had a problem with slippage or stalling.
I tried a whole bunch of different media. Inkjet transparency, laser transparency, baking parchment (not wax paper!), synthetic parchment from a stationery store, and last, Pulsar Toner Transfer paper I got from a friend. The only thing I didn't try was inkjet photo glossy paper, because neither of us had any.
Everything was printed in a 10-year old HP LaserJet 4MV with genuine HP toner. The winner was the Pulsar paper, and second place was inkjet transparency. It was 3M type CG3460. There were no problems with it melting or shrinking & getting brittle in the printer or the laminator. But it did have problems with large copper pours near the edge of the board...more of the toner tended to pull off in these areas, but I'm not quite sure what exactly caused it. All of the other media gave very poor results.
I think you could use a humidifier or steamer to with the inkjet media. I think that the little bit of moisture will cause the gelatin to swell, and release from the backing a little bit. Then it could be rinsed off while the toner stays. Just an I idea, but I have neither a steamer nor a humidifier. Just don't get them fully wet!!! I tried that, and it made a huge mess.
I used 2-3 passes to do the toner transfer, but I only needed 1 pass for the Pulsar Green TRF foil to seal the toner. I didn't have a second board to compare TRF to no-TRF. But if you look at the "registration" picture above, I still got a tiny bit of pitting. I think a scrubbing with scotch-brite and tin-plating should alleviate any concerns about that.
I etched with a HCl - hydrogen peroxide mixture. 3% peroxide and 31.5% HCl mixed in a 2:1 ratio, acid added to peroxide and etched with gentle back-and-forth rocking.
This page has some info on the ideal ratio of HCl to peroxide:
http://www.dr-lex.34sp.com/info-stuff/tonertransfer.html
I don't know if it's correct or not, but according to his calculations, I should be using a ratio of 8:3:1 peroxide:HCl:water. I thought 2:1 was close enough, and it worked in about 5 minutes, even on my cold garage floor.
About the board...the holes are 0.5mm, 0.7, 0.9 and 1.0, with 8,12,16,20,24 mil annular ring. The tracks are 4 mil line/4mil space at the top, and the 6/6, 8/8, 10/10, 15/15 and 20/20. The 8 mil are very good, and the 6 look OK, but the scan didn't capture it.
Anyway...I apologize for writing a book, but I just wanted to share my experiences. Thanks to the forum for helping me put all the pieces together.
--Greg
pinkmouse said:I do both sides at the same time. Print them both out on the same piece of paper, about 2cm apart,then you can use a lightbox or window to align them perfectly before creasing the fold in the paper. Allow another couple of centimetres overlap of blank paper at the top and bottom, and you can stick them to the PCB with masking tape, then iron both sides. Works every time!
I did it one side at a time because the Pulsar paper is so thick that light doesn't shine through very well. If I could get the transparency film working, then it would be a no-brainer.
What kind of paper are you using, pinkmouse?
--Greg
I use the Pulsar transfer paper and TRF too.
I get really good results, and Pulsar's TRF was a brilliant idea.
I found that applying 2 layers of the green TRF gets rid of the pitting.
Without TRF, the pitting is horrible, at least I've had trouble with it.
I use a Minolta/Konica Page-Pro 1350W laser printer @ 1200 x 1200.
I scale my artwork using Paint Shop Pro, and the printer prints the exact size... to less than .001" variation. (I've always hated HP software... their drivers suck!) Very happy with this printer.
The biggest problem I have is getting the heat right on my iron. Typically, it gets too hot and bubbles the toner. Then it smears and the resolution goes away. Maybe Santa will bring me a laminator for Christmas! (nerd!)
Greg,
Those boards look quite nice. After seeing the final product I think I am sold. I'll have to pick one of these laminating machines up the next time I start prototyping boards. The pitting you commented on isn't any worse than the boards I typically make using an iron, and for a 1-off board it should be quite acceptable. I did notice that the thinner traces around your drill holes seemed a bit uneven, but overall the quality of the traces is very good. As far as toner transfer boards go, yours are right up there with the best results I have ever gotten myself. If this means I can easily avoid photoresists, this will be well worth the $80.
MANY thanks for sharing your results! I'm quite glad that someone followed up on testing this idea since I am a slacker and didn't ever follow through!
David
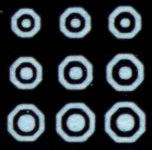
I wonder if the issue with the annular rings around the drill holes is toner smearing or under-cutting. I etched for the bare minimum to clear all the copper, so I can't imagine it's under-cutting. I might have to bust out my pocket measuring microscope to check the actual dimensions. Those smallest rings are 8 mil, so it is pushing the limits of my process.
BTW--I got my laminator on sale for $60, and that makes it an even better deal, IMO. If you keep your eyes open, it might go on sale again. And Staples stores will price-match the web site, unless it's indicated to be a online exclusive.
--Greg
BTW--I got my laminator on sale for $60, and that makes it an even better deal, IMO. If you keep your eyes open, it might go on sale again. And Staples stores will price-match the web site, unless it's indicated to be a online exclusive.
--Greg
So I checked out the board itself, and the image on the paper. The holes look a little gnarly even on the paper. It also looks like if you're using an HP printer, you should turn off their Resolution Enhancement Technology option (RET) in the print driver. The small octagonal holes were better formed when I did this.
The toner image also gets a little faint near the edges of the traces, so my 20mil traces were more like 18. That had a big effect on the narrowest pad rings. Turning off RET looks like it helps this a tiny bit, too.
I also agree with head_spaz. I think that a 1200 dpi output is probably better, but my printer driver for the other printer I have access to, a HP 5000N, is messed up and I can't select the 1200DPI option.
--Greg
Attachments
- Status
- This old topic is closed. If you want to reopen this topic, contact a moderator using the "Report Post" button.
- Home
- Design & Build
- Parts
- I tried toner transfer today...