johnthedoctor said:Got given some Wharfedales with the drivers o/c, have dismantled one and fancy having a go at rewinding the voice coils. The bit of coil I've pulled off has 17 turns in 3.5mm of width, so about .020mm including varnish. What gauge is that?
3.5MM/17=0.2059 ~0.008" = 32AWG assuming the varnish is very thin and doesn't add much to dia. It could be 33AWG =0.0071" dia.
Jeff
The voice coil must be both tight on the former. and the combination perfectly circular when finished. You will definitely need a very smooth rod that just slides into the existing former, (or some similar removeable jig).
You will not be able to make it circular after winding if you get it wrong.
Use only enough tension on the wire to keep it firm on the former.
(You may need to grease the rod, because the winding pressure will tend to shrink the former, but be very careful to keep grease off the winding side of the former itself, (use only a very light smear), or else the glue used to fix the winding into place won't take).
Good luck
I did it years ago with excellent results. The first was a Dyna A-25
woofer, this was for Phillips AD8060 woofers:
http://members.aol.com/basconsultants/hand_vc.htm
One mistake was that the former was slightly thicker than the original,
and it was a tight fit. Most hobby shops in the US carry very thin stock
sheet of aluminum and often brass. I used copper to match the thermal
properties of the wire. Be sure to use the correct gauge wire.
The wire now comes in different grades with different temperature ratings
as I recall.
I used high temp two part epoxy.
Pete B.
woofer, this was for Phillips AD8060 woofers:
http://members.aol.com/basconsultants/hand_vc.htm
An externally hosted image should be here but it was not working when we last tested it.
One mistake was that the former was slightly thicker than the original,
and it was a tight fit. Most hobby shops in the US carry very thin stock
sheet of aluminum and often brass. I used copper to match the thermal
properties of the wire. Be sure to use the correct gauge wire.
The wire now comes in different grades with different temperature ratings
as I recall.
I used high temp two part epoxy.
Pete B.
Thanks all for the help.
The 3.5mm is only part of the coil that I pulled off the former. Total coil is about 28 turns, single layer. Have a bad feeling that the cone has to be removed but will try doing it with the cone intact. 4 bolts holding the magnet to the basket so hoping there's enough play there for adjustments.
Wasn't expecting such interest in my progress, I'm a noob at diy audio and the drivers are dead anyway but I'll take pics as I go along for a 'How Not To' guide.")
The 3.5mm is only part of the coil that I pulled off the former. Total coil is about 28 turns, single layer. Have a bad feeling that the cone has to be removed but will try doing it with the cone intact. 4 bolts holding the magnet to the basket so hoping there's enough play there for adjustments.
Wasn't expecting such interest in my progress, I'm a noob at diy audio and the drivers are dead anyway but I'll take pics as I go along for a 'How Not To' guide.
Years ago I used to do this with the cone still attached to the coil-former. I removed the dustcap since it made things easier (especiallly the centering afterwards). If I couldn't find an adequate rod I used shets of thin paper or film negative inbetween. You definitely need to glue the wire to the former in the end.
Regards
Charles
Regards
Charles
Hi,
DO NOT unbolt the magnet from the pole pieces.
Due to the very strong magnetic attraction it will be extremely difficult to re-centre the pole gaps which must be concentric.
If the magnet surface is not plane (mine is not) and the pole piece is plane then there is a gap which I imagine reduces the total flux across the gap.
Q.
Is it better to fill the pole piece to magnet gap with a magnetic fluid before bolting it all back up?
I have still to design a jig to keep accurate alignment while offering up the pole to the magnet.
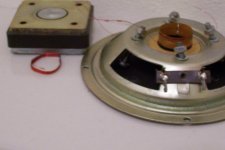
First try at posting a pic.
The wire isn't copper and the magnet has no effect on it. Don't think the driver is high end enough for it to be silver, aluminium alloy maybe? I remember reading here about it being used to increase sensitivity.
There's a bit of a well in the gasket and the 2 wires coming from the cone are intact, am hoping to solder the new coil to the existing cone wires in that space. Bad idea?
Attachments
Hi,
it will be safe to assume they are enamelled copper.
Carefull to not upset that pole to pole gap while the magnet assembly is unbolted. It must remain concentric!!!
The tinsel wires will be glued to the cone. The VC lead out wires are also glued to the cone. Try to peel the VC lead out wires away from the cone. Solder your new VC lead out wires to the old tails and then re-glue to the cone. The worst that will happen is that you have added a bit of extra weight due to the two soldered joints and some glue. A few tens of mg here will be imperceptable.
Try to focus your camera on the subject.
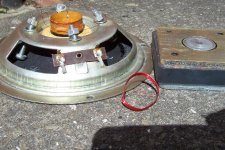
Under the red of the varnish the wire is bright, not copper coloured. I kept scraping and scraping but still looks bright under a 20x loupe. They're Wharfedale Dovedale III if anyone is familiar with them.
The magnet appears to be glued, no way of separatng the poles without destroying it. Seems pretty strong, affects my crt monitor from 18" away.
Does anyone know a supplier of magnet wire that I can send a sample of mine to make sure I'm buying the correct wire?
If not, anyone here able to indentify it if I send them some?
If I do manage the coil without removing the cones I'll have to make a jig to lower the magnet on slowly, the pull will most likely ruin the coil otherwise.
Not that great a camera re. macro but will have another go soon.

- Status
- This old topic is closed. If you want to reopen this topic, contact a moderator using the "Report Post" button.
- Home
- Design & Build
- Parts
- Going to try winding a voice coil