Anyone here ever recapped a Perreaux 1150B 100wpc amp? I have very low bass output in one channel and a number of small metal can caps w/ axial leads (polarized) appear to be leaking a dry waxy substance...Time for recapping? 1150B is 20+ years old and I imagine bad caps are the culprit. Does anyone know what kind of replacements I should use? Besides the old West German little cans, WIMAs and some banded,color-coded (poss ceramic?) caps are also used throughout the circuits. One last question: Should I try to also replace the two big 18000mfd power supply caps or wait until doing all the small ones first? All replies will be greatly appreciated! ---Jeff in Hawaii
Just Do It.
Hi Jeff, I have plenty of experience with high power pro Perreaux amps - 6000B, 8000B etc.
At 20 years old, just replace all the caps regardless, excepting the 18,000 uF resevoir caps - these are maybe duff, but are very likely fine.
The other fault with Perreauxs in my experience is that the joints are soldered, and then the leads cut, and the flux is left on the board - this is all bad news for long term reliability.
My standard procedure is to clean the pcb's, replace all the caps, blanket resolder the pcbs, and then clean them again.
I have had very good sonic sucesses with these Hitano EXR low esr caps, and they are cheap.
Take care with bias current on initial start-up (use a variac) and you should have a brand new amp again.
Once this job is done correctly your amp should sound as good as it can, and it should never let you down.
Eric.
OK, Eric, thanks for your reply. I'll try the Hitanos for replacing all the 10-100uF electrolytics as you suggest. As for the smaller .1uF WIMAS I'll go with some sort of good quality polypropylenes.
Sorry if this is a bother but I still have a few more questions:
1) As for the four color-coded caps that look sort of like chiclets--yellow top, purple-orange-white-red bands in descending order--are these 473pF 92v if I figured correctly? If so, good quality silver mica or polyprops to replace these?
2) Anything special you use for cleaning the PCBs? Isopropyl alcohol & cotton swabs OK?
3) I dont have/have access to a Variac. Does the bias need to be reset or adjusted after recapping even if I'm careful to replace with exactly the same values? There are a couple of variable resistors per PCB side that appear factory-set, but I don't think I should touch them without proper knowledge & test gear.
Any further enlightenment before I order the caps will be tremendously appreciated! Thanks again,
Jeff
Renovate It In Steps....
No bother, Jeff.
I would take things one step at a time.
I would do the blanket electros change/blanket resolder/pcb clean treatment first.
This will bring the amp to as good as factory and usually nicely better.
Try to stay with the same voltage rating and replace all the pcb mounted electros with the Hitanos, including coupling caps.
You may want to increase values of some electros too.
I find the these caps to sound good, clean and musical in all the applications that I have used them.
My next step would be to add RC networks across power supplies and windings, and get the power supply to sound decent, and live with that for a few days at least.
Once you have this reference, then go ahead and change polyesters to PP, also any ceramics to something better.
1) - Little square ceramics I think by your description.
2) - Newsagent art brush (long stem, flat white straight bristles, $1.00), Isopropyl alcohol (in a 200 mL squeeze bottle) and a toilet roll.
Wet the whole board, dissolve with the brush, dry the brush in the tissue and repeatedly wick up the dissolved flux/alcohol.
3) - Remove the fuse, and put a lamp across the fuse holder (40W or 60W then, 100W).
This will limit fault currents and allow you to run it up more safely.
ALWAYS, BUT ALWAYS check and set bias currents after any reworking.
You need a DVM - a $15.00 el-cheapo is good enough to set bias and DC offset (the two trimpots).
Use temporarily soldered in test point lead out wires for these fine adjustmets - ask if you don't understand these.
Use Multicore Savbit (60Pb, 38Sn, 2Cu) for good wetting/tinning and good sonics.
Treat all contacts, switches and controls.
Need any more info ? ..........just ask.
Eric.
Can you post photos ?.
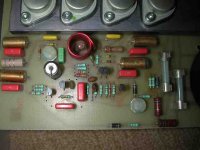
Thanks, Eric, for the additional info and yes, I'll attach a photo of one PCB to help clarify things (right after this posting).
Coincidentally, I received a second 1150B yesterday afternoon that I bought on eBay last month (for biamping). I opened it up to compare parts and discovered four blown resistors and an almost-blown rail fuse... Nonetheless, I hooked it up to some cheap speakers and it still works. Actually sounds good, as if nothing was wrong. Maybe it was a protection circuit or bridging circuit that failed leaving the main circuits intact? I'll worry about this later and get back to our original subject now but must add that I did also discover the value of the color-coded "tooth-shaped" caps in item 1) in doing so-- they're .047 Wimas (probably uF unless pF indicated?) in this later serial # amp and the 10uF/100v German electros were replaced by 160V Marcon/Maxcons (?) (Hard to read very tiny brand name).
Item 2) No problem, can do.
3) OK, but how should I know what the bias current/voltage should be? Will I need to order a schematic/service manual from Perreaux? They want $50USD just for a schematic, if I recall correctly.
One last question: Any ideas on where to find the Hitanos in USA? Or elsewhere if no US distributor? So far, no luck trying to track a retail source down over here. My many thanks to you again Eric!
Hi Jeff, the black electro is the LF rolloff cap I think.
If this cap is dry, then expect diminished bass output and lower sensitivity.
I do not know of any low ESR caps in the axial package, only RB types.
What are the values of all the electrolytics ?.
If you do some drilling you may be able to mount RB types.
I would replace the caps and blanket resolder the boards before any other mods, and see (hear) what you get.
Eric.
Thanks for posting the reduced jpeg, Eric. If you still need to see the complete boards I will send you more images but you might have solved my problem by possibly identifying the LF rolloff cap, a 100uF 25V Anodia CE 04W (One per side). I may just pick up a pair of whatever Radio Shack sells in that value and make a temporary fix to see if that's the root of the low bass output problem. Then I can replace the rest when I can round up the Hitanos (and new resistors for the other amp).
Sorry but I don't know what ESR or RB types mean. Could you enlighten me a bit further? Thanks, Jeff
Sorry but I don't know what ESR or RB types mean. Could you enlighten me a bit further? Thanks, Jeff
Bingo! Eric, that 100uF LF rolloff cap in the right channel was the culprit. I replaced it with a Nichicon 35v electro and now the amp is back to normal--great bass in both channels. I also cleaned the boards well and got a lot of flux off!
Now just have to replace those fried resistors in my other 1150 and then I'll be ready to biamp my speakers in fine style.
Thanks ever so much for your kind assistance. I'll go ahead and recap both amps with the Hitanos in due course (probably from your source in Sydney as they don't seem available here in the states).
Cheers! Jeff
Do you have a schem for the 6000B, and could I have a copy if you do please?
Nah, sorry.
I always end up fixing amps like these flying blind (that means no schematic, and not drunk).
")
I think I do have a schematic on paper somewhere, but only the Lord knows which box.
If I find it oneday, I will think of you.

From memory, there is not much to them - input diff pair with current source transistor, and driver stage with transistor current source - 6 small signal transistors plus outputs I think.
These are still very well regarded amongst PA guys, and would make a limitless home power amp - the 8000b would be even more fun.
The 6002 (or 6200?) is rated down to 2ohms, at full power all day long.
I have been in contact with Duncan Perreaux previously - I might drop him a line.
For physical construction and sensible layout, a whole heap of designers ought to take a leaf out of this series design books.
Eric.
What are the 8000 and 9000 models like? I have heard it is possible to get ~900WPC out of these!! 
Are they good sonically, or are they mainly meant for PA applications?
Also are the output devices still around (or similar ones available?!) Could you just use less than 8 per channel if you didn't need that much power?
Thanks for the 20 questions, I know someone who might have some parts for one... Gives me an interesting idea for a new project
Thanks
Sonically they are very good indeed, both home and PA.
The power output that they are capable of makes them essentially limitless for any domestic application.
Less output transistors would be fine for lesser power requirements - if anything these were overbuilt to ensure reliability in PA applications with low impedence loads, and would do it all day long.
10N20 and 10P20 are modern replacements for the original Hitachi Mosfet output transistors.
Do you have schematics ?.
Eric.
Hi Eric,
Thanks anyway. My 6000B is working fine and only needs a slight cosmetic cleanup; mounting bolt marks and a bit of corrosion on the fan guards. It spent it's whole working life doing <i>occaisional</i> foldback monitor duties in a small club, so it had an easy time, and will have an easier time now powering my horn subs (100dB/W).
I wanted the schem to make sure everything was up to spec (voltages correct etc). The signal caps will be replaced just to ensure reliabilty. It's never been touched, all the soldering is original.
It's an OK sounding amp, not great, but very nicely made and laid out. I'd never run it full range on my horns, but if I had low-eff squeezeboxes my opinion might be different.
Do It Now !.
Hi Brett,
Open it up now and clean (isopropyl) all flux and any fog juice off the boards before it goes SPLATT.
On the boards are two traces adjacent to each other that carry + & - 100V respectively, and any smeg here can cause them to exit bigtime.
Old fog juice and dust has been the demise of most of these that have gone expensively splatt - you have been clearly warned.
I also automattically just blanket resolder these boards too, and clean them again - a bit of laquer over the problem tracks is advisable also.
Take a closer look at earthing arrangements, and better pcb electros and you should be able to make it sing more nicely.
Eric.
- Status
- This old topic is closed. If you want to reopen this topic, contact a moderator using the "Report Post" button.
- Home
- Design & Build
- Parts
- Recapping a Perreaux 1150B amp?