I have a Hagerman Bugle preamp that requires +12VDC/-12VDC and I'd like to find a cheaper and easier way to power it than buying the Bugle power supply PCB and placing an order with Digikey for all of the parts. Do I need to get a symmetric power supply like this one:
http://www.allspectrum.com/store/product_info.php?products_id=1489
or can I just get a -12VDC wallwart and a +12VDC wallwart?
I guess the only other option would be using batteries, but I don't have an SLA battery charger.
http://www.allspectrum.com/store/product_info.php?products_id=1489
or can I just get a -12VDC wallwart and a +12VDC wallwart?
I guess the only other option would be using batteries, but I don't have an SLA battery charger.
Well, I was really looking to find something that's plug and play, or close to it. If there's a prebuilt Super Regulator, that would be great. I can't tell if the SMD version is or not. I've never had much luck working with SMD components.
I also looked into using a 24VDC supply that I have sitting around and getting a supply splitter or a TLE2426 rail splitter, but that would also require me to find a design and figure out what parts are needed and then order the PCB and order the parts from Digikey.
I also looked into using a 24VDC supply that I have sitting around and getting a supply splitter or a TLE2426 rail splitter, but that would also require me to find a design and figure out what parts are needed and then order the PCB and order the parts from Digikey.
I would build a basic little 2x12 Volt DC supply.
- 1 small 2x12 trafo, say 5-10 VA
- 4 x 1N4007, 1A rectifier diodes
- 2 electrolyt filter caps, say 470 / 1.000 uF
- Two 3 pin regulators: 7812 and 7912
The cost would be close to 'nothing'
The build is not problematic at all.
You will find typical basic circuits in the datasheets of
http://www.fairchildsemi.com/ds/LM/LM7812.pdf
http://www.fairchildsemi.com/ds/LM/LM7912.pdf
For cheap, stick with the Velleman kit or Lineup's idea.
I think the 7812's 7912's might even be newer, better
specs than the Velleman's regulators (LM317 and LM337)
The TI TLE2426 rail splitter can only handle about 20ma.
current. anything much more and your ground reference
will shift and become unbalanced unless you employ a
high current buffer. (more expense). The rail splitter circuit
is more or less to get a +gnd- supply from batteries.
I remember a few years back building Aunt Corey's Passive
Buffered preamp from Stereophile with some LT regulators
that was very good.
Yes.
I agree coloradosound.
A rail splitter is not much to have. It is a second hand solution for low currents.
A normal light power supply.
With a cheap little trafo.
And 2 standard IC regulators at 12 Volt.
It does not take much to do.
LM317 / LM337 are good, but 7812 / 7912 can do just at same level.
If you are not into some Space Technoglogy, that is
Which is not really what Diy Audio is about.
Not to me and most others.
(There are others that have joined our diyaudio community,
that would be better off in The US NASA Space Center building,
but they do not harm us too much, do they?
... I mean John Curl wouldn't make it too bad at some High Tech Physics Lab, for sure)
Lineup
If we look into the Manual
http://www.allspectrum.com/velleman/K8042/illustrated_assembly_manual_k8042.pdf
you see in point #9.
that this kit uses LM317 and LM337
So if you order Velleman kit, you in fact is using same way as suggested in this topic.
The difference is only that you get all that is needed in one package!
And you also get some good instructions how to set the +- dual 12 Volt.
For higher currents they say you may order a heatsink, too.
I do not know how much current you need.
I say you need not heatsink to order.
If you like, you can take some pieces of aluminum plate and put these onto those LM317 and LM337 3 pins IC.
Order that Velleman kit.
It looks very alright for your need.
However, you need to buy 1 transformer.
To power this kit.
See my attachment from the Manual.
And you may want to put it all into some box. If not in the other box you have.
That is all.
Kit + Trafo ... and you have it done.
Attachments
Since the transformer that Jim Hagerman uses in his design is out of stock at Digikey:
http://parts.digikey.com/1/parts/1000070-transformer-15v-334a-toroidal-70023.html
is this a suitable alternative?
Aside from the 1A higher max output, it looks the same to me.
http://search.digikey.com/scripts/DkSearch/dksus.dll?Detail?name=595-1333-ND
or this one?
http://search.digikey.com/scripts/DkSearch/dksus.dll?Detail?name=595-1219-ND
I actually prefer Signal's transformers over the Amveco's.
I have a preference for split bobbin over toroid, but
that would be a whole different thread going into
philosophy!
I'd say either one would be fine and may even prefer
the 14V paralell sec. (28V series sec. which is how you'll
want to wire it anyway).
Absolutely nothing wrong with extra current capability
and many (myself included) find sonic benefit in a beefier
supply. I'd even splurge myself and go for at least double
that current rating, but remember your goal is economy.
For a few bucks more, I ordered one of these:
http://search.digikey.com/scripts/DkSearch/dksus.dll?Detail?name=595-1026-ND
http://search.digikey.com/scripts/DkSearch/dksus.dll?Detail?name=595-1026-ND
I wasn't planning on it actually. I looked at some of the chassis mount transformers, but they're all MUCH higher current than I need. I was thinking that I'd hot glue the one I ordered in place inside the box that I'll be using for the transformer and the preamp, and then solder the connections to the preamp board and to the chassis mounted AC input jack.
JWFokker said:
I was thinking that I'd hot glue the one I ordered in place inside the box
that I'll be using for the transformer and the preamp,
and then solder the connections to the preamp board
and to the chassis mounted AC input jack.
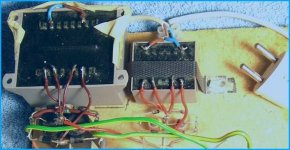
Something like this way of mine, maybe.
It is from one small Class A Power amp (my own design)
with separate Trafo+Regulator for input/voltage amp
and Unregulated Bigger transformer for Power Output stage.
The bigger is glued to the bottom of the board.
The one to the right is using mechanical attachment
I did fix smaller trafo using plastic package strips and 2 screws.
As shown.
Attachments
Well, I've got the transformer and now I realize that I'm not exactly certain how to wire it. I've never used a dual output transformer before and I'm terrible at reading schematics.
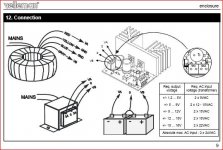
Based on this image from the datasheet PDF, it looks like I should have the 115VAC going to pins 1 and 4, and the neutral going to 3 and 6? And then 7 and 10 should end up 14VAC and 9 and 12 will be neutral/ground?
Based on this image from the datasheet PDF, it looks like I should have the 115VAC going to pins 1 and 4, and the neutral going to 3 and 6? And then 7 and 10 should end up 14VAC and 9 and 12 will be neutral/ground?
An externally hosted image should be here but it was not working when we last tested it.
You are correct about the primary (115V) side. On the secondary
side power one side of your rectifier assembly by pin 7 the other
side of the bridge by pin 12. Tie 9 and 10 together and make
and use this as your ground ref. Instead of the wire coming
off the middle leg of the secondary on the attachment your
jumper between pin 9 and pin 10 form that middle leg.
Hope this attachment works.
- Status
- This old topic is closed. If you want to reopen this topic, contact a moderator using the "Report Post" button.
- Home
- Design & Build
- Parts
- Symmetric supply or dual supply?