Here :
http://audio.peufeu.com/node/69
http://audio.peufeu.com/node/69
An externally hosted image should be here but it was not working when we last tested it.
jkeny said:Excellent Peufeu,
You never fail to amaze! What will you come up with next - a multichannel ethernet DAC?")
Or perhaps firewire
after signing the NDA with TC tech i got the DICE firmware yesterday.No time to look at it in great detail, but from what I have seen it looks very clean and well thought out...
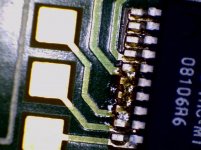
My first reflow solder - not a success!
Hi,
I tried my 1st reflow soldering today using an oven similar to the Elektor reflow smd oven. The oven is fine; the problem I have is with applying the solder.
I'm using a syringe with solder paste, and I find it hard to apply a small amount of paste to the board. The plunger of the syringe has to be pressed quite hard because the paste is so heavy, and then when something comes out, it is too much!
How do you guys do that, any tips?
Jan Didden
Attachments
This beautiful and informative article, thank you very much. Use this page to your friend told you. I am constantly followed. To receive more information about this topic the following internet sites can follow.
Jan, have you tried warming the syringe? I think you're seeing the effects of the thixotropy of the paste, and there's not much to be done about that.
Jan, have you tried warming the syringe? I think you're seeing the effects of the thixotropy of the paste, and there's not much to be done about that.
I once made a screw like thingie, to attach to the syringe. This made application much easier to control, and the use of a very thin needle possible, as pressure no longer was an issue to build up.
Magura
SY, Magura, OK I'll try that. I had the paste at room temp before use but store in in a fridge; this stuff has a limited shelf life.
I was also looking at what are called 'component stencils' which are stencils for individual components like a 40 pin QFP quad pack or a SOIC. You can get them for $35 each in stainless steel or from another outfit A 4*4 inch stencil to your design for $25, and you apply the past with a queegee I think it is called (basically an old screwdriver
). jd
Squeegee (= raclette). You might want to use something more flexible than a screwdriver- a strip of spring steel or hard plastic would be ideal. In production, the squeegee is generally a high durometer (like 90A) polyurethane.
Right. I was looking at this:
http://www.celeritous.com/estore/in...sult&search_in_description=1&keyword=squeegee
jd
Last edited:

Sparkfun sells reflow oven controller kits. it carefully monitors the temp and runs it through a preprogrammed temp sequence.
Yeah, they all do; the technology is very simple and not the problem. My problem is to fnd an easy and reliable way to attach the solder paste to the board.
I think I will get some component stencils from Celeritous.com.
jd
We got thin metal templates with holes where the paste goes.
Then, yeah, its just basically a squeegee applies the paste.
I don't think such a template would necessarily have to be
made of metal? plastic would probably do just as well...
Not sure how the template holes are cut, possibly a laser?
I'm sure a round punch of some kind would do. The paste
flows and would not necessarily have to be perfectly the
same shape as the pad, just as long as its the right size
blob to flow for that pad, and not touching its neighbor...
We got thin metal templates with holes where the paste goes.
Then, yeah, its just basically a squeegee applies the paste.
I don't think such a template would necessarily have to be
made of metal? plastic would probably do just as well...
Not sure how the template holes are cut, possibly a laser?
I'm sure a round punch of some kind would do. The paste
flows and would not necessarily have to be perfectly the
same shape as the pad, just as long as its the right size
blob to flow for that pad, and not touching its neighbor...
Some are indeed made from mylar, 3 or 5 mills thickness. There is one outfit you can send you pcb gerbers to and they will send you a stencil for the whole board, mylar laser cut. They charge around $32 for 4 square inches.
For larger production runs stainless steel stencils are used but they are an order of magnitude more expensive, not diy range. A good compromise would be individual component stainless steel stencils for, say, a 44 pin quad pack for $22. You just buy what you need so in time you collect a good range of footprints.
jd
I've always just used a regular soldering iron to tin and pre-load excess solder onto the traces. Then some thick regular solder paste (not the SMD kind with solder in it) to hold the pins in place and improve the solder flow. I usually use a hot-plate instead of a toaster, but the idea is the same:
http://www.sparkfun.com/commerce/tutorial_info.php?tutorials_id=59
With careful control of the heat, I can get very good results (I only make single sided boards at home since double sided are a pain to align). No messing with stencils or special pastes.
http://www.sparkfun.com/commerce/tutorial_info.php?tutorials_id=59
With careful control of the heat, I can get very good results (I only make single sided boards at home since double sided are a pain to align). No messing with stencils or special pastes.
I've always just used a regular soldering iron to tin and pre-load excess solder onto the traces. Then some thick regular solder paste (not the SMD kind with solder in it) to hold the pins in place and improve the solder flow. I usually use a hot-plate instead of a toaster, but the idea is the same:
http://www.sparkfun.com/commerce/tutorial_info.php?tutorials_id=59
With careful control of the heat, I can get very good results (I only make single sided boards at home since double sided are a pain to align). No messing with stencils or special pastes.
Fenris, how do you avoid that the solder you apply gets between the pads and shorts them out? Some of those chips have 0.5mm pitches.
jd
- Status
- This old topic is closed. If you want to reopen this topic, contact a moderator using the "Report Post" button.
- Home
- Design & Build
- Parts
- Attack of the mutant reflow toaster