Hi...
I need a psu for a project i'm currently doing - an emulation of the LC based on the designs by T.Klose at ucapps.de...
Rapid has an open frame ac/dc psu that gives 12-15v and is rated at 1.7A. This is perfect for my box, but it costs 40 quid . I really wanna keep costs down and so wondered if ne1 here has a pcb layout or schematic for a similar psu I can etch and stuff myself (as i've done with the mbhp modules)...
I know u havta be careful with the old psu building but i'm sure the knowledge on this board can point in the right direction
Peace n dumplinz
Dan
I need a psu for a project i'm currently doing - an emulation of the LC based on the designs by T.Klose at ucapps.de...
Rapid has an open frame ac/dc psu that gives 12-15v and is rated at 1.7A. This is perfect for my box, but it costs 40 quid
. I really wanna keep costs down and so wondered if ne1 here has a pcb layout or schematic for a similar psu I can etch and stuff myself (as i've done with the mbhp modules)...I know u havta be careful with the old psu building but i'm sure the knowledge on this board can point in the right direction
Peace n dumplinz
Dan
Hi Dan,
Is it 85-3200 you were looking at?
How much current do you need, and how well regulated do you want it to be?
It may be possible to do it for about half that price in components, and you probably won't need a PCB.
The only fly in the ointment is that you'll have to pay P&P on a lower value order
Where abouts in London are you?
Cheers,
Dan,
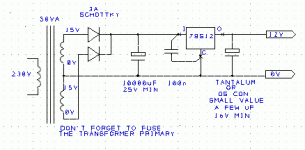
You'll need:
A 15-0-15v 50VA transformer such as 88-0310, or a toroidal if you want low profile.
4 schotky diodes such as 47-2538, or you could use a diode bridge, but you might need a bigger cap- depends on your actual max current.
A 10,000uF cap such as 11-2225 plus clamp.
A 78s12 fixed 2A regulator 47-3304
A suitable heatsink for 10watt dissapation.
A couple of small value caps for the input and output of the regulator, to keep it stable and quiet.
If you want a schematic I'll post one, but this is simple stuff
Disclaimer: check all numbers before ordering... I am dyslexic with numbers
Cheers,
Nice1 John...
By clamp dya mean mounting clip? Soz, newbness is rife on all things EE...
A schematic would be charmin, i'll prolly mount it all on stripboard - this should be cool ye?
Thanks again...
Dan
A 10,000uF cap such as 11-2225 plus clamp.
By clamp dya mean mounting clip? Soz, newbness is rife on all things EE...
A schematic would be charmin, i'll prolly mount it all on stripboard - this should be cool ye?
Thanks again...
Dan
Dan,
4u7 would be fine. Just to get rid of regulator noise.
You'll also need an insulation kit for the regulator. This should consist of a plastic bush and silicon washer. I find the stick-on washers are most convenient.
The heatsink has to dissapate up to 10 watts. Think about what size sink you'll need. They're rated in W/degC, so take the temperature rise that's acceptable and find a heatsink that's big enough. Leave a bit of headroom, 'cause the regulator also has some thermal resistance that we haven't taken into account, but it's "fudge-able".
Cheers,
John, soz - need to clear a few points up...
When u say fuse the xformer primary - does that mean just stuff a fuse before the xformer? I thought i'd use a 2A rated fuse after the regulator at the output...:?
Also, where would i place the power switch (which would also have an LED) - after the regulator right? Or would i get a fused power switch and thats what goes before the xformer?
Apologies for the basic q's - i'm new to all this and have only used wallplugs prior...
Dan,
I'd use a 315mA slow-blow fuse on the primary of the mains transformer. Make sure it's in the live terminal, and well insulated. You can fuse the secondary too (2A slow blow) if you like, but put it just before the regulator, otherwise the regulation will suffer.
If you use an LED as an indicator, wire it across the 12 volt output with a resistor of 500 ohms to 1 K in series.
You could switch the secondary (as in wall-warts), but I prefer to switch the primary for a number of reasons.
It's up to you
Cheers,
John, bits have arrived but i've got a tad baffled...again...
The xformer has 4 pins on top:
0 | 120V | 0 | 120V
Then 4 on the bottom again:
25VA | 15V | 25VA | 15V
Following your schem and also the addition of 2 fuses and a switch, am i right in thinking that from the AC socket the Live wire goes to the switch which goes to the 315mA fuse which goes the first 120V pin of the Xformer, the neutral wire goes straight to the first 0 pin on the xformer and earth to the metal casing (so no connections on the 2nd two 0 and 120V pins). Then, from the 25VA pin (corresponding to the top O pin) this goes to the (in ur pic) lower diode. The 15V pin (corresponding to the top 120V pin) goes to the 10k cap (-). The 3rd pin (25VA) left open, and the 2nd 15V pin (no connection on corressponding pin on top) goes to the upper diode, which goes to the 10k cap (+), then the 100n cap, then here i'd have the 2A fuse before goin into I of the regulator...so 2 wires would be connected to the top of the xformer and thered be 3 coming from the bottom...Or is this what a centre tapped psu is? do i just wire a bridge over the bottom 25VA outputs? I can work out which of the pins i feed off of from the bottom 4...apologies, but u got a beginner here (as the wording and knowledge shows)
Mebbe i shudda just got that open frame jobbie afterall eh ;p, but i got all the bits now and had to do another order for the fuses which i forgot to add before
Any pointers appreciated...
Don't panic!
Meta,
I can't draw a schematic today (might have facility tomorrow).
The mains / primary wiring should be like this:
Brown mains wire - fuse - switch - TX120v(#1)
then,
TX0(#1) - TX120v(#2)
then,
TX0(#2) - switch - blue mains wire.
If the above does not make sense, don't do anything, wait for a schematic.
On the secondary side, take no notice of the "25va" lables. They are just badly placed, and correspond to the "0V" points on the transformer in my schematic.
If you are short of a couple of fuseholders and fuses, just e-mail me your mailing address; I'll post you some.
What provision have you made for heatsinking the regulator? I said you'll need to dissapate (sink) 10 watts or so. The open frame supply you first looked at used it's L shaped aluminium chassis for that, and probably recommended you to mount it in a metal box..
If you have a metal case, it might be possible to mount the regulator on a piece of 'ally angle and bolt that to the side of the case.
Did you order the insulation kit?
Let me know. We all have to start somewhere, don't rush it, you just need patience.
Cheers,
Hey John...
Okay, i get that, just to make sure tho - i connect a wire (or bridge) from the 1st 0 pin to the 2nd 120V pin of the TX. I leave the ground pin from the ac socket open or connect a wire from the pin to the casing (metal)?
Very kind of ya fella, but i already ordered the parts i missed - just arrived
I got a heatsink rated at 10 DEG C /W - okay? I also got silicon rubber insulation kit for the regulator, it has a silicon pad (shiny side and matt side) and a plastic washer. I also got some insulation tubes...
We do, I wont, I know
Your contined help is v appreciated...
Best
The mains / primary wiring should be like this:
Brown mains wire - fuse - switch - TX120v(#1)
then,
TX0(#1) - TX120v(#2)
then,
TX0(#2) - switch - blue mains wire.
Okay, i get that, just to make sure tho - i connect a wire (or bridge) from the 1st 0 pin to the 2nd 120V pin of the TX. I leave the ground pin from the ac socket open or connect a wire from the pin to the casing (metal)?
If you are short of a couple of fuseholders and fuses, just e-mail me your mailing address; I'll post you some.
Very kind of ya fella, but i already ordered the parts i missed - just arrived
What provision have you made for heatsinking the regulator? I said you'll need to dissapate (sink) 10 watts or so...Did you order the insulation kit?
I got a heatsink rated at 10 DEG C /W - okay? I also got silicon rubber insulation kit for the regulator, it has a silicon pad (shiny side and matt side) and a plastic washer. I also got some insulation tubes...
We all have to start somewhere, don't rush it, you just need patience.
We do, I wont, I know
Your contined help is v appreciated...
Best
Meta,
The earth must connect to the case.
10degC/w seems a bit small.
For each watt it will rise 10deg C.
So for 10 watts it'll rise 100deg C.
If the ambient is 30 deg C, the final temp will be 130 deg C.
That is damn hot!. It's also close to meltdown inside the regulator.
You must make further sinking provision, such as mounting the sink on a metal surface (perhaps the outside of the box?).
Make sure the fins are vertical and unobstructed for airflow.
Cheers,
John...
So the heatsink i got is useless then - great. When u say mount it to the outside of the box i guess u mean on the inside of the metal enclosure i'm using for this project. Would just gluing it to the side of the metal casing with either aradite or silicon gel be sufficent?
As u didnt reply to head scratcher i had over weather or not to solder a wire from TX0(pin1) to TX120v(pin2) I guess it's okay to do so...
Now, what about the output (secondary side) of the XT? Was i right in the post a few posts back - it looks like u got 3 wires coming of it in ur schem, but there are 4 on the XT as stated. From what i gather its:
TX25VA(#1) - lower diode
TX15V(#2) - 10k Cap (-)
TX25VA(#3) - open
TX15V(#4) - upper diode
??
ta
Meta,
Join #2 to #3.
Which heatsink did you get?
The heatsink design will affect if/how to attach it to the case.
Is the case metal?
If you do fit it to a metal case, it'll need to be bolted to allow good thermal contact.
Are you still unsure how much current you need? If it less than the 2A we allowed for, the heatsink are might be OK.
Cheers,
Meta,
That one will be good for about 1 amp. But you will still need clear airflow above and below.
I just checked my stores and found one that is 110wide x 30deep x 59 high. It mounts on a flat surface eg the outside back of your box.
If your box is tall enough ie 60mm+, you could use this one as it is. If not, I estimate that you could cut it down to 44mm high, and still have enough cooling if externally mounted.
It's spare. I'll send it to you if you want.
Cheers,
Hey John...
The back of my enclosure is 80mm so that heatsink should be cool. Thats very kind of you to offer to send it
So with the heatsink for the regulator mounted on the back - how do u go about soldering to the pins of the regulator, or what if it was stuffed on a pcb in the first place?
I can see this getting pretty messy now :/ a heatsink on the back of the enclosure with the regulator showing and then, i guess, wires going from the pins of the regulator back into the box to the rest of the psu circuit doesn't seen right to me
i think i perhaps should drop this and just get the all in one job - i've spent that much in parts and delivery charges already now :/ - and it's all on me c/c which is already been caned with my intro into diy ee projects...
- Status
- This old topic is closed. If you want to reopen this topic, contact a moderator using the "Report Post" button.
- Home
- Design & Build
- Parts
- Help with Linear PSU