Welcome to Eagle PCB school
Hi guys, I would like to start an eagle tutorial thread here...
The need for it is undebatable... (i.m.o.)
I am by no means a master of this program yet, but I would say, I am at least 60 to 70% profficient... it sounds a little, but, this is the result of two years... there realy is a lot it offers, that I have not begun to investigate... this exludes 3rd party addons
So, I will need other more experienced users to jump in occasionaly when there is a shorter way, or alternative way to do something.
If you have your own contributions you would like to prepare, please try to follow the lead of the beginning posts in formulateing your stuff...
WE NEED TO ESTABLISH SOME RULES to keep this thread on track and filled with maximum useable data, not discussions and social commentary as usual.
So I thought we can do it like this...
Little lessons or sessions each explaining a concept or reinforceing a previous one, we can work through tools, the basic program, preparing gerbers, and viewing them, creating 3D renderings etc...But, I guess we will start at the beginning and see where the road leads us...
Appart from a few posts and comments suggestions and requests for the first two or 3 pages of this thread, I would like it if we can agree on the following. Of course its a free world and you can do as you like, but it will certainly loose you some respect if you want to make a mess out of this potential tutorial buster....
So first 3 pages is your chance to have your say, then we apply the rules...
>>>>RULES<<<<
1)POST NO "THANK YOU'S", these can be sent via the e-mai button to the person you are greatfull to.
2) POST NO QUESTIONS, it is our nature to not start at the beginning and repeat stuff... this turns good threads into spam fests of repetitiveness. SEND ALL QUESTIONS AND REQUESTS BY E-MAIL... i.e. treat it like a colomn in a magazine...
This way questions can be prioritized according to the amount of interest.
3) ONLY EAGLE POSTS, with the exception of showing how to perform an equivalent function of another package in Eagle.
4) NO COMMENTARY, leave this thread the way you found it, or leave it better. Those who come after you may be even more afraid and confused than you, and could appreciate a clean stream of information to get their heads around the basics.
I thank the moderators in advance for their strict handleing of unneccesary posts... especially Cal with the shotgun.
So guys and girls, welcome to eagle school.
In advance I ask your forgiveness for typos, spelling and concorde mistakes, this is not my mother tongue.
THE NEXT 3 PAGES ARE YOURS!!!!!!!!!!!!!! (mostly)
OH, and I need some volunteers, and even just people who know eagle well, who would be willing to enterain a question or two from me, that I can not handle yet.
Thanking you in advance
Nico

This is a great idea, and I will police it as best I can. The topic rules laid out below will be strictly enforced, and OT posts will be removed with no further notice. I have just put my post at the top to clarify the moderation stance, and all credit is Nordic's
Share and Enjoy.
EAGLE OVERVIEW
A free limited version of Eagle can be downloaded from Cadsoft.
It basically does everything the full version does, but only allows you to create relatively small boards (half a euro card). This is good as it teaches restraint...
Download it and run the installation... no surprises there
Let’s look at where it goes on your PC; it is handy to know as you will need to access these folders on occasion...
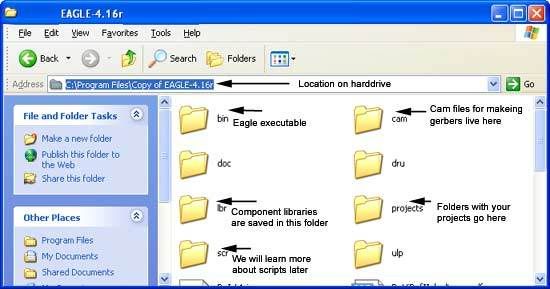
I think the image is pretty self explanatory, and does not need to be memorized, but it will be handy to remember where it is on your PC more or less...
What overwhelms most people the first time is when it actually runs... It opens a screen which does not look like you can draw PCBs anywhere in there...
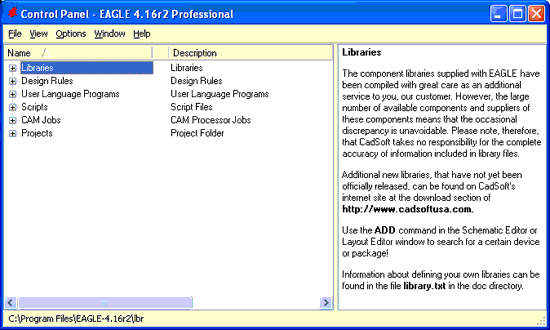
This is sort of the "hub" of eagle, you don't really need to spend anytime in the control panel, except maybe to make and organise project folders.
Eagle consists of many different "windows" the control panel is just one of them. You can close all other windows, but when you close the control panel, Eagle shuts down.
So it will always be running in the background...
So, let’s do with it what one does...
Click on the little plus next to projects to show its contents...
I think there is an examples folder in by default.
We want to make a CMOY headphone amp as a first tutorial project, as this is a pretty public domain schematic... and actually can be done in a way to be very educational... exploring even things like ground planes...
The projects folder becomes a mess very quickly if you do not keep it tidy as a rule.
Right-click on projects and select new folder.
A new folder opens and awaits a name, call it tutorials.
Right-click on this folder now and select New project.
Name your project cmoy.
Open the cmoy project now.
Right-click on cmoy, and select new schematic...
NOTE: you can do a board without the schematic but it is without all the benefits of quick parts swaps etc... and most importantly without any way to check for errors.
OK notice the schematic view window opened now.
Before you do anything else, save this schematic now.
Call it cmoy.sch
The reason is, that the default name is untitled.sch, if you wanted to make another board as part of the same project, it would
overwrite your current files... (highly annoying)
So you finally have your first project at the point where you can start working on it.
You can save and exit now and await the next lesson which will start with an overview of libraries (where the components live) and then jump straight into parts selections and getting a schematic down.
A free limited version of Eagle can be downloaded from Cadsoft.
It basically does everything the full version does, but only allows you to create relatively small boards (half a euro card). This is good as it teaches restraint...
Download it and run the installation... no surprises there
Let’s look at where it goes on your PC; it is handy to know as you will need to access these folders on occasion...
I think the image is pretty self explanatory, and does not need to be memorized, but it will be handy to remember where it is on your PC more or less...
What overwhelms most people the first time is when it actually runs... It opens a screen which does not look like you can draw PCBs anywhere in there...
This is sort of the "hub" of eagle, you don't really need to spend anytime in the control panel, except maybe to make and organise project folders.
Eagle consists of many different "windows" the control panel is just one of them. You can close all other windows, but when you close the control panel, Eagle shuts down.
So it will always be running in the background...
So, let’s do with it what one does...
Click on the little plus next to projects to show its contents...
I think there is an examples folder in by default.
We want to make a CMOY headphone amp as a first tutorial project, as this is a pretty public domain schematic... and actually can be done in a way to be very educational... exploring even things like ground planes...
The projects folder becomes a mess very quickly if you do not keep it tidy as a rule.
Right-click on projects and select new folder.
A new folder opens and awaits a name, call it tutorials.
Right-click on this folder now and select New project.
Name your project cmoy.
Open the cmoy project now.
Right-click on cmoy, and select new schematic...
NOTE: you can do a board without the schematic but it is without all the benefits of quick parts swaps etc... and most importantly without any way to check for errors.
OK notice the schematic view window opened now.
Before you do anything else, save this schematic now.
Call it cmoy.sch
The reason is, that the default name is untitled.sch, if you wanted to make another board as part of the same project, it would
overwrite your current files... (highly annoying)
So you finally have your first project at the point where you can start working on it.
You can save and exit now and await the next lesson which will start with an overview of libraries (where the components live) and then jump straight into parts selections and getting a schematic down.
Libraries
Libraries
Components are stored in files called Libraries. These files have the extension “.lbr” and are in the folder indicated in lesson 1.
The software comes with a large selection of component libraries… not all are by default linked to any project, but I think as
you use libraries they become part of the quick selection lists…
Open your schematic by finding it in the control panel and double clicking it. “cmoy.sch”
The libraries you would mainly use would be those containing Resistors, capacitors and inductors, or RCL for short.
In order to render them later on, I suggest you use film capacitors from the “capacitor-wima” library although most
of the small ceramics work too… I will publish lists later of what will work… not that using anything else would “break anything”
If at some point I ask you to use a library not available under the ADD (parts) button

You will need to check if you have it on your computer and add it to your project, using the method I will explain next.
Use the Library item on the top menu and select USE
This will show you all the .lbr files in your library folder to select the missing one from.
Are there more library items out there?
Yes for sure, one of the sources is Cadsoft themselves…
http://www.cadsoft.de/cgi-bin/downl.../download.htm.en&dir=pub/userfiles/libraries.
Just save them in the .lbr folder when downloading.
Libraries
Components are stored in files called Libraries. These files have the extension “.lbr” and are in the folder indicated in lesson 1.
The software comes with a large selection of component libraries… not all are by default linked to any project, but I think as
you use libraries they become part of the quick selection lists…
Open your schematic by finding it in the control panel and double clicking it. “cmoy.sch”
The libraries you would mainly use would be those containing Resistors, capacitors and inductors, or RCL for short.
In order to render them later on, I suggest you use film capacitors from the “capacitor-wima” library although most
of the small ceramics work too… I will publish lists later of what will work… not that using anything else would “break anything”
If at some point I ask you to use a library not available under the ADD (parts) button
You will need to check if you have it on your computer and add it to your project, using the method I will explain next.
Use the Library item on the top menu and select USE
This will show you all the .lbr files in your library folder to select the missing one from.
Are there more library items out there?
Yes for sure, one of the sources is Cadsoft themselves…
http://www.cadsoft.de/cgi-bin/downl.../download.htm.en&dir=pub/userfiles/libraries.
Just save them in the .lbr folder when downloading.
My first schematic
Let’s get back to RCL…. Still remember RCL?... you better!
Look at a basic schematic of what we will build
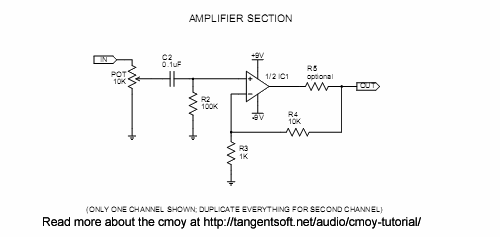
To make things interesting and more educational we will use a dual opamp opa2132.
As you can see there are few components so far, so it will make things much easier…
All resistors will be standard 0.25W, which can fit in 7mm pitch holes minimum…
We will use a ceramic input cap (C2) and then change it to a polyester or other box type film cap to explain how to change things in the schematic.
Exercise 1
Click the add tool
.
The parts selection window opens now.
Scroll down to the RCL Library, and expand it to show the contents.
Let’s just have a quick look before starting…
The parts are grouped as C for capacitors, L for inductors and R for resistors
You can choose between American symbols or European ones by looking at the extensions –EU and US.
Capacitors are grouped as
C-EU/ C-US for normal bipolar and ceramic caps
CPOL-EU and US for polar capacitors
and C-TRIMM for variable capacitors
Resistors are
R-US and EU normal resistors
and R-TRIMM for trimpots (not potentiometers)
And knowing this you can figure your way out to the inductors under RCL too…
Ok I want you to open the resistors (R-US or R EU)
The basic resistors are shown using their common package codes… which basically represents width and length of the smallest footprint they take up.
A standard 0.25W resistor will normally be a 0207. Now notice after the package code there is sometimes a slash and another number… these are optional lead pitches you can use for the same package.
Select the resistor with the description 0207/7 and click OK (you can also double click the appropriate line).
OK, you are back in the schematic window. Look at the top menu bar while clicking the RIGHT- button of your mouse a few times, notice where it indicates the orientation…
You can either right-click or use those buttons at the top while working in future…
Left click to place the resistor.
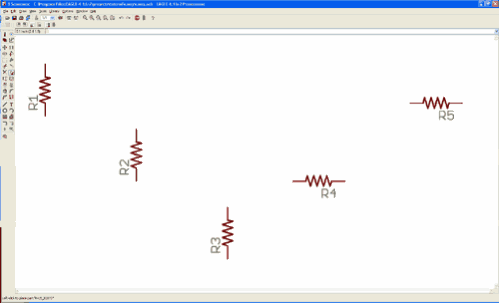
I want you to place five (5) 0207/7 resistors in your schematic… roughly in the shape of the schematic above…
You can use the MOVE tool by clicking the compass rose icon next to the two little men.
You can zoom using the scroll button of your mouse, or fit all the parts you have drawn so far by pressing alt+F2 at the same time…
Notice how eagle automatically increments the part number… (You can not duplicate a number).
Make the value of R1 10k and change the values of the other resistors to correspond with the schematic we are working from
You do this by selecting the value tool
 from the side menu and clicking on the component which’s value you need to change….
The button next to it is the Name button and can be used to edit the part numbers manually… (You don’t have to rename anything now)
Save your schematic now.
Click the add button and spend some time looking through the libraries you have listed.
See if you can find potentiometers and the power resistors for instance (hint there is a search box, but it needs an exact match, i.e. won’t match on partial word…)
Thanks for your participation; we will continue in the next session shortly.
Let’s get back to RCL…. Still remember RCL?... you better!
Look at a basic schematic of what we will build
To make things interesting and more educational we will use a dual opamp opa2132.
As you can see there are few components so far, so it will make things much easier…
All resistors will be standard 0.25W, which can fit in 7mm pitch holes minimum…
We will use a ceramic input cap (C2) and then change it to a polyester or other box type film cap to explain how to change things in the schematic.
Exercise 1
Click the add tool
The parts selection window opens now.
Scroll down to the RCL Library, and expand it to show the contents.
Let’s just have a quick look before starting…
The parts are grouped as C for capacitors, L for inductors and R for resistors
You can choose between American symbols or European ones by looking at the extensions –EU and US.
Capacitors are grouped as
C-EU/ C-US for normal bipolar and ceramic caps
CPOL-EU and US for polar capacitors
and C-TRIMM for variable capacitors
Resistors are
R-US and EU normal resistors
and R-TRIMM for trimpots (not potentiometers)
And knowing this you can figure your way out to the inductors under RCL too…
Ok I want you to open the resistors (R-US or R EU)
The basic resistors are shown using their common package codes… which basically represents width and length of the smallest footprint they take up.
A standard 0.25W resistor will normally be a 0207. Now notice after the package code there is sometimes a slash and another number… these are optional lead pitches you can use for the same package.
Select the resistor with the description 0207/7 and click OK (you can also double click the appropriate line).
OK, you are back in the schematic window. Look at the top menu bar while clicking the RIGHT- button of your mouse a few times, notice where it indicates the orientation…
You can either right-click or use those buttons at the top while working in future…
Left click to place the resistor.
I want you to place five (5) 0207/7 resistors in your schematic… roughly in the shape of the schematic above…
You can use the MOVE tool by clicking the compass rose icon next to the two little men.
You can zoom using the scroll button of your mouse, or fit all the parts you have drawn so far by pressing alt+F2 at the same time…
Notice how eagle automatically increments the part number… (You can not duplicate a number).
Make the value of R1 10k and change the values of the other resistors to correspond with the schematic we are working from
You do this by selecting the value tool
The button next to it is the Name button and can be used to edit the part numbers manually… (You don’t have to rename anything now)
Save your schematic now.
Click the add button and spend some time looking through the libraries you have listed.
See if you can find potentiometers and the power resistors for instance (hint there is a search box, but it needs an exact match, i.e. won’t match on partial word…)
Thanks for your participation; we will continue in the next session shortly.
")
- Status
- This old topic is closed. If you want to reopen this topic, contact a moderator using the "Report Post" button.