I have wasted exactly 20 WM-61a capsules, and have never got one working! Is the Linkwitz/Miller modification REALLY possible?
I understand that details of my experiences are necessary when posting to a forum such as this. Please excuse me if I am too long-winded in the name of completeness. My method has been as follows:
1) Cut existing trace to disconnect FET lead from pad 2 (I'm using the pad numbers as they are drawn on the Linkwitz page: http://www.linkwitzlab.com/images/graphics/microph1.gif ) I use a Dremel tool to make the cut with a very small burr. I check for open continuity between case and pad 2. All capsules have checked out fine to this point. So far, so good.
2a) I have tried to solder a thin wire or component lead between pad 1 and the miniscule pad 3. As configured by Panasonic pad three shows continuity to the mic case, so it seems that soldering to the case would be sufficient to establish the necessary connection.
I have never been able to get solder to stick to either the case or pad 3. I have tried several common soldering methods such as thoroughly cleaning the surfaces of both wire and case/pad 3 until they are shiny, using additional paste or liquid Rosin flux on both surfaces (cleaning between each attempt to solder,) and cutting a small cavity or groove (VERY small) to surround the wire where it connects to the case/Pin 3 with the Dremel. The last idea was to provide a more solid mechanical structure to aid flowing the solder between wire and case to get a good bond and reliable contact. This method worked several times, but later failed when the copper solder pads detached from the PCB or the wire popped off the case/pin3. The multimeter did show that the connection was made, until the failure. It seems the problems were most likely overheating the copper pads and flimsy electromechanical structure resulting from the modification.
2b) I also tried the method illustrated on the web of "dragging" solder from pin 1 to pin 3. Again, nothing would stick to pin 3 OR the case, despite my best efforts. This method overheats the capsule, and never seemed to work at all. All the capsules I used with this method were destroyed.
3) Attaching the mic cable wires invariably desoldered all the previous work I had already done. Even when I left a protruding wire "handle" to control the wire soldered between pad 1 and the case/pin 3. In my more recent attempts I used three separate "helping hands" jigs to try and hold everything together.
4) Once, I did get everything soldered, and the pads popped off during final assembly. Overheating.
This was all done with a visor magnifier under good light, so I could accurately see what was happening. I was careful to use the absolute lowest temperature that would melt the solder, which is 60/40 activated rosin core, 21 gauge.
For over 15 years, I have been a pro repair tech. IMHO, my soldering skills are not below average. I rarely have any trouble successfully soldering anything to anything.
It seems to me that the Panasonic capsules disintegrate when even moderate soldering heat is applied.
Yet, I have seen posts claiming to have bought 10 capsules, and successfully modified ALL of them!
Is this modification REALLY possible? In 20 attempts, my experience indicates that I am either missing something, or it is unlikely for an average or even more experienced DIY'er to achieve a positive outcome with this modification.
I hope that those who have completed this modification, if any, will reply to this post with additional construction methods or constructive criticism of the methods I have posted above. With additional encouragement, I'm not above trying again, but I will order at least 50 capsules.
Thank you. BTW, I am skeptical about this modification, but I assure all that I am just another audio DIY'er, not a "troll."
connection 3 is made on the copper nub on the PCB, not the aluminum case that is in contact with it.
Soldering at the minimal possible temp is the best way to ensure the PCB will be destroyed, especially when you have a heat-sink like the aluminum case of the mic in contact with it. You'll have to mash the soldering iron against the thing and try to transfer heat to it while the aluminum drains it away. That means you'll have to keep the soldering iron there for ages until the whole assembly heats up to solder melt temp. Turn the temperature up so you can hit it quickly and you'll have no more problems with the PCB coming apart.
I see you're in San Diego. Make sure you control static electricity when you do this work. The little FET is quite sensitive. I live in Phoenix and had to learn the hard way about dry desert air and static electricity.
I_F
STILL NO good caps!
I started this thread over 4-1/2 years ago. I bought 10 more wm61a capsules to try again. Same results -- not one usable capsule. Same problems experienced again. I trust that the follow up about using MORE heat was intended as humorous. People waste TOO MANY of these capsules as is without wise-guy stuff like this offered in respose to a serious post. These things will fall apart, meaning the pcbs will totally delaminate, before the solder begins to melt. Considerably below the flow point of the solder.
My new method of removing the aluminum surrounding the ground trace should be adequate. I used my Sherline hobby milling machine, with which I can can easily work to tolerances of 0.001 inch.
By the way, the question posed in my first post was never answered. Has anyone actually completed this modification.
Thanks All.
There is no way to solder to the case as it is aluminum and the heat will destroy the element , What you do is take some stranded wire and wrap it arround the capsule a couple times then slip some 1/4in shrink tube and put it arround the capsule and apply some heat to the shrink tubeing so it shrinks tight arround the capsule and holds the wire in tight contact to the case , then cut off any excess shrink tubeing ......
But really , you are better off building the Circuit with a Fetless Capsule like a TSB165 , there is also a Large diaphram fetless Electret capsule that is supposed to be pretty good ....
Cheers
But really , you are better off building the Circuit with a Fetless Capsule like a TSB165 , there is also a Large diaphram fetless Electret capsule that is supposed to be pretty good ....
Cheers
I have absolutely no idea what your problem is - I've done two capsules so far, and they've both worked.
The way I did it - use desoldering braid to clear the solder from the pad that needs to be cut. Cut it down the middle using a sharp knife or scalpel. Now you have three pre-tinned pads which, while small, can be soldered to easily enough.
The way I did it - use desoldering braid to clear the solder from the pad that needs to be cut. Cut it down the middle using a sharp knife or scalpel. Now you have three pre-tinned pads which, while small, can be soldered to easily enough.
I have successfully done a few capsules too (although mine were the original WM60A's)
The suggestion about making the iron hotter was not a joke, it makes perfect sense! Applying a hotter temperature for a very short time compared to applying a lower temp for a long time, does much less damage (same goes for any sensitive component)! The heat only briefly is applied to the area needed, as opposed to heating up the entire capsule, possibly damaging the membrane as well as the board.
TheSeeker's suggestion is a good one, and one that I will try if I need to do another mic. I destroyed a few by trying to cut back the aluminium at the edge of the pc board, it also makes the likelyhood of unsealing the back much lower.
Tony.
I started this thread over 4-1/2 years ago. I bought 10 more wm61a capsules to try again. Same results -- not one usable capsule. Same problems experienced again. I trust that the follow up about using MORE heat was intended as humorous. People waste TOO MANY of these capsules as is without wise-guy stuff like this offered in respose to a serious post. These things will fall apart, meaning the pcbs will totally delaminate, before the solder begins to melt. Considerably below the flow point of the solder.
My new method of removing the aluminum surrounding the ground trace should be adequate. I used my Sherline hobby milling machine, with which I can can easily work to tolerances of 0.001 inch.
By the way, the question posed in my first post was never answered. Has anyone actually completed this modification.
Thanks All.
I get most to work, the technique of bi-secting the solder pad at the ground with a fresh Xacto works best. You can solder a #32 wire to each half with a very fine point iron. The case is swaged onto the board but the ground tab is solderable the case is not. The mod is really only useful to extend the SPL capabilities, as in a measurement mic right up against a speaker.
Member
Joined 2007
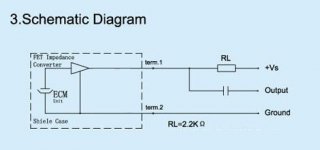
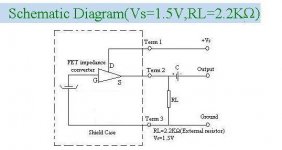
As the Electret condenser microphone the connector has two types. I have attached the schematic Diagrams,please check .Gary
Hi all,
I just happen to revive my interest in making home recordings and dug up my gear as well as bought a bunch of latest recording gear. However, a few years ago I too had made this modification successfully on my Panasonic WM61A capsules which I bought from Digi-Key electronics supplier. I don't recall having any problems with soldering to the pin 3 terminal except that it is indeed a delicate operation. Back them I think there was only one schematic showing how to rewire the capsule and it was the 2 wire way shown in this forum. So that is the mod that I did and wired up. After the mics behaved dull and funny, I noticed that he mod reverses the polarity of the power supply voltage for that particular configuration. So I had to make a reverse polarity battery box to power these modified mic capsules and then it worked fine. The sensitivity (as in voltage signal outpout) of the modified mic capsules is reduced drastically thus reducing the occurrence of overloading any mic preamp stages in your recorders. As for the sound of the modified vs unmodified capsules I have? The unmodified mics sound fantastic all by themselves really, but are very sensitive and thus prone to overload in very loud concerts settings. They are brighter sounding than the modified mic capsules. The modification dulls the highs from what I remember of my A/B comparisions. The modified mics sound duller and more like the Core Sounds Binaural mics that I also have. Pay attention to the battery polarity for that 2-way mod. The 3-wire mod I see available now does not reverse the polarity. So its up to you which way you want to wire it up.
No problems here...
I am ALWAYS late to the party, but the first 6 of these that I made worked perfectly. As previously pointed out, I cut the trace to the case with an x-acto knife in such a way that there was copper to which I could solder. Here is a picture of them in process. I have more if there is interest.
I soldered up 6 then cut them (carefully) apart. The other picture is the finished product, one of a set of 6 working stage props designed to look like RCA-44BX microphones. Worked great.
The trouble with the basic capsule is that modern PCs power the capsule from around 2.5V via 3k3.
This means that the capsule is run at <2V, right on the knee of the jfet curve, so horrible distortion
I have found that the unmodified WM-61 work well with 9V supply from a battery with about 15k pullup (Vds~5V), followed by a npn emitter follower. Capacitor couple to the end pin of the microphone plug. This gives a high gain microphone with reasonable linearity.
My microphones use 9V batteries and the Linkwitz mod applied with exactly his circuit. For my purposes, they work well provided they do not have to drive too much cable.
However, having tasted success, I am interested in trying other configurations and more complicated/improved circuitry with more gain and a true balanced output.
David: Would you care to share the schematic with which you have had good success?
However, having tasted success, I am interested in trying other configurations and more complicated/improved circuitry with more gain and a true balanced output.
David: Would you care to share the schematic with which you have had good success?
Last edited:

- Status
- This old topic is closed. If you want to reopen this topic, contact a moderator using the "Report Post" button.
- Home
- Design & Build
- Parts
- WM-61a/Linkwitz Mod. PROBLEMS!!!!