Hi All.
I have been making pcb's at home for some time now, using the photosensitive / UV light system, and I have been very happy with the results.
I would like to take my pcb work to the next level, but I am unsure how to proceed, and indeed if it is possible for the "home constructor"
Is there a way to easily produce component overlays and plate through holes, without going to considerable expense?
Any assistance will be appreciated.
Regards,
George.
Hi richie
I too have done the double sided method on occasion.
The only other thing that I thought of, was to try the toner transfer method that many use for PCB manufacture, but in this instance, try it on the fibreglass side.
May be worth a try.
I use to have a HP, A3 flat bed plotter which I gave away many years ago.
Boy do I wish that I still had it, as they are no longer made.
Anyway, it will be good to hear from thers on this issue, and the plate thru hole issue.
Cheers,
George.
For the Component side I simple Print out the Component side on to some Transparent Sticker Paper of the correct size and then just put the sticker on the top of the Board and then drill out my Holes and I have a PCB with Copper traces on one side and a component overlay on the other.......
Works for me....
Works for me....
The only sane way to do plated-through-holes at home is to buy little eyelets or rivets which you put through the holes, then stake or flare.
I just use machined-pin sockets and solder on both sides of the board where necessary. I built a 1200 bps modem that way, back when 1200 bps was high-speed.
Screen-printing at home isn't impossible; there's a photosensitive screen emulsion (or there used to be) that's easy to use. It's a fair amount of work, coating the screen, exposing and developing it. Printing takes no time at all. Clean-up however is a tedious and messy process. It's probably smarter to use a new screen each time.
If you really need labels on your board, you're probably better off to use double-sided board and put the text in copper.
What do you use for making holes in boards? It seems to me that mini-drillers are very popular abroad, is it so?
Here in Brazil we often use a perfurator, or puncture, or punch, that looks like a stapler, or a paper punch. I tougth this was standard all around the world, but recently I've been looking for it on the Internet and on catalogs, and it is starting to seem to me that this is a bazilian thing!... What other countries have the wonderful manual PCB perfurator?
Here in Brazil we often use a perfurator, or puncture, or punch, that looks like a stapler, or a paper punch. I tougth this was standard all around the world, but recently I've been looking for it on the Internet and on catalogs, and it is starting to seem to me that this is a bazilian thing!... What other countries have the wonderful manual PCB perfurator?
The toner method can be used for doing a "type" of silkscreen using Pulsar's pigmented TRF foils. Laser print your overlay, iron it on, and then just iron the TRF pigment onto the toner.
It works quite well... and it's super easy... but you have to be careful not to use strong defluxing agents. Acetone will erase it in a heartbeat.
I etch and drill my boards and then spray paint them using Testors - Transparent Candy Green 3 Oz. Spray Can. Then I do the toner/TRF "silkscreen" overlay... then solder the components. The paint melts easily when soldering, like it isn't even there.
The boards come out looking almost pro. Wish I had a digital camera so I could display some projects.
Thanks to all for your coments.
I took a look at Pulsar's web site, and this one definately looks pretty good for doing the over lay.
I have ordered some of the white transfer paper etc. I will post the results of my efforts once I get a chance to try it.
With respect to the plate-thru holes, I managed to find this site.
They were kind enough to send me some samples to try.
http://www.tarapath.com.au/products.cfm?CID=2393
Regards,
George.
Using the toner transfer method for your overlays is a piece of cake, if you're only doing stuff for yourself.
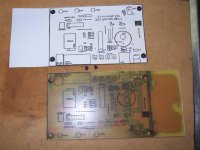
Doing the copper side for layouts can be a little hit and miss, depending on the paper you use, but the top side is ridiculously easy. I print out a mirror image on normal copier paper, iron it on for a minute or so, and it peels off straight away. Half the toner stays on the board, the other statys on the paper.
The only gotcha is that you have to have the overlay perfectly aligned, because as soon as the iron hits it it starts to melt, so you can end up with it smudged or crooked.
This is a (bad) example of a board I made recently. First try, so forgive the crookedness and the badly drilled holes, but you get the idea.
Attachments
paulmac said:
The only gotcha is that you have to have the overlay perfectly aligned, because as soon as the iron hits it it starts to melt, so you can end up with it smudged or crooked.
Make the paper larger than the board and have the corners or even edges of the board in the printout. Use the latter to position the board and use tape along all the edges to fix it to the paper.
- Status
- This old topic is closed. If you want to reopen this topic, contact a moderator using the "Report Post" button.
- Home
- Design & Build
- Parts
- home brew PCB production