Baffle question
I am going to attach the back today and then wrap the sides with the cherry laminate, my question is:
What are the proper steps (in order) to baffle assembly?
When does the baffle get painted?
Are the speaker cutouts Routed prior to painting?
Baffle Installed prior to or after painting?
Nailed as well as glued or glue only?
How close to the bottom of the cabinet should the Port opening be located?
Thanks for the help guy's!
Ron
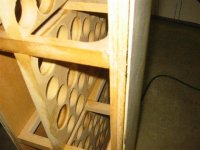
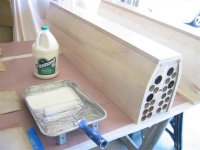
You can see the thin layer of Bitchathane just under the bendy ply skin.
I am going to attach the back today and then wrap the sides with the cherry laminate, my question is:
What are the proper steps (in order) to baffle assembly?
When does the baffle get painted?
Are the speaker cutouts Routed prior to painting?
Baffle Installed prior to or after painting?
Nailed as well as glued or glue only?
How close to the bottom of the cabinet should the Port opening be located?
Thanks for the help guy's!
Ron
You can see the thin layer of Bitchathane just under the bendy ply skin.
Attachments
Re: Another layer Another step closer
Love the shadows thru the holey brace.
Despite that the BBC advocated using similar, if the frequency of the thwump is considerably lower than that of the knock the bitumenum may well have reduced the performance of the box instead of increasing it. What happens when you hit it on the inside?
dave
Love the shadows thru the holey brace.
Originally posted by Renron I must say that for only a 1/16th layer of Bitchathane the cabinets sound has changed to a thwump instead of a knock when struck with knuckles, I am impressed with the difference. Baffle width is now Exactly 9".
Despite that the BBC advocated using similar, if the frequency of the thwump is considerably lower than that of the knock the bitumenum may well have reduced the performance of the box instead of increasing it. What happens when you hit it on the inside?
dave
Planet 10, Dave,
Thanks for your input, I can't believe how much time I have put into these already. They are starting to look like speakers!
It sounds like I am hitting solid wood, it is a different sound than when I hit the outside.
Did I get the answer right???
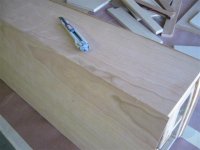
I could not stand looking at it any longer and I took a dremel with a cutoff wheel to all the shiner nails poking through the inside wall. Looks much better now.
The back was ripped as a trapezoid at 24* then run through a joiner after scribing the edges to meet the plywood. I will test my veneer skills on the back of the cabinets first. Not today though.
Thanks for your help,
Ron
Thanks for your input, I can't believe how much time I have put into these already. They are starting to look like speakers!
It sounds like I am hitting solid wood, it is a different sound than when I hit the outside.
Did I get the answer right???
I could not stand looking at it any longer and I took a dremel with a cutoff wheel to all the shiner nails poking through the inside wall. Looks much better now.
The back was ripped as a trapezoid at 24* then run through a joiner after scribing the edges to meet the plywood. I will test my veneer skills on the back of the cabinets first. Not today though.
Thanks for your help,
Ron
Attachments
Renron said:It sounds like I am hitting solid wood, it is a different sound than when I hit the outside.
Did I get the answer right???
That is a good sound... means that the box will impress those who think the knuckle rap test should make a dead thunk, but the inside (where it counts) won't know about it.
dave
Thanks for the good scare
DAVE,
Is the knuckle rap test worthless?
Whew! I thought I was going to have to skin it alive and start over....OK now I can ask, Why is that a problem? I always thought (from what I've read) that the cabinet was suppose to be as dead sounding as possible so as to not interject any resonance or tonal qualities of it's own?
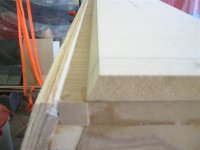
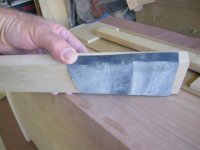
The intersection between the ply and the MDF back trapazoid is so smooth it cannot be felt when you rub your fingers across the seam. ShinObiwan would be proud. So am I.
How important is the placement of the port? Should it be as near the bottom as possible? Or can it be up off the floor 2"?
Thanks,
Ron
P.S. Thanks for keeping an eye on me
DAVE,
planet10 said:
That is a good sound... means that the box will impress those who think the knuckle rap test should make a dead thunk, but the inside (where it counts) won't know about it.
dave
Is the knuckle rap test worthless?
Whew! I thought I was going to have to skin it alive and start over....OK now I can ask, Why is that a problem? I always thought (from what I've read) that the cabinet was suppose to be as dead sounding as possible so as to not interject any resonance or tonal qualities of it's own?
The intersection between the ply and the MDF back trapazoid is so smooth it cannot be felt when you rub your fingers across the seam. ShinObiwan would be proud. So am I.
How important is the placement of the port? Should it be as near the bottom as possible? Or can it be up off the floor 2"?
Thanks,
Ron
P.S. Thanks for keeping an eye on me
Re: Thanks for the good scare
Not at all. It is just commonly misinterpreted (and no thanx to what almost seems a conspiracy to promote MDF as "the best" material for speaker building)
1st off, knocking on the outside of the cabinet only tells you about the ouside (which in a simple box is pretty much the same on the inside) As you have discovered in a more complex box it can be different.
All practicle panels resonate. What you want is a panel that has a resonance at a high frequency (where there is less energy to excite it) and one that is hi Q (so that it is even harder to excite, and if it does get excited, the energy is quickly disipated).
A broad, low frequency thunk means the panel is storing energy, and usually results in the cabinet re-radiating enuff to bury low-level detail.
Curved panels put the panels under tension which push their resonance up, So does bracing (and this best run along the long dimension of a panel)
dave
Renron said:s the knuckle rap test worthless?
Not at all. It is just commonly misinterpreted (and no thanx to what almost seems a conspiracy to promote MDF as "the best" material for speaker building)
Why is that a problem? I always thought (from what I've read) that the cabinet was suppose to be as dead sounding as possible so as to not interject any resonance or tonal qualities of it's own?
1st off, knocking on the outside of the cabinet only tells you about the ouside (which in a simple box is pretty much the same on the inside) As you have discovered in a more complex box it can be different.
All practicle panels resonate. What you want is a panel that has a resonance at a high frequency (where there is less energy to excite it) and one that is hi Q (so that it is even harder to excite, and if it does get excited, the energy is quickly disipated).
A broad, low frequency thunk means the panel is storing energy, and usually results in the cabinet re-radiating enuff to bury low-level detail.
Curved panels put the panels under tension which push their resonance up, So does bracing (and this best run along the long dimension of a panel)
dave
Thanks for the explanation Dave.
In reference to a question I asked earlier, I found the answer in the "Clarity" thread by ScottMoose post #231
"Port = 3" diameter x 4" long. 4" from the base. Can be front or rear mounted." It took me a while to re-read that thread but I found what I was looking for.") I'm starting to learn about MLQWR and length of baffle requirements (effects). Slowly.....
I'm starting to learn about MLQWR and length of baffle requirements (effects). Slowly.....
Most of my crossover parts (all upgraded) have arrived so I can build those while I wait for my drivers to arrive. They are coming by SLOW boat and mule team I think. Ordered from Zalytron about 3 weeks ago. The woofers are in, just waiting for the tweets now. I'll post pics when have something to show.
Ron
In reference to a question I asked earlier, I found the answer in the "Clarity" thread by ScottMoose post #231
"Port = 3" diameter x 4" long. 4" from the base. Can be front or rear mounted." It took me a while to re-read that thread but I found what I was looking for.
I'm starting to learn about MLQWR and length of baffle requirements (effects). Slowly.....Most of my crossover parts (all upgraded) have arrived so I can build those while I wait for my drivers to arrive. They are coming by SLOW boat and mule team I think. Ordered from Zalytron about 3 weeks ago. The woofers are in, just waiting for the tweets now. I'll post pics when have something to show.
Ron
Question for ScottMoose, or anyone who can help me out, please.
In the original layout of the small Thor Scott prescribes "The port is on the front panel, 3" diameter, 4" long, positioned 4" up from the internal base. "
Is that to the center of the port or to the bottom of the port?
As measured from the internal floor of the cabinet.
Thanks,
Ron
In the original layout of the small Thor Scott prescribes "The port is on the front panel, 3" diameter, 4" long, positioned 4" up from the internal base. "
Is that to the center of the port or to the bottom of the port?
As measured from the internal floor of the cabinet.
Thanks,
Ron
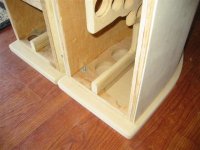
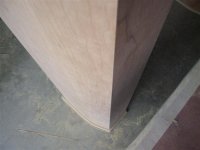
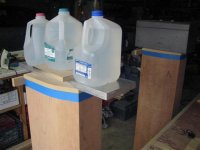
Gluing on the tops, any added weight helps. they will be trimmed with a flush bit on the router later. I wanted to protect the top edge of the veneer, it may be a while before I get around to staining and finishing the cherry veneer. I order Target waterborne ultma finish over 2 weeks ago from Homestead Finishing and still a no show. I'll call and find out whats up in the morning. It will probably show up via UPS or FedEx tomorrow.......go figure.
Ron
they will be trimmed with a flush bit on the router later. I wanted to protect the top edge of the veneer, it may be a while before I get around to staining and finishing the cherry veneer. I order Target waterborne ultma finish over 2 weeks ago from Homestead Finishing and still a no show. I'll call and find out whats up in the morning. It will probably show up via UPS or FedEx tomorrow.......go figure.Ron
Attachments
- Status
- This old topic is closed. If you want to reopen this topic, contact a moderator using the "Report Post" button.
- Home
- Loudspeakers
- Multi-Way
- Curved Small Thor Build