Any thoughts on what i'm about to do regards damping would be appreciated.
I have got a product called "Rams Acoustic Insulation" which is a blend of 65% wool 35% polyester. 90mm thick. R2.0
Not exactly Joes spec of R3.0 75mm but not far off.
Do you think i should put it in as is, or peel a bit of to bring it back to 75mm?
It is constructed in layers and it would be easy to peel off 15mm to bring it back to 75mm . Trouble is that would reduce the R rating even more.
Cheers
I think it should be fine as is but it's one of those things that if you try different amounts and listen to each over a long period you will find the amount that sounds right.. It takes a lot of time..
I'm likely understuffed with the fiber fill but not to concerned but
I wish I could get Rams available here.. I'm going to try Bonded Logic recycled bluejeans..
I take it your closer to hearing this great design..
Joel
I have got a product called "Rams Acoustic Insulation" which is a blend of 65% wool 35% polyester. 90mm thick. R2.0
Not exactly Joes spec of R3.0 75mm but not far off.
I think you emailed me and I got sidetracked, sorry.
I don't there should be a problem. As long as the rear behind the main brace is not totally stuffed up and full. Nice combination of wool and polyester, so go for it.
Cheers, Joe R.
Thanks guys. I have become a bit obsessive with the building of these speakers so attempting to get everything perfect.
Like someone else said earler in the thread, I'm so close to finishing these i can almost taste it.
Unfortunately work is interupting my progress lately but not far off finishing, thats provided i dont **** up the paint job.
Like someone else said earler in the thread, I'm so close to finishing these i can almost taste it.
Unfortunately work is interupting my progress lately but not far off finishing, thats provided i dont **** up the paint job.
Doesn,t look like Bonded Logic products are available in Aus however. It,s a pity Polymax isn,t distributed in Victoria. Then there would be no guesswork. I found it to be the most difficult thing to procure in the whole build. I guess there will allways be some experimentation after the initial build. I made quite some improvements with substituting/upgrading crossover components and modifying the physical layout. Many thanks to advice from others on this thread.
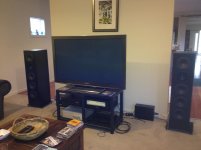
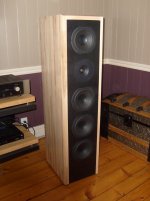
Finished and sounding good.
(apart from having to rotate the tweeters 45 degrees at a later date due to 2 tweeter stiffening panel screws being exactly in the wrong place !)
(apart from having to rotate the tweeters 45 degrees at a later date due to 2 tweeter stiffening panel screws being exactly in the wrong place !)
Attachments
Last edited:
Great to see another pair of Elsinores up and running. And in my neck of the woods. The best part is listening to your whole music collection again but really hearing it for the first time!Finished and sounding good.
(apart from having to rotate the tweeters 45 degrees at a later date due to 2 tweeter stiffening panel screws being exactly in the wrong place !)
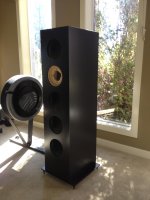
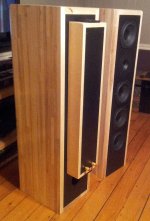
I finished mine 2 days ago. I like them a lot. First thing I noticed is how they sound right. Instruments sound like they should, even trumpet, which is not easy and gives hard time to lot of speakers. Vocals are superb. They are detailed without being too bright, very easy to listen and no harshness. Soundstage is wide and deep even if I still have to play with positioning of speakers to get the best they can. I don’t regret the time and money invested in these. Construction details will follow.
Attachments
Construction details
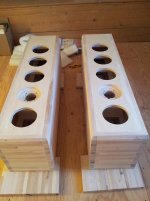
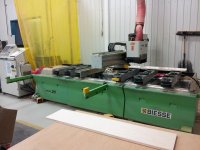
I will make some jealous here… I used the woodworking center that we have where I work to machine all the panels. I’m the one who do the programs on this machine so it was easy.
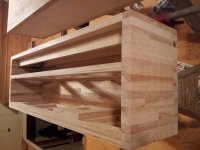
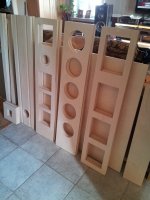
The finish of internal side of solid wood panels where a bit rough and uneven for gluing so a machined a 3 mm deep grooves for all internal panels. This added a bit of strength to the assembly also and created an assembly gig as well.
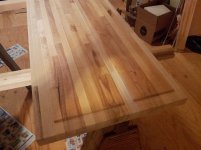
Since I choose to use laminated solid wood for external panels, internal panels are done with Baltic Birch plywood to have a stable assembly under humidity variations that we have here in Canada between winter and summer. If the wood is going to extend a bit, it will do it across the grain so all panels external panel will move in the same direction. Solid wood panels had 3 coats of varnish inside and 4 coats outside to seal them as much as I could. Finally, laminated wood are less sensitive to humidity variations so I don’t expect to have issues with this in the future.
I will make some jealous here… I used the woodworking center that we have where I work to machine all the panels.
I’m the one who do the programs on this machine so it was easy. The finish of internal side of solid wood panels where a bit rough and uneven for gluing so a machined a 3 mm deep grooves for all internal panels. This added a bit of strength to the assembly also and created an assembly gig as well.
Since I choose to use laminated solid wood for external panels, internal panels are done with Baltic Birch plywood to have a stable assembly under humidity variations that we have here in Canada between winter and summer. If the wood is going to extend a bit, it will do it across the grain so all panels external panel will move in the same direction. Solid wood panels had 3 coats of varnish inside and 4 coats outside to seal them as much as I could. Finally, laminated wood are less sensitive to humidity variations so I don’t expect to have issues with this in the future.
Attachments
Filters details
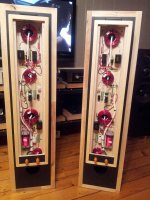
For the filters, I used good quality parts without going wild. All inductors are from Erse Audio and 14 Ga for air core and 15 Ga for the 18 mH iron core.
All resistors are standard MOX 5W except R1 which is a Mills 12W.
For capacitors, they are all from Erse Audio, using their Pulse X series everywhere except the 300 uF which is Bi-Polar.
For C1, which needs more quality, I went with a Mundorf Supreme 1.8 uF and bypassed with a MKP-1837 0.01 uF. I think I’m the first to use this combination on Elsinore. I like the result and recommend them but I did not compare with Jentzen cap so I don’t know which is better.
You will see that Bolster mod is installed but not connected. I have all the parts to do the bolster mods with Joe’s corrections but for now, I will stay with the original circuit designed by Joe.
Attachments
I finished mine 2 days ago. I like them a lot. First thing I noticed is how they sound right. Instruments sound like they should, even trumpet, which is not easy and gives hard time to lot of speakers. Vocals are superb. They are detailed without being too bright, very easy to listen and no harshness. Soundstage is wide and deep even if I still have to play with positioning of speakers to get the best they can. I don’t regret the time and money invested in these. Construction details will follow.
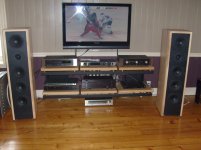
I agree with your comments Pete. My first impression is how effortlessly they perform. Then when you crank the volume a little .... WOW.
Big soundstage. I started at 2.8 meters apart but going to try closer to 4 meters.
I agree with your comments Pete. My first impression is how effortlessly they perform. Then when you crank the volume a little .... WOW.
Big soundstage. I started at 2.8 meters apart but going to try closer to 4 meters.
I have the same feeling about putting them farther apart. Right now, they sit where my old speakers were (about 2 meters apart, which is a perfect triangle from my sitting place in the room) but I found I could sit a lot closer to the speakers and the soundstage was better. Unfortunatly, my room does not permit me to put them as far as you plan to do but I I will try to gain about a half meter more between them and move them forward if this not enough.
Finished and sounding good.
(apart from having to rotate the tweeters 45 degrees at a later date due to 2 tweeter stiffening panel screws being exactly in the wrong place !)
Looking great ermat1234!
What are you going to use to drive them?
I will make some jealous here… I used the woodworking center that we have where I work to machine all the panels.
The finish of internal side of solid wood panels where a bit rough and uneven for gluing so a machined a 3 mm deep grooves for all internal panels. This added a bit of strength to the assembly also and created an assembly gig as well.
Since I choose to use laminated solid wood for external panels, internal panels are done with Baltic Birch plywood to have a stable assembly under humidity variations that we have here in Canada between winter and summer. If the wood is going to extend a bit, it will do it across the grain so all panels external panel will move in the same direction. Solid wood panels had 3 coats of varnish inside and 4 coats outside to seal them as much as I could. Finally, laminated wood are less sensitive to humidity variations so I don’t expect to have issues with this in the future.
Wow. Jealous indeed!
They turned out spectacular. A very unique look. What wood did you laminate for the external panels?
For the filters, I used good quality parts without going wild. All inductors are from Erse Audio and 14 Ga for air core and 15 Ga for the 18 mH iron core.
All resistors are standard MOX 5W except R1 which is a Mills 12W.
For capacitors, they are all from Erse Audio, using their Pulse X series everywhere except the 300 uF which is Bi-Polar.
For C1, which needs more quality, I went with a Mundorf Supreme 1.8 uF and bypassed with a MKP-1837 0.01 uF. I think I’m the first to use this combination on Elsinore. I like the result and recommend them but I did not compare with Jentzen cap so I don’t know which is better.
You will see that Bolster mod is installed but not connected. I have all the parts to do the bolster mods with Joe’s corrections but for now, I will stay with the original circuit designed by Joe.
Pete, those are the mother of all crossovers.

How easy is it to change over between configurations? Can you engage/disengage the 33R resistors equally easy?
CNC Envy here.. If you were a little closer Pete, I'd see about getting some future ideas machined..
Great job on all recent builds..
Elsinore works great at 10'(havent experimented with closer) apart to centers and around 42" out but inch back and fourth to find bass balance without boom or cancellation..
Great job on all recent builds..
Elsinore works great at 10'(havent experimented with closer) apart to centers and around 42" out but inch back and fourth to find bass balance without boom or cancellation..
Goldilocks and the three port sizes...
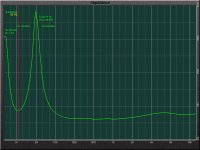
I have been spending a lot of time investigating the optimum port size for my enclosures. The original ports I made put the port frequency somewhere around ~36Hz for my enclosures. In my listening space, this was slightly boomy for lack of a better word.
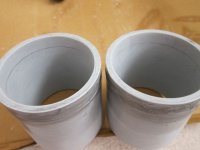
So, I created a 10mm extension that put it around ~35Hz. I listened to this for a few weeks and decided the change was not significant enough. I then tried 20mm which put it around 31~32Hz. This length significantly leaned out the bass and made the deep bass much more prominent when it was present in the recording. This was a really nice sound for some material, but, also lacked a bit of thump for some other material. I then split the difference at 15mm which put the tuning at ~33Hz. For my listening space and musical tastes, this seemed the optimal setting. I gave it a few weeks to be sure and then constructed the final pieces.
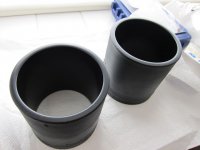
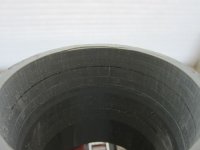
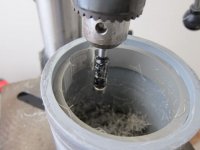
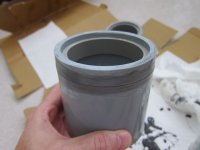
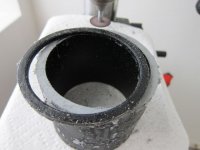
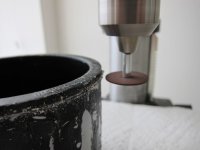
I am using electrical coupler fittings for my ports. To extend them, I mounted a dremel cutting wheel on my drill press to cut the extension pieces from an existing fitting. The use of the drill press with it's adjustable deck allowed a precise cut to be made for each extension. I then glued/chemical-welded the extensions to the main pieces using a small piece of pipe to aligned the pieces. Once cured, I used a router flush trim bit (same as used to remove the middle rib from the coupling) to remove the alignment piece. Lots and lots of sanding later, they were ready for paint and installation.
The couplers themselves have just the slightest taper inherent in them from one side to the other. I exploited this for this installation and they actually had to be tapped into place with a rubber mallet and then final sealed with silicon caulk. They now seem more tightly coupled to the enclosures than the first time. I am most pleased with the results.
This speaker continues to get better and better....
I have been spending a lot of time investigating the optimum port size for my enclosures. The original ports I made put the port frequency somewhere around ~36Hz for my enclosures. In my listening space, this was slightly boomy for lack of a better word.
So, I created a 10mm extension that put it around ~35Hz. I listened to this for a few weeks and decided the change was not significant enough. I then tried 20mm which put it around 31~32Hz. This length significantly leaned out the bass and made the deep bass much more prominent when it was present in the recording. This was a really nice sound for some material, but, also lacked a bit of thump for some other material. I then split the difference at 15mm which put the tuning at ~33Hz. For my listening space and musical tastes, this seemed the optimal setting. I gave it a few weeks to be sure and then constructed the final pieces.
I am using electrical coupler fittings for my ports. To extend them, I mounted a dremel cutting wheel on my drill press to cut the extension pieces from an existing fitting. The use of the drill press with it's adjustable deck allowed a precise cut to be made for each extension. I then glued/chemical-welded the extensions to the main pieces using a small piece of pipe to aligned the pieces. Once cured, I used a router flush trim bit (same as used to remove the middle rib from the coupling) to remove the alignment piece. Lots and lots of sanding later, they were ready for paint and installation.
The couplers themselves have just the slightest taper inherent in them from one side to the other. I exploited this for this installation and they actually had to be tapped into place with a rubber mallet and then final sealed with silicon caulk. They now seem more tightly coupled to the enclosures than the first time. I am most pleased with the results.
This speaker continues to get better and better....
Attachments
Wow. Jealous indeed!
They turned out spectacular. A very unique look. What wood did you laminate for the external panels?
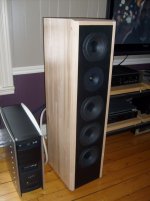
Thanks! I did not laminated them myself but the wood is maple. I bought these panels from a company around here which does floors for van trailers. The panels came in dimensions of 300mm by 1200mm and this is garbage for this company so they cost me less than the baltic plywood used for inside panels.
Pete, those are the mother of all crossovers.
How easy is it to change over between configurations? Can you engage/disengage the 33R resistors equally easy?
It is easy to engage what is added in Bolster's mod for the top mid bass drivers. I have the 33R resistors but I will need tho remove the 4 mid bass drivers to put them in place but this not very long to do. L5 and R3 will need to be replaced to do the phase correction described by Joe.
- Home
- Loudspeakers
- Multi-Way
- The "Elsinore Project" Thread