Hi guys, I'm looking at starting a new build and considering the Elsinore, and have a couple of what might be straightforward questions:
1. Budget: is ~$1000 feasible ...
2. Waveguide: Does it have to be a metal like aluminum?
2b. Waveguide: What are the tolerances on this? If I do
.. a 1" circle will be maybe 1.004 wide by .996 high. Would this be fatal or could it be adjusted for when the waveguides are mounted?
2c. Waveguide: How "smooth" does the surface of the conical part need to be? .... Just wondering if it needs to be glass flat or if very small variations are OK.
Thanks in advance!
Hi Sansbury,
Having recently finished my Elsinores I'll give it a shot - hopefully the "experts" will contribute too.
1. A 1000 US$ is quite feasible based on basic materials, but nothing fancy - in addition to not getting fancy veneer that would also not get you Finnish Baltic Plywood, audiophile film caps and ribbon inductors, but you could upgrade the X-over components as you please later.
2. Metal is not essential for the waveguide - Joe's friend provided the first batch of waveguides in MDF. I think a waveguide turned/machined out of exotic wood would look very nice.
2b. Regarding tolerances -- e.g. 1.004 wide by .996 high -- such a small change would have negligible effect on waveguide performance. However, the tweeter dome is fixed and round, so there could be some issues making the throat of the waveguide fit properly.
2c. I'm not sure about smoothness. Smoother is better but I doubt that there would be an audible difference between "glass smooth" and "slightly stepped". The waveguide I (and several other satisfied customers) purchased on this thread is more like "sandblast smooth" due to the powder coating finish.
Hope this helps. Best wishes with your build.
Francois
Hamlets
As per Joes post 80 on page 8.
Re port, use 60mm (internal) and 120mm long. If the 60mm port is slightly less than 60mm, then that will be OK as well. But if it gets close to 55mm, then reduce length to 100mm.
I found this.
OD: 90mm
ID: 60mm
L: 125mm
Cutout: 70mm
An externally hosted image should be here but it was not working when we last tested it.
Looks the goods.
Great!
I couldn't seem to find anything(Thread is large) but there it is.. Post 80
I have been listening to Bolserst's crossover mod ... First go with the 33 ohm resistors in parallel with the woofers.
Hello tpate,
Thank for your comments (and to Bolserst for sharing the mod) on this modification. Could you clarify "First go with the 33 ohm resistors in parallel with the woofers", please?
Do you mean the pair of low frequency drivers or all four mid-bass drivers? Could you commeny on the incremental sequence of mods you recommend.
Thanks,
Francois
Francois, All four woofers/mid bass drivers need a 33 ohm resistor between the positive and negative connections. That will be a total of 8 for the stereo pair. I suggest doing this first, as this makes the most difference and doesn't take ordering special parts. The notch filter makes the overall sound smoother and seems to be more amp friendly. I can point the speakers at me without harshness and the extra energy is not in the room reflections. Being able to point the speakers at you makes the image rock solid stable. If your crossovers are outside your speaker box, the notch filter is easy to hook up and disable. The 33 ohm resistor mod means taking the speakers out and reinstalling.
I'm super interested in people who have built a set of Elsinore's choice of capacitors, inductors and resistors too.
I found this great reference: Humble Homemade Hifi which deals with the characteristics of capacitors, but havnt found much on the others apart from what Sharkythefrog has summerised above.
Using solen inductors and 18mh is a basic iron core
Caps are a mix. Experimented with tweeter cap between solen, mcap, clarity cap and superior zcap..
I thought about your question but not really the guy to answer it because even with the clear audible difference between the caps I mentioned I feel the overall design of the speaker is what counts and changing part brands seems less important..
Bolserst's xover mod makes a big difference that's worth trying
Joel
Thanks for your input Joel. Sounds like I am probably putting too much thought into the XO components and I really should just get stuck into building them so I can enjoy the cabinet design as you said.
I think I'll probably just endup going with a high quality film cap, like Mcap silver-oil for the tweeter and then use reputable film caps for the rest with a bi-polar on the whoofers because 300uF of film caps is too expensive!!! Inductors I'd say i'll stick to a reputable brand which dont exceed Joe's DCR values. But am open to comments...
Thanks
Paul
Elsinore upgrade
tpate: I am interested to read more about this upgrade and possibly an explanation as to why this offers an improvement in the Electronic domain. Is the excess energy there because of the crossover point? I notice many small midwoofers tend to exhibit a gain in energy when rolled off near their upper limit. When using the 5" and 4" midwoofers as midrange duty, they need padding to lower this energy gain.. A mystery when each are rated for 88dB!
Your thoughts?
When we did measurements on the output of each section there was a rise at about 4k in the upper two woofer/mid drivers. The lower two are rolled off before that point. The notch filter removes that bump. The end result is that the excess energy at 4k is attenuated and the impeadence rises in the upper registers, this makes the load easier on the amp. We tried a configuration that did essentially the same thing but didn't have the rising impeadence and the sound wasn't nearly as open. The notch filter isn't really a pad, as it only attenuates a narrow frequency range. Hope this answers your question. The proof is in the pudding (or in this case listening). A cheap and easy way to make very good speakers sound great.IMHO
Hamlets MKV
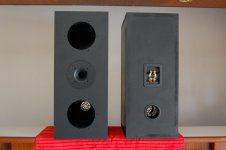
All done just have to find some foam and cardboard to wrap them up in then i,ll post them to Joe on Monday.
Thanks Joel for supplying the Waveguieds.
Jdjake if it still alright i,ll send you a pm for postage costs when i know exactly.
Thanks for helping out guys appreciated.
All done just have to find some foam and cardboard to wrap them up in then i,ll post them to Joe on Monday.
Thanks Joel for supplying the Waveguieds.
Jdjake if it still alright i,ll send you a pm for postage costs when i know exactly.
Thanks for helping out guys appreciated.
Attachments
Jdjake if it still alright i,ll send you a pm for postage costs when i know exactly.
Yup, still alright.
 Just send me a PM.
Thanks for building these spoonted! They look good. Nice size.
Changed you mind about veneering them?
Now to give them a voice...
Well, the holidays and the day job took quite a toll on my ability to make forward progress (and I thought it might be a slow start to the year, HA!).
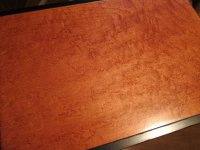
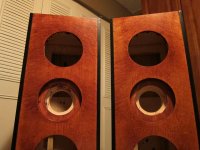
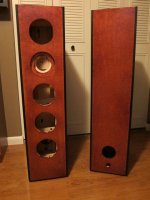
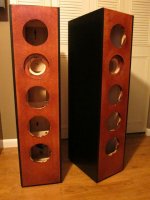
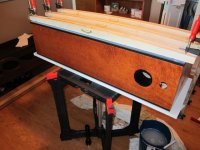
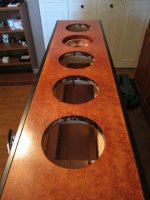
Anyway, I was finally able to finish and attach the side panels, insert and chalk the ports into place and put the final finish coats to the side panel end facings. Overall, I am very pleased with the results. The pictures are some what poor due to lighting, but, should give you a general idea on what the finished product will look like and where I am ultimately heading.
In any case, the cabinets are finally finished. (Yeah!!) I fit and drilled the driver holes this weekend as well. Now to stuff them, wire them up and then transition to build the cross overs.
The end is actually in sight and that feels good.
Well, the holidays and the day job took quite a toll on my ability to make forward progress (and I thought it might be a slow start to the year, HA!).
Anyway, I was finally able to finish and attach the side panels, insert and chalk the ports into place and put the final finish coats to the side panel end facings. Overall, I am very pleased with the results. The pictures are some what poor due to lighting, but, should give you a general idea on what the finished product will look like and where I am ultimately heading.
In any case, the cabinets are finally finished. (Yeah!!) I fit and drilled the driver holes this weekend as well. Now to stuff them, wire them up and then transition to build the cross overs.
The end is actually in sight and that feels good.
Attachments
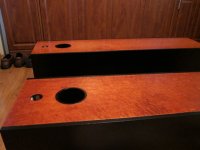
Jake, Noticed that you only left one hole for the input wires. A big part of tuning the speakers will entail changing some of the crossover parts to your liking. It is much harder and takes much more time to change parts when they are inside the cabinet. With that much time between changes it can be very hard to tell which you like best. Yes, ultimately you will probably end up with a favorite set up and it won't be an issue. At least use speaker terminal style spade connectors on the tweeter cap so it will be easy to reach through the woofer hole and change. Also the port tuning will be something you will want to do when the speakers are finished and working. Small differences in stuffing and stuffing material make a lot of difference at the port length. The speakers look stunning. A far cry from the black painted particle board mine are made of.
tpate,
I will be building external crossovers. I am using a neutrik 8-conductor speak-on connectors to bring out the connections to each of the drivers (two spare connections). Each driver will use spade connections to allow quick disconnect from the wiring harness. I will take a pic of the harness when I am finished with it to give you a better idea of where I am headed. I hear you though, flexibility appears to be key for any DIY design and I am attempting to embrace that philosophy to the fullest extent possible.
As for the port, it is held in by friction and anchored (and sealed) by silicon chaulk. If required, it will be straightforward to remove and remount. Not easy, but, straightforward. The material for the port is an electrical PVC coupling, so, extending should not be an issue (nor shortening for that matter). I should have a fair amount of leeway if need be.
Thanks for the kind words on the looks.
Joel, I am using the Scanspeak tweeters, but haven't heard a set of Peerless to compare. tpate
Thanks, I'm assume there is no difference.
I read two stories regarding the HDS tweeter a while back. One is that scanspeak bought the tooling from peerless and another that speculated scanspeak built them for peerless all along.
In any case, they appear identical by their specs.
Perfect, that actually helps us here
The whole tymphany/scan-speak story is actually pretty interesting to say the least.
From what I can tell, scan-speak owned and manufactured peerless/vifa. Then tymphany bought them all and moved peerless/vifa manufacturing to Asia. In early 2009, scan-speak left tymphany, tymphany re-organized and scan-speak was back in for a bit and then spun off again. There appears to be quite a bit of cross company intellectual property, so, scan-speak brought the original peerless/vifa tooling back online in Denmark and now makes a number of those original peerless branded parts under a scan-speak part number.
What I cannot tell is if the manufacturing of the peerless version of the HDS tweeter was ever relocated to Asia or it actually remained in Denmark the whole time.
Regardless, I would suspect the scan speak version to be of very high quality and most importantly, consistent across units. Whether it was alway like that with the peerless branded parts is unknown. Although, no one ever seems to have complained about peerless quality control for the HDS line.
The whole tymphany/scan-speak story is actually pretty interesting to say the least.
From what I can tell, scan-speak owned and manufactured peerless/vifa. Then tymphany bought them all and moved peerless/vifa manufacturing to Asia. In early 2009, scan-speak left tymphany, tymphany re-organized and scan-speak was back in for a bit and then spun off again. There appears to be quite a bit of cross company intellectual property, so, scan-speak brought the original peerless/vifa tooling back online in Denmark and now makes a number of those original peerless branded parts under a scan-speak part number.
What I cannot tell is if the manufacturing of the peerless version of the HDS tweeter was ever relocated to Asia or it actually remained in Denmark the whole time.
Regardless, I would suspect the scan speak version to be of very high quality and most importantly, consistent across units. Whether it was alway like that with the peerless branded parts is unknown. Although, no one ever seems to have complained about peerless quality control for the HDS line.
Thanks. A new pair is in the works and wanted to certain.
BTW: Good job on the cabinets
- Home
- Loudspeakers
- Multi-Way
- The "Elsinore Project" Thread