John, are you talking about the rabbet/mitred cornersIt looks like a 45 degree with a 90 degree or two.
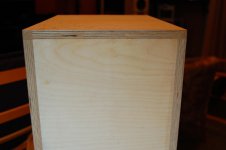
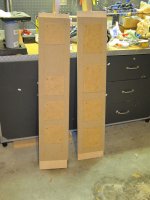
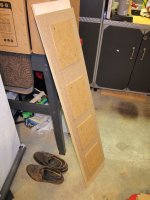
Deep dado for the front is working well. I install the front panel in 2 steps. The first panel is 230mm wide and glued to subfront. Then the side panel/top bottom panel is machined to leave only the outside 2 veneers of the plywood and a wider panel is glued into that space covering most of the ply end.
veneering over the front now with only 2 plys(only outside veneer of the remaining 2 is end grain ) facing forward seems to work out nicely with no surprises.
Also consider building the cabinets so veneer will go opposite grain orientation of the plywood. this also helps with rabbet mitered top and bottom corners because the mitre will be cut "with the grain" on the ply.
The movement of the 2 veneers are not additive
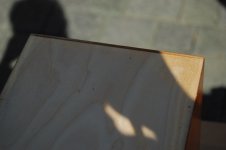
Bondo is used on plywood end as well. Butt joint or rabbet with 1/4" space and fill with bondo and trim the corner square.
Never done it myself but read many have with good results.
Hardwood corners work and 1/4 thick edging is good for corners and front.
For me at this point for future builds it will go Rabbet/mite on top/bottom corners and 2 step front panel..
Attachments
John, are you talking about the rabbet/mitred corners
Yes. Thanks for the suggestions. Any pictures of your speakers during construction?
John
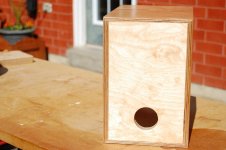
The small speaker has a 45 deg mitre with a rabbet. The sides and top are dado'd so the pack panel fit in, hence, you dont see the full rabbet on corners..
One board is cut complete with 45 deg v router bit and the other requires a straight grooved cut first, then a 45 mitre.
I used 4mm mdf on the front to cover end grain and this worked good.
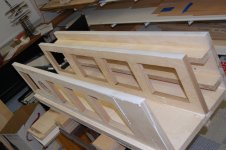
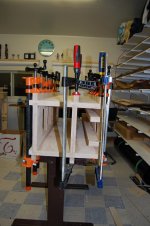
The Elsinore is clamped with dodo joints and care has to be taken to keep it all square because the clamps put forces in unwanted directions.
Top and bottom is put on after the rest is set.
Hope this helps, that all for related pics
Have a happy build, Joel
One board is cut complete with 45 deg v router bit and the other requires a straight grooved cut first, then a 45 mitre.
I used 4mm mdf on the front to cover end grain and this worked good.
The Elsinore is clamped with dodo joints and care has to be taken to keep it all square because the clamps put forces in unwanted directions.
Top and bottom is put on after the rest is set.
Hope this helps, that all for related pics
Have a happy build, Joel
Attachments
Hi Joel and others...
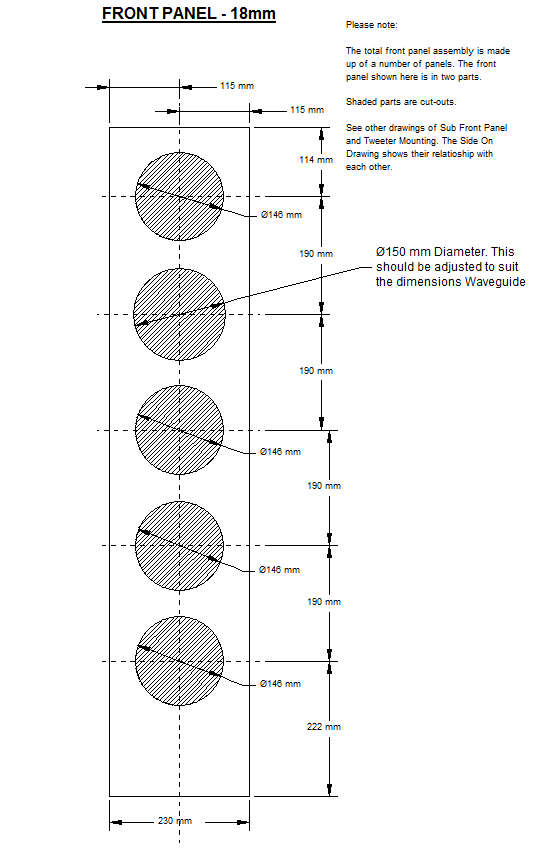
RE: ROUND WAVEGUIDES & FRONT PANEL CONSTRUCTION:
It is apparent that the Front Panel should be one piece from now on for those making new Elsinores
I have changed the Construction Page on the website to reflect that. Both variations are shown.

The older design is still there for those who prefer it.
BUT MY SUGGESTION IS NOW TO USE ROUND WAVEGUIDE (a la Joel's).
If unable to make your own, then by all means contact Joel and buy them from him.
The square Waveguides I have here will be reserved for those with existing Elsinores that needs upgrading.
For Joel: I have shown the cut-out on the above drawing as 150mm diameter - but what diameter are you actually using. Does the 150mm round aluminium end up a slightly less diameter and thus an exact 150mm cut-out will be perfect?
Cheers, Joe R.
Firstly I want to Thank Joe, for the great gift! Speakers sound fantastic, after B & W 601 it is such a breathe") Most surprising was bass response, which I thought impossible to archive without subwoofer. Highs are not as aggressive compared to other speakers, but all in all it is very natural speakers, even in my living room with laminate floor and not many furniture, while it is not big. Everything seems to sound right, from m jackson, apocalyptica, rihanna, a. bochelli, to die for, judas priest, erasure, dire straits and even old recordings from russia and bulgaria. Currently they not finished completely: crossovers are lying on the floor and no vaweguide installed as yet, but sound is already the pure joy. More likely this is the speakers that I grew old with Maybe I will do a few more speaker designs in order to satisfy my DIY Crutch and curiosity with TQWP like:TQWP - Tapered Quarter Wave Pipes or TQWP [English] , TQWP. Open baffle like this if I manage to source saba drivers for Endorphine project: Endorphine from Kingston Kitchen and finally spheric speakers since it is so much noise about spheric design on the inet and forums something like: assembly.nm.ru: Ñôåðè÷åñêèå êîëîíêè èç ÄÑÏ or as an inspiration-http://www.audioholics.com/reviews/speakers/floorstanding/proclaim-audioworks-dmt-100.
Most surprising was bass response, which I thought impossible to archive without subwoofer. Highs are not as aggressive compared to other speakers, but all in all it is very natural speakers, even in my living room with laminate floor and not many furniture, while it is not big. Everything seems to sound right, from m jackson, apocalyptica, rihanna, a. bochelli, to die for, judas priest, erasure, dire straits and even old recordings from russia and bulgaria. Currently they not finished completely: crossovers are lying on the floor and no vaweguide installed as yet, but sound is already the pure joy. More likely this is the speakers that I grew old with Maybe I will do a few more speaker designs in order to satisfy my DIY Crutch and curiosity with TQWP like:TQWP - Tapered Quarter Wave Pipes or TQWP [English] , TQWP. Open baffle like this if I manage to source saba drivers for Endorphine project: Endorphine from Kingston Kitchen and finally spheric speakers since it is so much noise about spheric design on the inet and forums something like: assembly.nm.ru: Ñôåðè÷åñêèå êîëîíêè èç ÄÑÏ or as an inspiration-http://www.audioholics.com/reviews/speakers/floorstanding/proclaim-audioworks-dmt-100.
Once again thumbs up for Joe!!!!!!!!!!!!!!!!!!!!!!!!!!!!!!
Most surprising was bass response, which I thought impossible to archive without subwoofer. Highs are not as aggressive compared to other speakers, but all in all it is very natural speakers, even in my living room with laminate floor and not many furniture, while it is not big. Everything seems to sound right, from m jackson, apocalyptica, rihanna, a. bochelli, to die for, judas priest, erasure, dire straits and even old recordings from russia and bulgaria. Currently they not finished completely: crossovers are lying on the floor and no vaweguide installed as yet, but sound is already the pure joy. More likely this is the speakers that I grew old with Maybe I will do a few more speaker designs in order to satisfy my DIY Crutch and curiosity with TQWP like:TQWP - Tapered Quarter Wave Pipes or TQWP [English] , TQWP. Open baffle like this if I manage to source saba drivers for Endorphine project: Endorphine from Kingston Kitchen and finally spheric speakers since it is so much noise about spheric design on the inet and forums something like: assembly.nm.ru: Ñôåðè÷åñêèå êîëîíêè èç ÄÑÏ or as an inspiration-http://www.audioholics.com/reviews/speakers/floorstanding/proclaim-audioworks-dmt-100. Once again thumbs up for Joe!!!!!!!!!!!!!!!!!!!!!!!!!!!!!!
Hi Joel and others...
RE: ROUND WAVEGUIDES & FRONT PANEL CONSTRUCTION:
It is apparent that the Front Panel should be one piece from now on for those making new Elsinores
I have changed the Construction Page on the website to reflect that. Both variations are shown.
The older design is still there for those who prefer it.
BUT MY SUGGESTION IS NOW TO USE ROUND WAVEGUIDE (a la Joel's).
If unable to make your own, then by all means contact Joel and buy them from him.
The square Waveguides I have here will be reserved for those with existing Elsinores that needs upgrading.
For Joel: I have shown the cut-out on the above drawing as 150mm diameter - but what diameter are you actually using. Does the 150mm round aluminium end up a slightly less diameter and thus an exact 150mm cut-out will be perfect?
Cheers, Joe R.
Joe, I have to say I'm very pleased to see my cabinets your website.
Working hard on the cabs is a pleasure when knowing how amazing the final sound is going to be..
Does the 150mm round aluminium end up a slightly less diameter and thus an exact 150mm cut-out will be perfect?
The round Waveguides are 150mm before paint and powder adds a little so THE CUT-OUT IS 151MM.The unit slides in with >.5mm space around it.
I'm also getting made 8 CNC'd flushing templates the same as the one on post 905 in picture 2. The material will be particle board and can be used many times so one could be shared. If your not sinking the woofers then it's not needed. If everything works out as planned the price will be $60
If unable to make your own, then by all means contact Joel and buy them from him.
I'm putting in an order for 10 and should have them in about 3 weeks.
FOR ANYONE THAT WOULD LIKE TO HEAR THE ELSINORE'S WITHIN DRIVING DISTANCE YOU CAN DROP IN WITH YOUR OWN AMPS. SEND ME AN EMAIL TO SET IT UP.. I HAVE A DEDICATED LISTENING ROOM THAT YOU CAN LISTEN FOR A FEW HOURS. FOR US PEOPLE YOU MIGHT JUST FIND THAT CROSSING THE BORDER IS WORTH IT
Joel
I find this to be a great featureEverything seems to sound right, from m jackson, apocalyptica, rihanna, a. bochelli, to die for, judas priest, erasure, dire straits and even old recordings
1399.8 miles from Seminole FL to Courtice Ontario (23 hours, 56 minutes).
Hmmm, might still be worth it.
In 2004 I drove to Miami to buy a set of speakers, seems crazy to me now
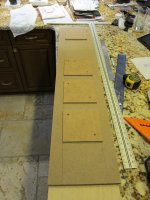
New tools, New skills...
Best part about this effort is the chance to acquire new tools and new skills.
Spent some quality time with my new router this weekend. I have not worked a lot with one in the past, but let me tell you, it is one VERY cool and very versatile tool!
Decided to make jigs for the main brace and sub-front panel. Learned how to straighten rough cut lumber, made up a couple of templates and finish cut the jigs this morning.
Turned out pretty good. A couple mistakes, but nothing that cannot be fixed. One thing is for sure, I am feeling MUCH more comfortable using the router.
On to straightening the rough-cut cabinet material and routing the main brace and sub-front panel. What a great project this has turned out to be!
Attachments
I find this to be a great feature
In 2004 I drove to Miami to buy a set of speakers, seems crazy to me now
If it was January it would make a lot of sense, really.
Hi Joe,
I have been following this thread for a while and am currently building a set of Elsinore Mk Vs with a work colleague (Ian) who recently passed his crossover PCB artwork to you. I also intend to build 5 of the "Hamlets" to use in conjunction with the Elsinores in a surround setup.
My question is have you worked out the port length and diameter for the Hamlets yet ? and will the hamlets use the same waveguide arrangement with the tweeter that the Elsinores use ?
Many Thanks
Best part about this effort is the chance to acquire new tools and new skills.
Yeah
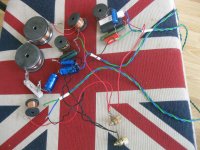
because of this project I lay my hands on the plunge router and make small rawing rabbids speakers for my son, along with elsinore project since I was in the DIY mood. I will post pictures later...Pictures of the progress
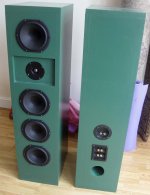
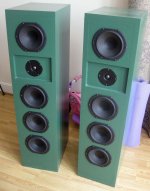
Here is my Elsinores in Winchester Green and crossover which I am still tempted to put inside speakers instead of external x-overs and sub project of rabbids. I contacted Joe about waveguides but did not receive reply yet, if anybody else can supply waveguides pls contact me.
Here is my Elsinores in Winchester Green
and crossover which I am still tempted to put inside speakers instead of external x-overs and sub project of rabbids. I contacted Joe about waveguides but did not receive reply yet, if anybody else can supply waveguides pls contact me.Attachments

Dig the deranged rabbit speakers
Well at least couple of the drivers used, while my son is happy. Pretty usual in HI-FI: one AC has looks, but the other has performance
Installing Joel's waveguides.
I'm almost there and very excited. Installing the waveguides next as final step.
What is the best way of installing the waveguides in a situation where I had previously drilled the tweeter screw holes. i.e. how are the tweeter and waveguide lined up perfectly?
I'm thinking of placing the loose waveguide over the mounted tweeter and move it around for the best fit. Then mark the screw holes for the waveguide. Hand drilling the holes for the waveguide (with the tweeter removed) will be tricky because I can't use the drill press now.
Better ideas?
Thanks,
Francois
I'm almost there and very excited.
Installing the waveguides next as final step.What is the best way of installing the waveguides in a situation where I had previously drilled the tweeter screw holes. i.e. how are the tweeter and waveguide lined up perfectly?
I'm thinking of placing the loose waveguide over the mounted tweeter and move it around for the best fit. Then mark the screw holes for the waveguide. Hand drilling the holes for the waveguide (with the tweeter removed) will be tricky because I can't use the drill press now.
Better ideas?
Thanks,
Francois
I'm almost there and very excited.
What is the best way of installing the waveguides in a situation where I had previously drilled the tweeter screw holes. i.e. how are the tweeter and waveguide lined up perfectly?
I'm thinking of placing the loose waveguide over the mounted tweeter and move it around for the best fit. Then mark the screw holes for the waveguide. Hand drilling the holes for the waveguide (with the tweeter removed) will be tricky because I can't use the drill press now.
Better ideas?
Thanks,
Francois
The method you have in mind is a good one I believe, but the only thing is that ounce you have the waveguide in position its best to first use a drill bit size close to the size of the hole in the waveguide. Drill this in a little and it should give a good center marks for the pilot holes. The holes have to be right on or waveguide will pull off center. I'm drilling the holes a little larger now so the screws have a bit more play.
I recently mounted the tweeter to the waveguide and like what I'm hearing Maybe my imagination at this point but time will tell
When the tweeter is attached to the waveguide it just feels right to use the waveguide for a very large and stiff tweeter mounting plate. I drilled right through the front of the waveguide(unpainted) for the screws but one could use a bottoming tap and not disturb the front.. Washers used to space the two.
I'll post a picture on the jig to get the two together aligned. Its easy to make and only adds a little extra time.
Joel
- Home
- Loudspeakers
- Multi-Way
- The "Elsinore Project" Thread