Cal:
I knew my sleuthing would give you a bit of a chuckle. I also suspect I was not too far from the mark with the chain of logic it portraited.
If I may, I suggest you forego the belt sander in favour of the 6 inch random orbital variable speed PSA sander. I have a couple of them and they are the gift to non linear woodworking. It allows you to work in multiple planes and make smooth transitions. The random action means it is a non directional cutter so you do not need to worry about going accross grain, the variable speed allows you to adjust for cuttng diferent material types. I used mine on the hull of a canoe project and it turned out incredibly well. I do not think a belt sander would have come close.
For the side panels you may want to add contour layers to the sides so you can have a completely non linear project.
The other insipration I thought you may have had was from a Vino Pisco bottle, but that is way to cultured for you. OR it could have been Sonia's idea that you are plagiarizing.
Hmmmmmmmmmmmmmmmmmm the mistery continues.................
Cal,
You may want to speak with the King...
www.katools.com
The King Arthur tools lancelot and squire on a small grinder are an incredibly fast and fun way to do your roughing in.
Of course read and abide by all the safety requirements. I wear welding gloves, face shield, safety glasses, dust mask, long sleeves, hearing protection... You get the picture. Two hands on the tool at all times and clamped down workpiece. Be careful not to cut into the endgrain of the ply (tearout)
Otherwise, these are a joy to use and can cut down on your belt sanding time significantly, especially if you move onto the big ones.
As an added bonus, you can carve those scales...
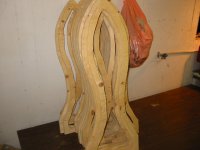
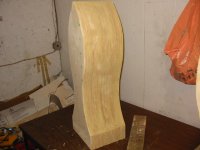
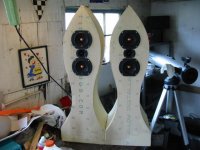
This is getting fun. The cabinets are together and ready for final sanding before paint. I'm impatient so I put the drivers in for a listen.
The sound is pretty good. Those drivers sound bigger than they are. So far running the WR's straight and a 1 mfd cap on the tweet. Light stuffing. Think I will add more and maybe add a coil to the woofs.
I'm still at Sonia's but I do have my camera and will post the pics soon.
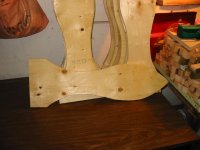
They don't look quite like fish or beer bottles but I think I'll use the inside part of the cut out and recut them to look like fish and decorate a big ugly wall at the back of the property.
Reduce
Reuse
Recycle")
The sound is pretty good. Those drivers sound bigger than they are. So far running the WR's straight and a 1 mfd cap on the tweet. Light stuffing. Think I will add more and maybe add a coil to the woofs.
I'm still at Sonia's but I do have my camera and will post the pics soon.
They don't look quite like fish or beer bottles but I think I'll use the inside part of the cut out and recut them to look like fish and decorate a big ugly wall at the back of the property.
Reduce
Reuse
Recycle
Should have read your posts before I answered.
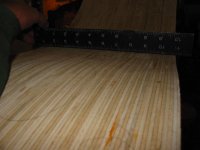
It seemed to go fine with the belt sander, after I couldn't find a spindle sander that is. Great day for sanding, got the stuff spread around quite nicely, including places you should never find dust. Oh well, a half tank of hot water later I was good as new.
ToE,
Thanks for the advice, I never mess with safety. I'm happy to wear full gear even for a small job, including the custom ear "oysters" to preserve my critical analysis devices.

Couldn't wait till they were finished to listen.
OK, that's seven pics, guess I can't count.
First impression with only a 1mfd cap on the tweet and the WR's running straight was good. Then I went in for breakfast.
I had stored the drivers in the garage so when they warmed up they actually had some midrange and it was obvious that XO was not going to do. After spending the afternoon smiling and having a beer or two and I now have a 12dB top and bottom around 8K. I suspect I will fiddle a bunch more. What a difference cold drivers vs. warm.
Finish work later and the final coat takes about 2 weeks to dry so there won't be any more pics for a bit.
Attachments
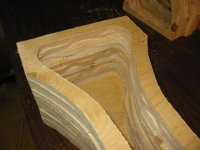
No, it's a very common item that almost everyone has had in their hand at one time or another. In real life they are a lot smaller than the cabs and the bottom part has been cut off.
They often made of wood and are somewhat flat, not deep like the cabinets.
EDIT: The pic on the wall in the last shot is Sonia and me.
They often made of wood and are somewhat flat, not deep like the cabinets.
EDIT: The pic on the wall in the last shot is Sonia and me.
Here:
http://www.partsexpress.com/pe/pshowdetl.cfm?&DID=7&Partnumber=264-804
The one I have seems the same but has an aluminum heatsink glued to the back of the magnet and is called the 25-302SE.
http://www.partsexpress.com/pe/pshowdetl.cfm?&DID=7&Partnumber=264-804
The one I have seems the same but has an aluminum heatsink glued to the back of the magnet and is called the 25-302SE.
- Status
- This old topic is closed. If you want to reopen this topic, contact a moderator using the "Report Post" button.
- Home
- Loudspeakers
- Multi-Way
- Laminating cabinets